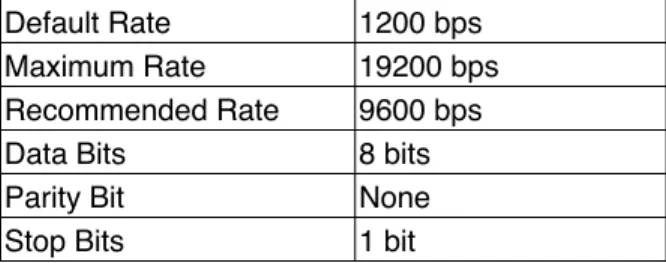
• Keine Ergebnisse gefunden

RAD7 RADON DETECTOR

N/A
N/A
Protected

Academic year: 2021

Aktie "RAD7 RADON DETECTOR"

Copied!
89
0
0

Wird geladen.... (Jetzt Volltext ansehen)

Volltext

(1)

User Manual

Owner__________________________

Serial #______________

SERVICE RECORD

Date Service

It is recommended that the unit be returned to DURRIDGE Company annually, for recalibration.

DURRIDGE Company Inc.

524 Boston Rd Billerica, MA 01821

Tel: (978)-667-9556 Fax: (978)-667-9557 service@durridge.com

Revision 7.3.8. © 2015 DURRIDGE Company www.durridge.com

(2)

Opening the cover of this instrument is likely to expose dangerous voltages.

Disconnect the instrument from all voltage sources while it is being opened.

Due to battery power, the instrument may still be dangerous.

Using this instrument in a manner not specified by the manufacturer may

impair the protection provided by the instrument.

(3)

...

INTRODUCTION 10

...

1. GETTING STARTED: 11

YOUR FIRST DAY WITH THE RAD7 11

...

1.1 Unpacking 11

RAD7 Packing List! 11

...

1.2 General Safety Instructions 12

...

1.2.1 Air Travel 13

...

1.3 Taking a Look 13

The RAD7 Professional Electronic Radon Detector! 13

...

1.4 Starting a Two-day Test 14

RAD7 Normal Configuration! 14

...

1.5 Starting a Sniff Test 16

RAD7 SNIFF Configuration ! 16

...

2. BASICS OF RAD7 OPERATION 18

...

2.1 Introduction 18

...

2.1.1 The Key Pad 18

...

2.1.2 Command List 18

...

2.2 Test 18

...

2.2.1 Test Status 18

...

2.2.1a Quick Save-and-Restart 19

...

2.2.2 Test Start and Test Stop 20

...

2.2.3 Test Save 20

...

2.2.4 Test Clear 20

...

2.2.5 Test Purge 20

...

2.2.6 Test Lock 21

...

2.2.7 Test Sleep 21

...

2.2.8 Test Print 21

...

2.2.9 Test Com 21

...

2.3 Data 21

...

2.3.1 Data Read 21

...

2.3.2 Data Print 22

...

2.3.3 Data Com 22

...

2.3.4 Data Summary 23

...

2.3.5 Data Free 23

(4)

...

2.3.8 Data Erase 24

...

2.4 Setup 24

...

2.4.1 Setup Protocol 24

Table 2.4.1 Preset protocols! 24

...

2.4.2 Setup Cycle 24

...

2.4.3 Setup Recycle 25

...

2.4.4 Setup Mode 25

...

2.4.5 Setup Thoron 25

...

2.4.6 Setup Pump 26

...

2.4.7 Setup Tone 26

...

2.4.8 Setup Format 26

...

2.4.9 Setup Units 27

...

2.4.10 Setup Savuser 27

...

2.4.11 Setup Clock 27

...

2.4.12 Setup Review 28

...

2.5 Special 28

...

2.5.1 Special Ident 28

...

2.5.2 Special SPrOn 28

...

2.5.3 Special SPrOff 28

...

2.5.4 Special SetBaud 28

...

2.5.5 Special Status 28

...

2.5.6 Special Start 28

...

2.5.7 Special Stop 28

...

2.5.8 Special Comspec 29

...

2.5.9 Special ComAll 29

...

2.5.10 Special SPrAll 29

...

2.5.11 Special S-Load 29

...

2.5.12 Special Version 29

...

2.5.13 Special Model 29

...

2.5.14 Special Serial 29

...

2.5.15 Special Beep 29

...

2.5.16 Special Relays 29

...

2.6 Infrared Printer 29

Alpha Energy Spectrum! 30

...

3. BASICS OF RAD7 TECHNOLOGY: 31

HOW IT WORKS 31

...

3.1 Introduction 31

...

3.2 Radon Decay Chain 31

Radon and Thoron decay chains! 32

...

3.2.1 Radon-222 (Radon) 33

...

3.2.2 Radon-220 (Thoron) 33

...

3.3 Continuous Monitors 33

(5)

...

3.5 Working Level 34

...

3.6 RAD7 Solid-State Detector 35

...

3.6.1 RAD7 Calibration and Data Correction 35

...

3.7 RAD7 Spectrum 36

...

3.8 Windows 37

...

3.9 Isotope Equilibrium 38

...

3.10 Modes: Sniff and Auto 39

...

3.11 Background 39

...

3.11.1 Short-lived Radon and Thoron Daughters 39

...

3.11.2 Adsorbed Radon Gas 40

...

3.11.4 Long-lived Radon Daughters 40

...

3.11.5 Contamination by Radon, or Thoron, Producing Solids 40

...

3.11.6 Other Alpha Emitters 40

...

3.11.7 Beta and Gamma Emitters 41

...

3.12 Precision & Accuracy 41

...

3.12.1 Dry operation 41

Table: 3.12 Typical RAD7 precision based on counting statistics only.! 41 ...

3.12.2 Humidity Correction 42

...

3.12.3 Concentration Uncertainties 42

...

3.13 Spectrum Examples 44

...

3.13.1 Operational Radon Spectra 44

...

3.13.2 Thoron Spectra 45

...

3.13.3 Combination Spectra 46

...

3.13.4 Pathological Spectra 48

...

4. USING THE RAD7: 50

RADON AND THORON MEASUREMENT IN AIR 50

...

4.1 Introduction 50

...

4.2 Continuous Monitoring 50

...

4.2.1 Preparation 50

...

4.2.2 Purging 50

...

4.2.3 Test Location 51

...

4.2.4 Test Protocol 51

...

4.2.5 To Print Or Not To Print 51

...

4.2.6 Running the Test 52

...

4.2.7 Security and Quality Control 52

...

4.2.8 Finishing the Run 52

...

4.2.9 Examining the Data 53

...

4.2.10 Very Short Term Monitoring 53

(6)

...

4.3.2 Locating Radon Entry Points 54

...

4.3.3 Preparation 54

...

4.3.4 Purging 54

...

4.3.5 Running the Test 54

...

4.3.6 Drilled Sampling Points 55

...

4.3.7 Spot Readings 55

...

4.4 Grab Sampling 55

...

4.4.1 Applicability 55

...

4.4.2 Preparation 55

...

4.4.3 Protocol 56

...

4.4.4 Taking the Sample 56

...

4.4.5 Analysis 56

...

4.5 Thoron Measurement 56

...

4.5.1 Thoron and Radon 56

...

4.5.2 Thoron Measurement Issues 56

...

4.5.3 Calculation and Interference Correction 57

...

4.5.4 Avoiding Longer Lived Decay Products 57

...

4.5.5 Decay Correction, Flow Rate, and Thoron Calibration 58

...

4.5.6 Calculating Sample Decay 58

...

4.5.7 Calculating Internal Cell Concentration 58

...

4.5.8 Internal Cell Thoron Sensitivity Calibration 58

...

4.5.9 Setting up a Thoron Measurement 58

...

4.5.10 Thoron Mode 59

Recommended RAD7 Thoron Configuration ! 59

...

4.6 Managing Background 60

...

4.7 Airflow Rate Limits 60

...

4.7.1 Maximum Airflow Rate 60

...

4.7.2 Minimum Airflow Rate 60

...

4.8 Harsh and Hazardous Environments 61

...

4.8.1 Splashing Water 61

...

4.8.2 Dusty Environment 61

...

4.8.3 Radiation Hazard 61

...

5. USING RAD7 ACCESSORIES: 62

TESTING FOR RADON IN THE GROUND AND WATER 62

...

5.1 Introduction 62

...

5.2 Radon in Water 62

...

5.2.1 The RAD H2O Accessory 62

The RAD H2O Accessory! 62

The RAD AQUA Accessory! 62

...

5.2.2 The RAD AQUA Accessory 63

...

5.2.3 The WATER PROBE Accessory 63

(7)

...

5.3.2 The Soil Gas Probe Accessory 63

...

5.3.3 Soil Gas Probe Preparation 63

...

5.3.4 Running the Test 64

...

5.3.5 Interpreting the Data 64

...

5.4 Emission Measurements 64

...

5.4.1 Application 64

...

5.4.2 Open or Closed Loop Configurations 64

...

5.4.3 Bulk Emissions 65

...

5.4.4 Surface Emission 65

The Bulk Emission Chamber! 65

The Surface Emission Chamber! 65

...

5.5 Supporting Accessories 66

...

5.5.1 Overview 66

...

5.5.2 The Range Extender 66

The Range Extender! 66

...

5.5.3 The DRYSTIK 66

The DRYSTIK (Model ADS-3R)! 67

...

6. PC Connectivity 68

...

6.1 PC Connectivity Basics 68

...

6.1.1 Connecting the RAD7 to the Computer 68

Connecting the RAD7 to a computer using the StarTech USB to Serial Adaptor! 69 Connecting the RAD7 to a computer using the KeySpan USB to Serial Adaptor! 69

...

6.2 CAPTURE Software 70

...

6.2.1 CAPTURE Installation 70

CAPTURE Software running in Windows 7! 70

...

6.2.2 Feature Summary 71

...

6.2.3 Downloading RAD7 Data 71

...

6.2.4 Graphing and Analysis 71

...

6.2.5 Real-Time RAD7 Monitoring 71

...

6.3 RAD7 Communication Protocol 72

...

6.3.1 Communication Requirements 72

...

6.3.2 RAD7 Command Format 72

...

6.3.3 Parsing RAD7 Data 72

Table 6.3.3 RAD7 Data Record Content ! 73

...

6.3.4 Terminal Emulator Tips 74

...

6.4 Serial Port Specifications 74

...

6.4.1 Communication Protocol 74

Table 6.4.1a Serial Port Pin Assignments! 74

Table 6.4.1b Communication Parameters! 74

...

6.4.2 Extending the RS-232 Range 74

(8)

...

7.1 Accessories - Usage and Care 75

...

7.1.1 Desiccant 75

...

7.1.2 Laboratory Drying Unit 75

Table 7.1.2 Laboratory Drying Unit Life! 75

...

7.1.3 Small Drying Tube 75

Table 7.1.3 Small Drying Tube Life! 75

...

7.1.4 Cascading Drying Tubes 76

...

7.1.5 Filters 76

...

7.1.6 Batteries 76

...

7.1.7 Real-time Clock and Non-volatile Memory 77

...

7.1.8 Printer and Adapter 77

...

7.2 Operating ranges 77

Table 7.2 RAD7 Operating Ranges! 77

...

7.3 Service and Repair 78

...

7.3.1 Calibration 78

...

7.3.2 Repair 78

...

7.3.3 Shipping 78

...

7.3.4 Upgrades 78

...

7.4 RAD7 Quality Assurance 79

...

7.4.1 Spectrum 79

...

7.4.2 Spill Factor 79

...

8. TROUBLESHOOTING 80

...

8.1 Display 80

...

8.1.1 Blank Display 80

...

8.1.2 Frozen Display 80

...

8.1.3 Incomplete Or Garbage Characters 80

...

8.2 Readings 80

...

8.2.1 No Counts 80

...

8.2.2 Excessive Uncertainty In Reading 80

...

8.2.3 Run/Cycle Number 0000 80

...

8.3 Relative Humidity high 80

...

8.4 Water Catastrophe 81

...

8.5 Battery Voltage Low 81

...

8.6 Pathological Values and Error Messages 81

...

Appendix 1: Wireless Infrared Printer 82

(9)

...

A1.1.2 Features 82

...

A1.1.3 Power Switch 82

...

A1.1.4 Indicator LEDs 82

...

A1.1.5 Push Buttons 82

...

A1.1.6 Sensors 82

Infrared Printer Component Locations and Functions! 83

...

A1.2 Infrared Printer Operation 84

...

A1.2.1 Precautions 84

...

A1.2.2 Self-Test 84

...

A1.2.3 Setup Mode 84

Table A1.2.3 Sel and Feed Functions! 84

...

A1.2.4 Using the Printer 85

Using the Infrared Printer ! 85

...

A1.3 Infrared Printer Maintenance 85

...

A1.3.1 Battery Installation 85

...

A1.3.2 Paper Installation 85

...

A1.3.3 Cleaning the Printer 86

...

A1.3.4 Cleaning the Print Head 86

...

A1.4 Infrared Printer Specifications 87

Table A1.4 Infrared Printer Specifications! 87

...

Appendix 2: RAD7 Specifications 88

Table A2.1 Functional Specifications! 88

Table A2.2 Technical Specifications! 88

Table A2.3 Physical Specifications! 89

(10)

The RAD7 is a highly versatile instrument that can form the basis of a comprehensive radon measurement system. It may be used in many different modes for different purposes. This manual adopts a progressive approach, in which there is, first, a simple, step-by-step description of how to get readings for a) real-time monitoring, and b) sniffing. Next comes a more detailed description of the many features of the

instrument and how to access them. The rest of the manual covers a whole range of topics, in somewhat arbitrary order. We recommend that, as soon as possible, you read the entire text, just so that you will have an idea of what there is. While you can start to make good measurements on the first day of ownership of the RAD7, it can take years to master the subtleties of radon and thoron behavior, and to appreciate the full capabilities of the instrument.

We have tried to make the manual easy to use, with a useful table of contents. Please let us know how well we have succeeded. If there are some topics inadequately covered, please tell us. We will issue updates from time to time.

Points of special note

The RAD7 is a rugged and long-lasting piece of equipment. There are many units still in daily use that were sold ten years ago or more. However, it is a sophisticated, precision electronic device, and it is not hermetically sealed, so please treat it with respect. Please do not allow water, other liquids or dirt to get into the machine. If using it somewhere where it may get splashed, damaged, or exposed to rain, please protect it. See Chapter 4.8.1.

The batteries are lead-acid technology, like a car’s. If left in a discharged state they will lose capacity.

After running the RAD7 on its batteries please recharge them as soon as possible (by plugging in the unit). With careful use the batteries will last five years or more.

Finally, there is one security feature that is sometimes inadvertently set by an inexperienced, though authorized, user; namely the key pad lockout. If the key pad ceases to function, and all you see is DURRIDGE RAD7 on the display, just do the following: Hold down the [ENTER] and two arrow keys until you hear a beep, release the three keys and immediately push [MENU] . You should then be rewarded by >Test on the display. If the tone was set to OFF, then you will not hear the beep, so hold the three keys down for three to four seconds, before releasing them and pushing [MENU] , - try hold-down times a little longer, or shorter, if, at first, you do not succeed.

DURRIDGE Company Inc.

524 Boston Rd, Billerica, MA 01821 USA Tel: (978)-667-9556 Fax: (978)-667-9557

Email: Service@durridge.com Web: www.durridge.com

European Representative:

Dr. Martyn J. Key c/o Radiansa Consulting S.L.

Montcalm 20-22, 17006 Girona, Spain

Tel: +34 972 243232

(11)

1. GETTING STARTED:

YOUR FIRST DAY WITH THE RAD7

1.1 Unpacking

First make sure you have everything you are supposed to have. Take the materials out of the packing boxes and see if you have all the items shown in the diagram below, or on the packing list

enclosed with the shipment. If anything is missing, please email DURRIDGE immediately or call us at (978) 667-9556.

RAD7 Packing List

RAD7 and Case Accessories •RAD7 electronic radon detector •12V adaptor w/ 4 plugs

• 12V cord for custom applications •RAD7 Carrying Strap

•Keys for RAD7 case

RAD7 Printer Supplies •Wireless infrared printer •Battery Charger

•4 Rechargeable AA batteries •6 Rolls printer paper

Drying Tubes and Desiccant •Gas drying unit

•Opener tool for drying unit •5 lbs desiccant

•4 drying tubes

RAD7 Filters •5 RAD7 inlet filters •1 Dust filter

(Continued on next page.)

(12)

RAD7 Packing List (Continued)

Vinyl Tubing Set (3ft x 3) •From sample to drying tube •From drying tube to RAD7 inlet •From RAD7 outlet to exhaust

USB/Serial Supplies •Null modem cable •USB Cable

•USB to serial adaptor

RAD7 Documentation Binder •RAD7 User’s Manual

•Infrared Printer Manual •Additional documentation •DURRIDGE Software CD •DURRIDGE Software USB Stick

1.2 General Safety Instructions

For your own safety and the proper operation of RAD7:

DO NOT spill liquids onto the machine.

DO NOT expose operating panel of machine to rain or any other excess moisture.

DO NOT allow liquid to be sucked into inlet tube.

If you intend to use the instrument in a harsh environment, give it some protection. Even just a transparent plastic bag enclosing the RAD7 (but not the air sampling tube) can protect it from splashing mud and water. Allowing the dry air from the RAD7 outlet to exhaust into the interior of the bag will keep the RAD7 in a clean and dry environment.

If liquid does get into the machine, please disconnect the power cord, turn off the power switch, and follow the instructions in Chapter 4.8.1, Harsh and Hazardous Environments:

Splashing Water. It will be necessary to return the RAD7 to DURRIDGE for repair.

Do not use your RAD7 if the instrument is damaged or malfunctioning. Please call, or email, the DURRIDGE service department, who will advise what to do about the problem.

Replace a frayed or damaged power cord immediately. Electrical equipment may be hazardous if misused. Keep away from children.

Do not open or attempt to repair the machine.

The detector has an internal high voltage supply

that can generate more than 2,500V.

(13)

The batteries are Gates Monobloc type

0819-0012, 6V 2.5Ah. There are two installed in the instrument. They are not user replaceable.

1.2.1 Air Travel

The RAD7 is safe to take on an airplane either as carry-on or checked baggage. It is probably easiest, and least likely to cause problems, if it is put inside a suitcase, with clothes, and checked in.

Some airlines and some airline staff are concerned about lead-technology batteries, such as those in the RAD7. An MSDS sheet, issued by the battery manufacturer, is enclosed with the manual in the RAD7 documentation. A copy of that should be carried and presented when requested, when traveling with a RAD7 by air.

1.3 Taking a Look

The RAD7 Professional Electronic Radon Detector

(14)

1.4 Starting a Two-day Test

You will need the RAD7 and power cord, the Laboratory Drying Unit (the large tube of desiccant, with a screw cap at one end), an inlet filter (one of the six small filters supplied), the piece of tubing with a 5/16” ID segment at one end and a ⅛” ID segment at the other and the printer.

On first starting up, you may need to set the clock for your time zone (See Setup Clock, Chapter 2.4.11). Switch on the RAD7, push [MENU] , then push [ ➔ ] twice. You will see Setup on the display. Push [ENTER] , then push [ ➔ ] ten times. You will see Setup Clock. Push [ENTER] . Use the arrow keys to adjust hours, minutes, seconds, day, month and year, pushing [ENTER]

to confirm each setting. Now we are ready to continue.

RAD7 Normal Configuration

a) Attach the filter to the tubing (push it into the end with the insert).

b) Carefully remove both plastic caps from the Drying Unit (you will need them later, to reseal the unit). Attach the sleeved end of the tubing to the tube fitting, on the Drying Unit, farthest from the screw cap.

c) Attach the filter to the Inlet port of the RAD7.

The air sampling system is now set up for the measurement. (See RAD7 Standard

Configuration diagram at left.) d) Plug in the RAD7 and switch on.

e) Push [MENU] , [ENTER] , then push [ ➔ ] four times. You should see on the LCD display:

Test Purge.

f) Push [ENTER] . The pump should start.

g) Set up the printer (insert paper and batteries - see manual).

h) Place printer between green lines on face plate (See photo, Chapter 1.3).

i) After purging for some time (normally, at least five minutes), push [MENU] , and [ ➔ ] two times, you will see: Setup on the display.

j) Push [ENTER] twice, then push either arrow key repeatedly until you see:

Protocol: 2-Day on the display. Push [ENTER] . k) With Setup on the display, push [ENTER] , then

[ ➔ ] seven times, to see >Setup Format on the display. Push [ENTER] then use arrow keys to select Format: Short . Push [ENTER] .

l) Switch off the RAD7. Switch on the printer, now switch the RAD7 back on. The printer will print out something like the following:

DURRIDGE RAD7 Vers 2.5f 991128 Model 711

Serial 00512

Calib 21-MAY-13

Last used

(15)

! FRI 21-MAY-13! 17:30 Current settings

! FRI 21-MAY-13! 19:09 Protocol: 2-Day

Cycle: 01:00 Recycle: 48 Mode: Auto Thoron: Off Pump: Auto Tone: Geiger Format: Short Units: pCi/L C

m) Push [MENU] , [ENTER] , [ ➔ ] . You should see on the LCD display: >Test Start

n) Push [ENTER] . The pump will start running.

On the LCD display you will see something like:

0101! ! Live! ! Sniff 00:59:37! ! ! 00001

You are now monitoring the radon level right where you are. Every hour, the printer will print out a reading something like this:

0102 2.69 " 0.73 p Sniff

! FRI 21-MAY-13 19:41

! 26.8 C RH: 7% B:7.06V Where 0102 are the run (01) and cycle (02) numbers, 2.69 is the measured radon concentration, 0.73 is the two-sigma

STATISTICAL uncertainty, p indicates the units (in this case pCi/L), and Sniff shows that, for this reading, only the Po-218 decays are being counted (after three hours, the mode changes automatically to Normal). The second line is clearly the date and time, while the third shows the temperature and humidity inside the

measurement chamber, and the battery voltage.

Medium and Long format settings print more information each cycle.

If you allow the RAD7 to complete a run, it will print out a summary of the entire run, including:

1. Date and time

2. Machine serial number 3. Average value for the test

4. Bar chart of the individual readings, and 5. Cumulative alpha energy spectrum.

In the example shown it may be seen that the average level was 3.71 pCi/L, or 137 Bq/m

3

. To terminate the run early, you may switch off the RAD7. The data collected, to the end of the last completed cycle, is automatically stored in the RAD7 memory, and available for later display, printing or download to a PC. If you wish to store the last, incomplete cycle data as well, use Test Save before switching off the RAD7. When you do this, the end-of-run printout does not take place. The summary is stored in memory and may be printed at any time, except that the cumulative spectrum, which would have been printed out at the end of the run, is lost.

End-of-Run Printout

(16)

1.5 Starting a Sniff Test

Sniffing lets you make quick, qualitative surveys of radon and thoron levels. It may be used to search for radon entry points. There are some advantages in sniffing for both thoron and radon at the same time, (see Chapter 3.13.3), so that is the procedure described here.

You will need the same equipment as for the 2- day test, above, except that a small drying tube should be used, instead of the laboratory drying unit. Also, for portability, you may remove the external power from the RAD7, and run the RAD7 on its batteries.

If you have not already done so, set the clock, as described above.

RAD7 SNIFF Configuration

a) Attach the filter to the tubing (push it into the end with the ⅛” ID segment)

b) Carefully remove both plastic caps from the small drying tube (you will need them later, to reseal the unit). Attach the 5/16” ID end of the tubing to one end of the tube.

c) Attach the filter to the Inlet port of the RAD7.

Make sure it is firmly fit onto the inlet. The air sampling system is now set up for the

measurement. While testing, you can use the small drying tube as a wand, to collect your air sample from the location of interest.

d) Plug in the RAD7 and switch on.

e) Push [MENU] , [ENTER] , then push [ ➔ ] four times. You should see on the LCD display:

Test Purge.

f) Push [ENTER] . The pump should start.

g) Set up the printer.

h) Place printer between green lines on the face plate (See photo, Chapter 1.3).

i) After purging for a few minutes push [MENU] , and [ ➔ ] two times, you will see: >Setup on the display.

j) Push [ENTER] twice, then push either arrow key repeatedly until you see:

Protocol: Thoron on the display. Push [ENTER] . (See Chapter 2.4.5 for difference between Thoron and Sniff protocols).

k) With Setup on the display, push [ENTER] , then [ ➔ ] seven times, to see Setup Format on the display. Push [ENTER] then use arrow keys to select Format: Short . Push [ENTER] . l) Switch off the RAD7. Switch on the printer,

now switch the RAD7 back on. The printer will

print out something like the following:

(17)

DURRIDGE RAD7 Vers 2.5f 991128 Model 711

Serial 00512 Calib 21-MAY-08 Last used

! WED 23-MAY-08! 17:30 Current settings

! FRI 25-MAY-08! 19:09 Protocol: Thoron

Cycle: 00:05 Recycle: 00 Mode: Sniff Thoron: On Pump: Auto Tone: Geiger Format: Short Units: pCi/L C

!

m) Push [MENU] , [ENTER] , [ ➔ ] . You should see on the LCD display: >Test Start

n) Push [ENTER] . The pump will start running.

On the LCD display you will see something like:

0201! ! Live! ! Sniff 00:04:37! ! ! 00001

You are now sniffing for thoron and radon. Every five minutes, the printer will print out a reading something like this:

0203! 2.69 " 2.83! p Sniff

! ! 1.68 " 2.15! p Thoron

! FRI 21-MAY-99 19:41

! 26.8 °C RH: 7% B:7.06V

Where 0203 are the run (02) and cycle (03) numbers, 2.69 is the measured radon concentration, 2.83 is the two-sigma

STATISTICAL uncertainty, p indicates the units (in this case pCi/L), and Sniff shows that, for this reading, only the Po-218 decays are being counted. The second line is the measured thoron concentration and uncertainty. The third line is now the date and time, while the fourth shows the temperature and humidity inside the measurement chamber, and the battery voltage. Medium and Long format settings print more information each cycle.

Note that the Po-218 has a 3-minute half life.

After moving to a new location, it will take about 15 minutes for the count rate to reach equilibrium with the new radon concentration. So not until after the third 5-minute cycle will the reading indicate the new level. However, the thoron daughter, Po-216, has a very short half life (150 ms), so the response of the RAD7 to thoron is virtually instantaneous. For thoron, the first 5- minute cycle is as good as any other.

Thoron will only be found very close to radon entry points. That, together with its fast response, makes thoron sniffing an excellent sleuth for radon entry points.

To terminate the run any time, you may switch off

the RAD7. The data collected, of completed

cycles, is stored in the RAD7 memory, and

available for later display, printing or

downloading to a PC.

(18)

2. BASICS OF RAD7 OPERATION

2.1 Introduction

2.1.1 The Key Pad

The RAD7 is operated through a four-key menu- driven interface. These four keys allow you to look at the commands, select one, and then do it.

Menu Key

Press [MENU] and you see the menu prompt ( > ) and the word Test:

>Test Arrow Keys

Press the forward and backward arrow keys to go through the available options. To advance quickly through the options, hold down the key so that it

"auto-repeats."

The arrow keys allow you to move right and left through the various commands, looking for the action you want.

Enter Key

When you have decided on a certain menu option, you select it by pressing [ENTER] . The enter key tells the RAD7 that you have made your selection.

You are telling it what you want it to do.

The enter key makes it happen.

2.1.2 Command List

The RAD7 command list has four command groups: Test, Data, Setup and Special. The Test group of commands controls the collection of new radon data. The Data group retrieves data from memory, outputs them, and gets rid of old, unwanted data. The Setup group prepares the RAD7 to operate according to your requirements.

The Special group is a set of commands that are available when RADLINK, the remote control software, is loaded.

2.2 Test

The Test group of commands controls the collection of radon data and allows you to

manipulate the current test (test-in-progress). You can start and stop data collection, save or clear the current test, or print the current test as it stands.

(The Test commands do not allow access to stored data. You have to go to Data for that.)

2.2.1 Test Status

To see the status display, enter the Test Status command. Press [MENU] , [ENTER] , [ENTER]

On the LCD display, you will see:

0501! ! Idle! ! Sniff 00:30:00! ! ! 00000

On the upper left, you see the current run number/

cycle number (0501 - run 05, cycle 01.).

The middle shows the detector status (Idle or Live), and the upper right gives the current test mode (Sniff, Normal or Grab). (Note that in AUTO mode, the indication will change from Sniff to Normal after three hours of measurement.

Lower left shows the count-down timer (00:30:00

= 30 minutes) which counts down to zero when the detector is Live (i.e., a test is in progress).

The lower right shows the total number of counts since the beginning of the current cycle.

The arrow keys may now be used to access additional status information.

Press [ ➔ ] once, and you will see something like this:

Last reading:

0409! 1.80 " 0.74!p

The lower left is the run number (2 digits) and cycle number (2 digits) of the last completed cycle stored to memory.

The lower right is the radon reading and two-

sigma statistical uncertainty, followed by "p",

(19)

indicating picoCuries/liter, or "b" for Becquerels/

cubic meter.

When a cycle ends, the information on this display is updated. If there have been no readings yet, the display will show

No readings yet.

Press [ ➔ ] once again, and now you will see something like this:

24.8°C! RH:3%

B: 6.36V! P: 00mA

Top left is the internal temperature. (To change from Celsius to Fahrenheit, see Chapter 2.4.9, Setup Units.)

Top right shows the internal Relative Humidity reading. When testing, maintain this value at 10%

or less, by using the desiccant.

Bottom left is the battery voltage. This should range from about 6.00V to 7.10V. A discharged battery (less than 6.00 ) should be recharged as soon as possible. A fully charged battery will rest at 6.40 to 6.50 V. During a recharge, the voltage will eventually rise above 7.00 V. At no time should this read higher than 7.20V. In the lower right is the pump current. This number should vary from 00mA (pump off) to 80mA. When the pump is running with a light load, the current will range from 40-70mA. When the pump is running with a heavy load (clogged filter or blocked hose), the current will go to 90mA or higher. Pump currents above 90mA are considered a sign of trouble. Try changing the filters and check for blockage.

Press [ ➔ ] again, and you will see something like this:

HV: 2218V, 10%

L: 02 S: 0.21V

This is a display of diagnostic values. Ordinarily it will be of little interest to you.

The top line is the high voltage reading and duty cycle. The range of normal values is from 2000 to 2500V, and from 8% to 18%.

The lower left corner is the leakage current. At room temperature, this value will normally range from 0 to 10. Higher temperatures ordinarily cause this value to rise. Excessive leakage current will result in "noise" in the lower energy end of the spectrum, and will also cause broadening of the alpha peaks.

The lower right corner is the signal voltage from the analog circuit. This number should be

"stable"; that is, fluctuations should be no more than " 0.05V from the average value.

Press [ ➔ ] yet again, and you will see something like this:

w! | cpm! | +/- ! | %tot A! | 6.0! | 4.3! | 48.8 This is the display for the A window data. You may press [ ➔ ] to advance to B, C, D, etc.

The RAD7 records 8 windows (A - H) every time you make a measurement. They separate counts due to daughters of radon and thoron, and the background. Specific alpha particles end up in specific windows.

W: The window letter.

cpm: The counts per minute observed in the window.

+/-: The two-sigma statistical uncertainty of the cpm value, also in units of cpm.

%tot: The number of counts in the window as a percentage of the total counts in the spectrum.

This tells you quickly where the majority of the counts are: In the 3-minute radon peak (window A), or the long-lived radon peak (window C), etc.

As always, you press the [MENU] key to exit this display and return to the start of the menu.

2.2.1a Quick Save-and-Restart

This function allows the user to end a sniff test, store it to memory, and start up a new sniff test, all using a single key. It operates only from the SNIFF mode.

From the status display (showing the countdown timer), press the [ENTER] key once. The display will show:

Save and restart

(20)

? Yes

Press the [ENTER] key once more to confirm your intention. To escape, push the [MENU] key or push an arrow key to select “No” and push [ENTER] .

2.2.2 Test Start and Test Stop

To start testing (or "counting"), after you have chosen the required setup, go to >Test Start by pressing [MENU] , [ENTER] , [ ➔ ] , and then [ENTER]. The display will indicate that counting has begun:

Start counting.

One second later, the Status display will appear with the countdown timer in motion:

0501! ! Live! ! Sniff 00:29:37 ! ! ! 00001

When the countdown reaches zero, the RAD7 will automatically calculate the radon concentration, store (or "save") the counts to memory, and clear the counters to begin a new cycle.

To interrupt the measurement, go to >Test Stop by pressing [MENU] , [ENTER] , [ ➔ ] , [ENTER] . The display will respond:

Stop counting.

After one second, the display will go back to the top of the menu >Test .

You may wish to examine the Status display to verify that the status is Idle.

To resume testing from exactly the same point in the cycle where you stopped, select >Test Start as described above.

Note that Stop does not terminate the run, it is a pause. If you do not wish to resume testing from the same point, you should select either >Test Save or >Test Clear before continuing. This will terminate the suspended test, store it to memory (Save) or wipe it out (Clear), and clear the counters to begin a new run.

2.2.3 Test Save

The >Test Save command suspends counting and saves the suspended test (test-in-progress) to memory as if it had reached completion. Test Save completes the current run, so any subsequent test data will be stored as a new run. The display momentarily shows the run and cycle number in the form of 0101 Saved . This command may be accessed whether the status is Live or Idle. It always leaves the status Idle.

You will find this command especially useful when you wish to move the instrument to another location without waiting for the countdown to reach zero, but without losing that last incomplete cycle. The calculated radon concentration from the incomplete cycle is still good.

2.2.4 Test Clear

The >Test Clear command causes counting to be suspended and the current run to be completed without saving the last (suspended) incomplete cycle. Subsequent test data will be stored as a new run. You must answer Yes to the question Are you sure? in order to activate this command.

This command may be accessed whether the status is Live or Idle. It always leaves the status Idle.

2.2.5 Test Purge

The >Test Purge command suspends counting and begins purging the detector. The pump begins running and the high voltage circuit turns off in order to clear the sample chamber of radon gas and daughters as quickly as possible. You must provide clean, desiccated, radon-free air to the inlet in order to push out any radon that was previously sampled. Outdoor air is usually adequate for this purpose.

As always, use the inlet filter and drying tube.

Ten minutes is usually sufficient for bringing the background down after exposure to moderate amounts of radon.

In order to dry out the RAD7 without using up

much desiccant, connect the hoses from the

RAD7 to the drying unit, as a loop. When the

pump runs, the same air will circulate repeatedly

through the desiccant. This procedure will

(21)

efficiently remove residual moisture from the RAD7. This does not introduce any fresh air, and so does not change the radon level in the

instrument, but you can make a measurement of the background while it is set up in this

configuration.

To end the purge, answer Yes to the question Stop purge? which appears on the display.

Alternatively, you may push [MENU] to end the purge.

2.2.6 Test Lock

If you push [ENTER] when this is displayed, it will lock the key pad. The LCD display will just show:

DURRIDGE RAD7

Nobody will be able to unlock the key pad, unless they know the secret.

If the key pad was locked during a measurement, then the readings will continue as normal, with the RAD7 recording all the data, until the end of the run.

Switching the unit off, while locked, will stop the measurement, but the key pad will still be locked when the RAD7 is switched on again.

To unlock the key pad, hold the [ENTER] and both arrow keys down, all together, for 3 - 4 seconds, or until the unit beeps, then release the three keys and push [MENU] immediately.

2.2.7 Test Sleep

The >Test Sleep command allows you to turn off most of the electronic circuits, with the power switch on, in order to conserve battery charge. A fully charged RAD7 should be able to "sleep" for about one week on batteries alone. Press the menu key to "wake up" the RAD7.

The Sleep function was for older models that did not have the Real Time Clock (RTC) and Non- Volatile Memory (NVRAM) options. New and upgraded instruments may be shut down

completely, power switch off, without losing any stored data or clock.

2.2.8 Test Print

The >Test Print command calculates results for an incomplete or suspended test cycle and prints them according to the print format that is currently set.

Spectrum output is available by selecting >Setup Format Long beforehand.

If you wish to abort printing, press the [MENU]

key. The run number and cycle number that ordinarily appear on printed data are replaced by 0000 to signify that the cycle is not completed.

2.2.9 Test Com

The >Test Com command outputs the results for an incomplete test cycle to the serial port.

If you wish to abort output, press the menu key.

The run number and cycle number that ordinarily appear with the data are replaced by 0000 to signify that the cycle is not completed.

2.3 Data

The Data group of commands retrieves data from memory, displays it, prints it, reports it

graphically, and outputs it to the serial port. The Data group also includes commands for managing memory. The memory will hold the data for 1,000 cycles, in up to 100 runs.

Many commands in the Data group require you to enter a two-digit run number after the command.

The "default" run number (the one automatically set if you do nothing) is the run number of the last complete cycle of data stored. The arrow keys allow you to select any other run number.

2.3.1 Data Read

Select >Data Read followed by a two-digit run

number, to examine radon readings from that

particular run. For example, select >Data Read

01 to examine readings from run number 01, the

first test in memory.

(22)

You will see something like this:

0101! 23.3 " 1.54!p 11:45 ! 19-MAY-99

Line 1 is the run/cycle number followed by the radon concentration, two-sigma uncertainty, and unit indicator. This example shows:

Run 01, Cycle 01, 23.3 " 1.54 pCi/L.

Line 2 is the time (24-hour military time) and date the reading was completed.

Press [ ➔ ] to advance to the next reading in memory; press the backward arrow to go back to the previous reading.

To quit examining data, press [ENTER] or [MENU] .

Note that large numbers are presented in shorthand notation. The symbol “K” stands for 1,000 and “M” stands for 1,000,000. For example, 33K2 stands for 33,200.

2.3.2 Data Print

To print out a run of data from memory, select

>Data Print followed by the two-digit run number. For example, to print the data from run number 05, select >Data Print 05 .

If the printer format has been set to Short, the following printout will be made for each cycle of the run:

0501! 2.69 " 2.83! p! Sniff

! FRI 21-MAY-99 19:41

! 26.8 EC RH: 7% B:7.06V Line 1 is the run/cycle number, the radon concentration, the two-sigma uncertainty, the units indicator (p=picoCuries per liter, B=Becquerels per cubic meter), and the mode indicator.

Line 2 is the date and time that the cycle was completed and stored to memory.

Line 3 is the temperature (in either "C" Celsius or

"F" Fahrenheit), relative humidity (internal), and battery voltage at the time the cycle ended.

If the printer format has been set to Medium or Long, then you will see a printout like this for each cycle:

0501! 2.69 " 2.83! p! Sniff

! FRI 21-MAY-99 19:41

! 26.8 EC RH: 7% B:7.06V Total Counts:! 42.

Livetime:! 27.8min

A:!0.53"0.08! cpm! 47.3%

B:!0.02"0.02! cpm! 1.7%

C:!0.52"0.08! cpm! 46.4%

D:!0.01"0.02! cpm! 0.9%

O:!0.04"0.03! cpm! 3.6%

Lines l, 2 and 3 are the same as in Short format, as outlined above. Line 4 is the total number of counts detected during the cycle.

Line 5 is the livetime, the time that the detector was actively collecting data.

Lines 6 through 10 are the windows data for windows A, B, C, D, and O. (O is the

consolidated window for "others", or counts that are not included in windows A through D.) Each line of windows data contains the window letter (A, B, C, etc.) followed by the window's counts per minute (cpm), two-sigma statistical uncertainty of the counts per minute, and percent of the total counts included within that window.

NOTE: The RAD7 does not store spectra from old cycles, so no spectra will print from memory even if the printer format is Long. If you need a spectrum, be sure you print while the test is still running.

If no data are available to print, the RAD7 will beep and display No tests stored .

To abort a printout, press the menu key, then press the printer paper advance button.

2.3.3 Data Com

The RAD7 has an RS232 port that can transfer data to your computer. Status must be Idle.

To send a run of data to the serial port, select

>Data Com followed by the two-digit

run number. When ready, push [ENTER] .

(23)

The following message will appear on the display as the data is sent:

Data transfer ...

When the data transfer finishes, the RAD7 will beep.

To enable your PC to receive data, appropriate software should be running. A terminal emulation program, or CAPTURE, the data link software provided with the RAD7, may be used. See Chapter 6 for more details on data

communication.

2.3.4 Data Summary

To print a summary report and time graph of a run's data, select >Data Summary followed by the two-digit run number. The following information will be printed:

Run 31

Begin!01-Jun-99! 12:49 Serial! 00500

Cycles = 048 Mean:!0.77 pCi/l S.D.:!0.27 pCi/l High:!1.41 pCi/l Low:! 0.20 pCi/l where:

Line 1 is the run number.

Line 2 shows the date and time of the first reading.

Line 3 is the serial number of the instrument.

Line 4 is the number of completed cycles in the run.

Line 5 is the arithmetic mean (or "average") of the radon concentrations recorded.

Line 6 is the standard deviation of the readings taken during the run.

Lines 7 and 8 are the highest and lowest radon concentrations.

Following Line 8 is a bar graph of radon concentration through time. Time-of-day is printed along the left-hand edge of the graph. If there is only one cycle of data, the bar graph will not print.

This printout procedure has been programmed into several protocols. When you choose one of the pre-programmed protocols, this report is

printed out automatically at the end of the run, together with a cumulative spectrum.

2.3.5 Data Free

To determine the amount of free memory available for storing new radon readings, select

>Data Free , and push [ENTER] .

For about two seconds, the display will look something like this:

910 cycles free.

The RAD7 can store up to 999 cycles of data. As the memory fills with data, the Data Free

indicator decreases. If the Data Free indicator reaches 000, any subsequent attempt to store data to memory will result in a "memory full" error.

Keep your eye on this indicator to avoid embarrassment! When the amount of free

memory gets uncomfortably low (i.e. 200 or less), consider deleting un-needed old data to open up space for new data. See Data Delete and Data Erase.

2.3.6 Data Delete

To delete an entire run of data, select >Data Delete followed by the two-digit run number.

The display will prompt you for confirmation:

Delete run 31?

No

Press [ ➔ ] to find Yes , then press [ENTER] to delete the run's data from memory and free the space for new data. No other run's data will be affected.

After deletion of a run's data, any attempt to retrieve the data will result in a No tests stored message. The main purpose of the Data Delete command is to selectively free up memory space for new tests. Do not confuse Data Delete with Data Erase, which wipes out all runs of data from memory. See also Data Free, Data

Renumber, and Data Erase.

(24)

2.3.7 Data Renumber

Select >Data Renumber to renumber remaining runs into consecutive order after deleting one or more runs. This allows you to free up run numbers for new runs to be added, which is necessary when the run number approaches 99.

Say you have used all 99 runs and you wish to clear out some space for new runs. Furthermore, you have decided that you no longer need the data from runs 01 to 10. Delete these runs using Data Delete . Now select >Data Renumber to renumber runs. Runs 11 to 99 become runs 01 to 89, leaving 90 to 99 free to take new data.

The Data Renumber command does not free up memory space, only run numbers. The 999 cycle memory limit remains whether or not all 99 runs have been used.

2.3.8 Data Erase

Select >Data Erase only if you wish to completely wipe all data from the entire RAD7 memory. Data Erase deletes all runs and resets the current run/cycle number to 0101.

Select >Data Erase . The RAD7 will ask for confirmation:

Erase all Tests?! No

Press [ ➔ ] to find Yes . Press [ENTER] to complete the erasure. Use with caution!

2.4 Setup

The Setup group of commands configures the RAD7 to perform tests according to your needs.

The RAD7 remembers all Setup parameters when it is turned off, so access the Setup commands only to change parameters.

Setup includes a 1-step >Setup Protocol command to configure the most frequently used parameters (Cycle time, Recycle number, Mode setting, and Pump setting) according to preset

"protocols". These standard preset protocols include (None), Sniff, 1-day, 2-day, Weeks (that is, indefinite), User (which lets you preset your

own), Grab, Wat-40 and Wat250 (for use with the RAD H

2

0), and Thoron.

The special command >Setup SavUser defines the user protocol according to the current

parameter settings.

2.4.1 Setup Protocol

Select >Setup Protocol to automatically load in a group of predefined Setup parameters under one of the standardized protocols, or the User protocol. If you do not wish to select a protocol, you may abort the command by pressing the menu key, and no parameters will be changed.

Table 2.4.1 Preset protocols Cycle Recycle Mode Thoron Pump Sniff 00:05 0 Sniff Off Auto

1-day 00:30 48 Auto Off Auto

2-day 01:00 48 Auto Off Auto

Weeks 02:00 0 Auto Off Auto

User xxx xxx xxx xxx xxx

Grab 00:05 4 Sniff Off Grab

Wat-40 00:05 4 Wat-40 Off Grab Wat250 00:05 4 Wat250 Off Grab

Thoron 00:05 0 Sniff On Auto

A Recycle number of 00 indicates indefinite test length. The test ends only if the operator intervenes, or if the RAD7 memory fills.

2.4.2 Setup Cycle

How long a test do you want, and how often do you want the RAD7 to take a reading (a cycle)?

A typical radon test is made up of many cycles.

Select >Setup Cycle to adjust the Cycle time, or integration time, for a single radon reading.

The Cycle time can be adjusted anywhere from two minutes to 24 hours. For continuous

monitoring, the Cycle time is usually 30 minutes or longer. For radon sniffing, the Cycle time is usually 5 or 10 minutes. For thoron sniffing, the cycle time may be as little as 3 minutes.

Upon selection of >Setup Cycle , push

[ENTER] and you will see something like this:

(25)

Cycle: 00:30

First, select the number of hours (00 to 23), and press [ENTER] . Then select the number of minutes (00 to 59) and press [ENTER] . Remember that a run includes many cycles in sequence, and the total duration of the radon test is determined by the Cycle time multiplied by the number of cycles, or Recycle number. To adjust the Recycle number, use the >Setup Recycle command.

2.4.3 Setup Recycle

How long a test do you want, and how often do you want the RAD7 to take a reading (a cycle)?

You determine the length of your test by choosing both the length and number of cycles. If you make a reading every 30 minutes, you will need 48 cycles to get a 24-hour test. In this case, 48 is the Recycle number.

Use >Setup Recycle to set the total number of cycles in a complete run. Multiply Cycle time by Recycle number to determine the total duration of the run.

Select >Setup Recycle . Push [ENTER]

and you will see something like this:

Recycle: 48

Use the arrow keys to change the Recycle number, and press [ENTER] to complete the selection. Recycle number may be set from 00 to 99.

If 00 is selected, then the number of cycles is assumed to be infinite. Select 00 if you want the RAD7 to collect data indefinitely, or to go beyond the 99th cycle. After the 99th cycle, the RAD7 will then simply start a new run, and continue collecting data. Data collection will stop only when the operator intervenes, or when the memory completely fills up.

2.4.4 Setup Mode

Select >Setup Mode to change the RAD7 mode of operation. Five modes are available: Sniff, Auto, Wat-40, Wat-250, and Normal.

SNIFF mode is used when you want to follow rapid changes of radon concentration. In SNIFF mode, the RAD7 achieves rapid response to changing radon levels by focusing on the 3- minute polonium-218 alpha peak, calculating the radon concentration on the basis of this peak alone.

In NORMAL mode, the RAD7 achieves higher statistical precision by counting both

polonium-218 and polonium-214 alpha peaks.

AUTO mode automatically switches from SNIFF mode to NORMAL mode after three hours of continuous measurement. This allows time for the equilibrium of the longer-lived radon daughter isotopes. The earliest part of the run will have the benefit of the SNIFF mode’s quick response, while the latter parts of the run will benefit from the NORMAL mode’s superior statistical precision.

We recommend that the AUTO mode be used for all screening tests and any tests to measure the average concentration over a period of time. With the AUTO mode there is no need to throw away the first three hours of data, or to calculate adjustments to correct for disequilibrium. The mean concentration reported in the run summary should accurately reflect the actual mean. SNIFF mode should be used where the goal is to follow, and measure, rapid changes in the radon

concentration.

Wat-40 and Wat250 make calculations of the radon concentration in 40 mL and 250 mL water samples, respectively. They require the RAD H

2

O water accessory kit to aerate the water under the controlled conditions necessary for these calculations.

2.4.5 Setup Thoron

Select >Setup Thoron . Push [ENTER] and you will see:

Thoron: Off

(26)

Use the arrow keys to toggle between On and Off, and press [ENTER] to complete the selection.

With Thoron On, the calculated thoron

concentration will be printed during continuous data logging, or in subsequent printing of data.

Also, if the pump is in AUTO mode, it will be directed to pump continuously during the thoron measurement.

Note that the thoron calculation assumes a standard setup for the measurement. A small drying tube, three feet of vinyl tubing, and the inlet filter, should be used. Typically, the small drying tube is held in the hand, and used as a wand. If the laboratory drying unit is used instead of the small drying tube, it creates additional sampling delay, which allows more of the thoron to decay before reaching the RAD7, reducing the sensitivity of the measurement to about half that of the standard setup.

The only difference between Sniff protocol and Thoron protocol is that this setting, ‘Setup Thoron’, is Off in Sniff protocol and On in Thoron protocol (See Setup Protocol, Chapter 2.4.1).

2.4.6 Setup Pump

Select >Setup Pump to change the Pump setting.

Four settings are available: Auto, On, Grab, and Off.

Auto means that the RAD7 switches the pump on and off according to a predetermined pattern that allows for sufficient sampling of air while conserving battery charge and pump wear.

In Auto pump setting, the pump always switches on for 4 minutes at the beginning of a new test cycle to ensure a good initial sample. If the humidity in the sample cell remains above 10%, then the pump stays on to allow the cell to dry out. Then the pump runs for just one minute in every five, until the end of the cycle.

On means the pump is always on, whether the RAD7 is counting (Live) or not (Idle).

Grab initiates a standard grab sampling sequence at the beginning of a run. When you start a new run with the pump set to Grab, the pump will run for exactly 5 minutes. This is followed by a five-

minute equilibrium delay, after which the

counting period begins. The pump does not run at all during the counting period. As usual, you can determine the length of the count period by multiplying the cycle time by the recycle number.

The total time to complete a test is the pump sample time (5 minutes) plus the delay period (5 minutes) plus the count period. Note that the Grab, Wat-40 and Wat250 protocols, under

>Setup Protocol , above, all use this pump setting.

Off means the pump is always off.

Use Auto pump setting for routine radon testing.

The RAD7 has been factory calibrated with the pump in this setting.

2.4.7 Setup Tone

Select >Setup Tone to choose the audible tone type. Three settings are available: Off, Chime, and Geiger. Off means the beeper remains quiet.

Chime means the beeper will sound only at the end of a cycle, and is otherwise silent. Geiger means the beeper will emit a chirp whenever a particle is detected, much like the familiar Geiger counter. But unlike a Geiger counter, the pitch of the chirp depends on the energy of the alpha particle. A trained ear can distinguish "old" radon from "new" radon by the sound of the chirps. The thoron beep is the highest pitch. In the Geiger setting, anyone will recognize a radon "gusher" by the rapid-fire chirping the RAD7 produces.

2.4.8 Setup Format

Select >Setup Format to change the way data are printed out. Four settings are available:

Short, Medium, Long, and Off.

Short causes the RAD7 to print results in an abbreviated form. Three lines of printed text contain a cycle's most important data: the run/

cycle number, radon concentration and two-sigma uncertainty, units and mode, time and date, temperature, relative humidity (internal), and battery voltage.

Medium and Long printouts include seven additional lines of data: total counts, livetime, and counts per minute for five alpha energy windows.

These seven lines are the raw data from which the

Abbildung

Table 2.4.1  Preset protocols! 24
Table 6.3.3  RAD7 Data Record Content ! 73
Table 7.1.2  Laboratory Drying Unit Life! 75
Table A1.2.3  Sel and Feed Functions! 84
+7

Referenzen

ÄHNLICHE DOKUMENTE

FIGURE 9 | Diurnal composite (A,B) radon, and (C) ozone distributions, for days containing periods of katabatic, coastal and oceanic fetch at DDU, based on absolute humidity in

Top branches of spruces a well exposed to the electric field and collect the radon daughters from the air.. Method: The top needles of spruces under HV line were picked and

Using high yield steel fixtures and rollers ( y  2000 MPa) and testing high strength ceramics, these contact stresses limit the outer span length to about 12 mm... If

Non-goal: don’t start editing or writing the slides

Quelle: Kopiervorlagen aus Kowanda/SMALL TALK–Seasons and Festivals; © VERITAS-Verlag, Linz 2003, S.. Illustrationen: Alena

erdberührenden Räumen für den permanenten Aufenthalt oder bei Umnutzung von erdberührenden Räumen in Wohn- oder. Arbeitsräume, sowie bei energetischen/thermischen Sanierungen

This mean that without the labor force participation female- male ratios, the employment variables does not solve the gender inequality in Japan.The R-square that explain is

I want to introduce to you the idea of interconnecting the subject-specific online reference service EconDesk 1 of the German National Library of Economics (ZBW) with the