• Keine Ergebnisse gefunden

ArmWrestling: efficient binary rewriting for ARM

N/A
N/A
Protected

Academic year: 2021

Aktie "ArmWrestling: efficient binary rewriting for ARM"

Copied!
74
0
0

Wird geladen.... (Jetzt Volltext ansehen)

Volltext

(1)

Research Collection

Master Thesis

ArmWrestling: efficient binary rewriting for ARM

Author(s):

Di Bartolomeo, Luca Publication Date:

2021

Permanent Link:

https://doi.org/10.3929/ethz-b-000474088

Rights / License:

In Copyright - Non-Commercial Use Permitted

This page was generated automatically upon download from the ETH Zurich Research Collection. For more

information please consult the Terms of use.

(2)

ArmWrestling: efficient binary rewriting for ARM

Master Thesis Luca Di Bartolomeo

January 15, 2021

Advisor: Prof. Dr. Mathias Payer

Supervisor: Prof. Dr. Kenny Paterson

Institute of Information Security

Department of Computer Science, ETH Z¨ urich

(3)

This thesis was developed with the guidance of prof.Mathias Payer and

the HexHive research group at EPFL, and under the remote supervi-

sion of prof. Kenneth Paterson at ETH.

(4)

No matter where you go, everyone is connected.

— Serial Experiments Lain

Dedicated to my parents, my brothers Sara and Leo, my dear Giulia, to my friends back in Rome and to my roommates Matteo and Fil- ippo who all inspired me and kept up with my constant complaining.

Thanks!

(5)

Acknowledgments

I would like to thank my advisor, Prof. Mathias Payer, for his support, guidance, and for assigning me this inspiring project. I wish all the best for him, and I look forward to continue working with him in the future.

I would like to thank as well the HexHive research group, as I always found myself very welcome there, even if I could visit them only once a week.

The last six months have been inspiring and pleasant: I had very good conversations with everyone at EPFL and I always felt like I was learn- ing a lot.

Special thanks go to my family and my friends in Rome. Their support was always available even when remote and it has been a huge pleasure to visit them once in a while in Italy. I am also need to thank my S.O. Giulia, I felt she was always behind my back, keeping a good check on my mental sanity during the worst times of the outbreak.

My roommates Matteo and Filippo deserve a mention here as well, since their patience and their rubber duck debugging skills proved to be fundamental during some nasty bug-hunting sessions.

Finally, I would also like to mention my CTF team, Flagbot, and the

teams I had played with occasionally, namely Polyglots and TRX; they

made me spend so many weekends staying at home but ultimately let

me meet many new interesting people. Thanks!

(6)

Abstract

Closed source programs are particularly hard to audit for vulnerabili- ties. Moreover, it is often the case that modern security measures and mitigations are available only as compiler passes that require posses- sion of the source code. Even if there were good recent attempts [24] [30] [25]

at completely avoiding usage or closed source libraries of modules that run at privileges higher than we might want (e.g., manufacturer spe- cific kernel modules [16]) in practice it is almost impossible to restrict our computing to exclusively open source and audited software. It is then of paramount importance that we find new ways of securing software without source code.

Many existing tools were developed to improve the auditability of closed source programs, especially aimed at helping the fuzzing pro- cess, with approaches such as implementing AddressSanitizer (a com- piler pass only applicable when the source code is available) through dynamic instrumentation. However, even state-of-the-art dynamic in- strumentation engines incur in prohibitive runtime overhead (between 3x and 10x and more). Static rewriters introduce less overhead, but they are mostly targeted towards the x86 architecture.

We would like to show that symbolization for ARM binaries is a vi- able alternative to existing static approaches, that has less flexibility (only works on C, position independent binaries) but has negligible overhead. We present RetroWrite-ARM, a zero-overhead static binary rewriter for aarch64 executables that solves key challenges such as pointer construction symbolization and jump table instrumentation, based on the (x86 64) RetroWrite project.

Our proof of work implementation of a memory sanitizer instrumen-

tation pass has the same core functionality of AddressSanitizer, and

our benchmarks show that it is an order of magnitude faster than Val-

grind’s memcheck .

(7)

Contents

Contents v

1 Introduction 1

2 Background 6

2.1 Binary Rewriting . . . . 6

2.1.1 Binary rewriting in short . . . . 7

2.1.2 Applications of binary rewriting . . . . 9

2.2 Dynamic and Static Instrumentation . . . . 10

2.2.1 Dynamic instrumentation . . . . 10

2.2.2 Static instrumentation . . . . 11

2.3 Symbolization . . . . 12

2.4 Examples of code instrumentation . . . . 13

2.4.1 Fuzzing . . . . 13

2.4.2 ASan . . . . 14

2.5 The ARM architecture . . . . 15

3 Design 18 3.1 Goals . . . . 18

3.2 System architecture . . . . 18

3.2.1 Differences with RetroWrite-x64 . . . . 19

(8)

Contents

3.3 Key Issues . . . . 20

3.3.1 Pointer construction . . . . 20

3.3.2 Jump table target recovery . . . . 23

3.3.3 Enlarging jump tables . . . . 25

3.3.4 Control Flow broken by instrumentation . . . . 27

3.3.5 Instrumentation register saving . . . . 27

4 Implementation 28 4.1 Symbolizer . . . . 28

4.1.1 Detecting pointer constructions . . . . 28

4.1.2 Symbolization of pointers . . . . 31

4.2 Jump Tables . . . . 33

4.2.1 Detection of jump tables . . . . 33

4.2.2 Jump Table symbolization . . . . 35

4.2.3 Jump Table enlargement . . . . 36

4.3 Instrumentation (BASan) . . . . 37

5 Evaluation 41 5.1 Setup and Hardware . . . . 41

5.2 Performance . . . . 43

5.2.1 Symbolization performance . . . . 43

5.2.2 Memory sanitization performance . . . . 44

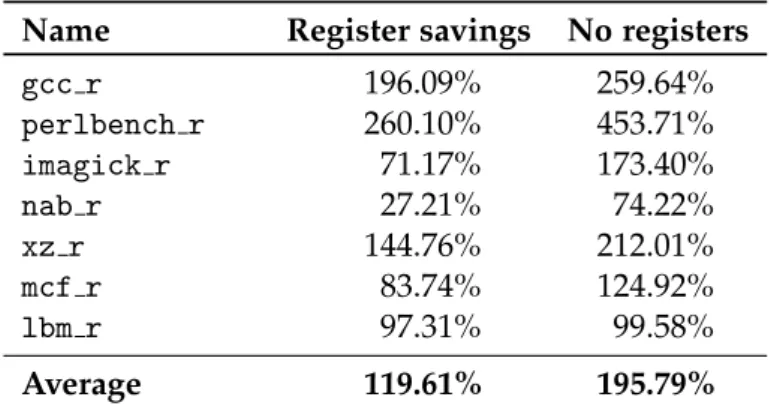
5.2.3 Optimization: register savings . . . . 48

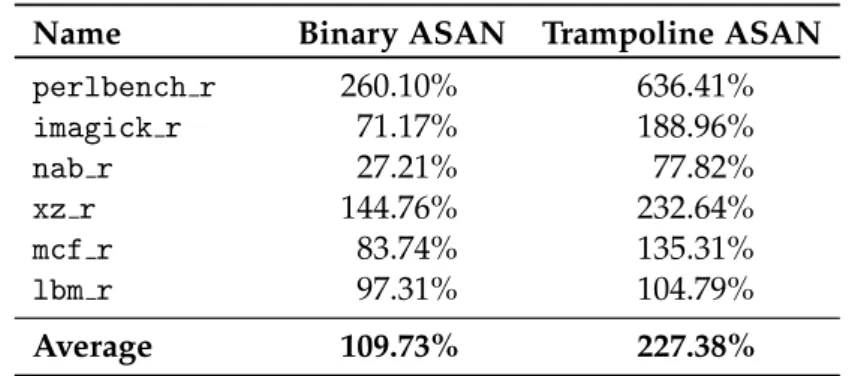
5.2.4 Comparison to trampolines . . . . 49

5.3 Correctness . . . . 50

5.4 Comparison to Egalito . . . . 51

6 Related Work 52 6.1 Dynamic binary rewriting . . . . 52

6.2 Static binary rewriting . . . . 53

6.2.1 Static rewriters that use trampolines . . . . 53

(9)

Contents

6.2.2 Static rewriters that lift to IR / full translation . . . . . 53

6.2.3 Static rewriters that use symbolization . . . . 54

6.3 Static rewriters aimed at ARM binaries . . . . 54

6.4 Summary of related work . . . . 55

7 Future Work 57

8 Conclusion 59

Bibliography 60

(10)

Chapter 1

Introduction

Mobile environments are ubiquitous but often lack security updates. For ex- ample, on Android over 60% of devices are outdated by at least two years [1].

Security testing in mobile environments is extremely challenging as ven- dors often release components as binary-only, i.e., without accompanying source code. Binaries cannot be readily evaluated by security analysts, re- sulting in potentially undiscovered vulnerabilities in these binary-only mod- ules, which often run with high privileges and are exposed to the network.

Binary rewriting is a process that allows insertion of arbitrary code (instru- mentation) in an executable without the need to recover its source code, allowing the insertion of hardening measures that can substantially reduce the exploitability in the case of a vulnerability. Binary rewriting is also vital to analysts looking for new vulnerabilities, as it’s an important step in the fuzzing of closed source software.

Binary rewriters can be split into two main categories: dynamic rewriters ,

that inject code into the target executable at run-time, and static ones , that

transform the executable into a new one with the instrumentation already

inserted. The first kind allow more flexibility, and support a broader range

of binaries, but they insert noticeable overhead during its execution; the

static ones instead have a much smaller footprint in execution time but are

(11)

only applicable on binaries on which static analysis (the analysis without runtime information) is successful.

While there is no shortage of static rewriters targeted towards the x86 archi- tecture, only a few support ARM. In fact, ARM binaries require a very different kind of static analysis than x86, and present many challenges that are not found on x86. Those challenges derive from the fact that the ARM ISA (In- struction Set Architecture ) is fixed-size, and all instructions occupy exactly 4 bytes. Since addresses in the 64 bit space are 8-byte long, they do not fit into a single instruction, and executables must “craft” addresses in various ways (storing them in a data section at compile time, or using arithmetic expressions to construct them). Many static analysis techniques commonly used on x86 are not usable anymore on ARM for this reason. There are a number of dynamic rewriters that support ARM, and they work by running together with the binary to instrument and modifying it in real time: this allows them to use powerful dynamic analysis techniques to recover more information, but as a side effect they introduce large overhead even with very light instrumentation.

Introducing only a small overhead onto an instrumented binary is a very desirable feature to have, as nowadays the largest use case of binary instru- mentation is the injection of fuzzing hooks and memory sanitization checks in a closed source binary to drastically improve the efficiency of modern fuzzing engines. Using a static binary rewriter versus a dynamic one when fuzzing can lead to an order of magnitude more executions per second.

Fuzzing on the ARM architecture has had little growth compared to x86,

and one of the main causes is that the instrumentation passes required for

fuzzing are supported only by heavy dynamic binary rewriters, which lead

to low fuzzing performances due to their overhead. The fact that ARM be-

came popular only very recently, combined with the difficulty of perform-

(12)

ing static analysis on it, are the reasons behind the lack of advanced static binary rewriters for ARM. In fact, most of the existing ones rely on simpler techniques (like trampolines) that require only superficial analysis, but are not flexible nor efficient.

Static analysis is the core foundation on many state-of-the-art static binary rewriters: one of the most recent and successful ones for x86 64 is RetroWrite [11].

It uses a novel technique called symbolization, which is the process of trans- forming an executable back to an assembly listing that is re-assemblable, where absolute addresses are substituted with assembly labels (or symbols).

Having all addresses substituted with labels makes adding custom code (in- strumentation) or arbitrary transformation on existing code very easy, as the resulting assembly can be parsed by a generic off-the-shelf assembler and assembled into a new instrumented executable.

In this thesis we would like to introduce RetroWrite-ARM, a new, advanced static rewriter for ARM64 binaries that builds on the original RetroWrite (from now on referred as RetroWrite-x64) and uses the same symbolization tech- nique to allow the development of complex and efficient instrumentation for closed-source binaries. Our work focuses on the development of novel ap- proaches to tackle the static analysis challenges presented by ARM executables such as pointer construction symbolization and jump table enlargement. We also implement an example instrumentation pass (implementing the same algorithm of Google’s AddressSanitizer, an LLVM compiler pass to sanitize memory accesses) to show the ease and efficiency of writing instrumenta- tion using the symbolization technique, we then measure its performance to demonstrate that the execution time is comparable to the original LLVM pass (that requires the source code of the binary to instrument, so impossible to apply on binary-only modules.)

The main challenges we had to tackle were the detection and recovery of

(13)

pointers, that are either stored in a read-only region or more commonly are built through a series of arithmetic operations because a single pointer can- not fit into a single ARM instruction. This required reverse-engineering the patterns of code the compiler generates and clever ways to transform said arithmetic sequences of instructions into symbolized assembly snippets that can support the insertion of arbitrary code in between. Another big part of our work focused on the detection, recovery and symbolization of jump ta- bles: switch statements on ARM binaries are very different from x86 (they are stored as a set of offsets from a given base address, not as a sequential list of absolute addresses). All the standard heuristics methods that are commonly used on x86 cannot be used on ARM as the jump tables are indistinguish- able from random data, so this required the development of a bare-bones symbolic emulator to detect them. Furthermore, since they are stored com- pressed in memory (if cases are close to each other, every offset may occupy only 1 or 2 bytes instead of the normal 8 bytes), they do not support the insertion of large instrumentation. We solved this problem with a new tech- nique called jump table enlargement which lets us introduced arbitrary-sized instrumentation inside a jump table.

We will show that our binary rewriter incurs in very low overhead through standard CPU benchmarks commonly used to evaluate binary rewriters.

We will also show that our implementation scales well to COTS binaries, as the benchmarks include large programs such as gcc and perl. Finally, we also evaluate the performance of our implementation of AddressSanitizer, showing that it is competitive with its source-based counterpart, adding only 19% additional overhead on top of it (depending on the binary and hardware configuration of the machine).

Our core contribution consists in the development of the first zero-overhead

aarch64 static binary symbolizer that scales to large COTS binaries, with key

insights in detecting and symbolizing pointer construction mechanisms and

(14)

compressed jump tables, and an efficient instrumentation pass that retrofits

aarch64 binaries with AddressSanitizer.

(15)

Chapter 2

Background

Here we will provide a summary of the basic notions required to understand the underlying concepts behind RetroWrite-ARM and the problems we faced during its development.

2.1 Binary Rewriting

Binary rewriting describes the alteration of a compiled program in such a way that the binary under investigation remains executable. It is useful in the case some additional functionality needs to be added to a closed-source binary, or to perform live changes on an already running executable. At first, binary rewriting was considered a “hack” to change parts of a program during execution (run-time patching, with the first uses dating back to the 60s on the PDP-11 [22]) but today it evolved into a stable and researched field of computer science, with a number of applications ranging from security to software optimization.

In the next subsection we will briefly explain how it works, and then we will

present the most common uses of binary rewriting.

(16)

2.1. Binary Rewriting 2.1.1 Binary rewriting in short

To better explain how does a rewriting algorithm work, we can summarize its process into four main steps [33]:

• Parsing: Executables are complex formats and are often optimized for speed instead of readability. Separating code, data and metadata in an executable format is not easy: often all three are scattered through the file in different ways. Furthermore, data is usually untyped (there is no type information on global variables), and the boundary between code and data is not always clearly defined as in many architectures in- structions have variable width. Finally, recovering and distinguishing references (pointers) from scalars (constants) is a problem which was only recently solved on position-independent executables [11]. The purpose of this step is to parse the input file and separate informa- tion between code and data into clearly defined structures ready to be analyzed in the next step.

• Analysis: This step focuses on the code of the executable, and on the recovery of as much information as possible from the raw instructions present in the code sections of the executable. Usually this involves the disassembly of the raw instructions to be able to analyze them individ- ually, the study of the structure of the code to split it into functions, and the analysis of the branches of each function to build the control flow graph (CFG). Often times this step also involves the computation of all cross-references (list of pointers to a specific address). At the end of this step the rewriter should have a very precise representation of the executable in a convenient data structure that allows fast answers to queries such as listing all the call sites of a specific function.

• Transformation: With all the information gathered from the analysis,

now the rewriter must identify all the instrumentation locations in

(17)

2.1. Binary Rewriting which code has to be altered/injected. For example, in the case of a memory sanitization instrumentation pass, the code must locate all memory stores and all memory loads and mark them for insertion of snippets of code that check if the target memory region lies inside an uncorrupted heap chunk, and abort execution if the check fails.

• Code generation: The rewriter now has to make sure that the inserted instrumentation does not break the intended functionality of the orig- inal executable, and then patch it or generate a new executable from scratch. There are multiple ways to achieve this step, the most common ones being using trampolines (creating a section with the new code in the target binary, and then inserting branches at instrumentation loca- tions to make the new code reachable), in-place instrumentation (gen- eration of a new executable with the new instructions already inserted at each instrumentation locations, with all the code and data references adjusted to make place for the new code), or run-time patching.

The last two steps, “transformation” and “code generation” are where most of the research in binary rewriting is done. We will shortly list the most prominent techniques that rewriters use to perform those latest two steps:

• Trampolines: All the instrumentation code is put into a new section in the binary. At every instrumentation point, the rewriter changes an instruction with a branch that redirects execution to the right location inside the new section. At the end of the instrumentation, there is a branch that leads back to the old location in the executable. This is one of the simplest methods as the layout of the code section stays the same and no references or branches are broken inside the executable.

• Direct: At each instrumentation point, code is either overwritten or

shifted to make space for the instrumentation to insert. In the case

of a shift, all references and branches must be carefully readjusted to

(18)

2.1. Binary Rewriting match the displacement of the code.

• Lifting: This approach involves lifting the binary code to an Intermedi- ate Representation (IR) language similar to the one used in compilers such as LLVM. The logic behind it is that IR usually is a simpler lan- guage on which it is easier to apply instrumentation to. At the end of the process the IR is compiled back to binary code and a new instru- mented executable is generated.

• Symbolization: The process of transforming a binary into a reassem- blable assembly listing and applying instrumentation on it. Since this is the method used by RetroWrite-ARM, we will go more detail of how it works in the next section.

A more comprehensive report of all the different techniques can be found in a recent survey about binary rewriting by Wenzl et al. [33].

2.1.2 Applications of binary rewriting

The applications of binary rewriting are multiple and can be summarized as follows:

Cross ISA binary translation: A binary translator is a special software that mimics the behaviour of a device while executing on a different device. Emulators use binary rewriting to translate system calls, in- structions, memory access and all the other execution primitives from one processor architecture to another. An example of this would be QEMU [3].

Optimization: In the domain of high performance computing, having

a way to patch subtle things like cache misses or timing anomalies in

very long running tasks without the need to restart the whole program

is of special interest. In such situations, binary rewriting is a solution

for run-time patching, as shown by DynInst [4] or Frida [13].

(19)

2.2. Dynamic and Static Instrumentation

Profiling: Having an in-depth look during the execution of a binary by inserting profiling or tracing instructions in the middle of its code can prove to be particularly useful in many applications, like catching memory leaks (e.g., Valgrind [23]), coverage information for fuzzing (e.g., AFL-QEMU [35]) and more.

Hardening: This is by far the most popular use case of binary rewrit- ing, as many times we are forced to use software with the absence of source code, with no vendor support, or with deprecated build tools that make recompilation impossible. Binary rewriting can be used to apply security measures such as adding stack canaries, implement- ing address layout randomization schemes and memory sanitization to make exploitation substantially harder. Closed source software and lack of vendor support is so widespread that there are already many binary rewriting tools on x86 that are aimed at hardening executa- bles. Examples of such software are Stackguard [8] (that supports the insertion of stack canaries) or RetroWrite-x64 [11] (that implements a memory sanitization pass to prevent heap corruptions).

2.2 Dynamic and Static Instrumentation

In this section we will analyze the difference between the two different bi- nary rewriting approaches, namely dynamic and static instrumentation.

2.2.1 Dynamic instrumentation

Dynamic rewriters modify and instrument the code of the target binary

during runtime. Usually, the target binary is executed in a controlled en-

vironment side by side with the rewriter engine, which patches instructions

and fixes references on the go. Sometimes the rewriter engine leverages the

operating system’s primitives to control the execution of the target, like us-

(20)

2.2. Dynamic and Static Instrumentation ing the ptrace system call on Linux, but there are notable cases in which the rewriter engine comes with its own instrumentation runtime (e.g., Dy- namo [2]) or implement a full featured virtual machine (e.g., STRATA [26]).

The big advantage of dynamic rewriters is the additional information that is available at run time, like the path that the execution has taken, or the contents of the registers. Furthermore, dynamic rewriters can avoid analyz- ing the whole binary at once, as they can just focus on the part that is being currently executed, making them scalable to arbitrarily large programs.

However, the additional runtime information comes at a high performance cost: running the rewriter engine alongside the target binary is expensive, and the frequent context switches the CPU must perform to execute both processes make the performance even worse. The total overhead for an instrumentation pass like memory sanitization for a dynamic rewriter like Valgrind is an order of magnitude higher [11] than the overhead introduced by source-level memory sanitization.

2.2.2 Static instrumentation

Static rewriters process the target binary before execution, and produce as output a new binary with all the required instrumentation included. The overhead introduced is usually very low, and execution speeds are com- parable to compile-time instrumentation. Furthermore, static rewriters are able to add complex instrumentation that is computationally expensive to introduce, as since it is done statically before execution, it won’t introduce unnecessary delays at runtime.

Without runtime information, to correctly perform instrumentation static

rewriters need to rely on complex static analysis, which is inherently im-

precise and often needs to rely on heuristics. The common disadvantage of

static rewriters is that they do not scale well on large binaries or binaries

(21)

2.3. Symbolization that do not follow standard patterns. In fact, virtually no static rewriter supports packed binaries or self-modifying code, as they are too complex to statically analyze. Moreover, many static rewriters struggle even with binaries produced by deprecated compilers or with aggressive optimization flags.

More recent static rewriters such as Ramblr [31], Uroboros [32], and RetroWrite- x64 rely on symbolization, which works around the rigid structure of binaries by substituting hard coded references with assembly labels. RetroWrite- x64’s approach is particularly interesting in the fact that it avoid heuris- tics to differentiate between scalars and references by focusing on position- independent executables (PIE).

2.3 Symbolization

The symbolization technique is a special form of code generation that focuses on the output of reassemblable assembly that can be directly fed to a generic assembler to produce the instrumented executable. Listing 2.1 highlights an example of this process .

Symbolization works by transforming all reference constants in the exe- cutable (both in the code and data sections, including relative branches) with assembly labels, in such a way that pointers and control flow will re- solve correctly even after new instructions are inserted in the middle of the code. The usefulness of symbolization relies in the fact that many existing tools can be applied to insert instrumentation or analyze the symbolized assembly.

The symbolization approach is usually defined as being zero-overhead, as

the generated executable does not incur in more overhead other than the

time it takes to execute the inserted instrumentation (unlike other methods,

(22)

2.4. Examples of code instrumentation like trampolines, where for each instrumentation location two additional branches need to be executed).

Originally, symbolization was introduced by Uroboros [32], and was later used by ramblr [31] and RetroWrite-x64 [11].

0x400: adr x0, 0xab0000 0x404: cmp x1, 20 0x408: b.eq 4 0x40c: ret 0x410: ret

.LC400: adr x0, .LCab0000 .LC404: cmp x1, 20

.LC408: b.eq .LC410 .LC40c: ret

.LC410: ret

Listing 2.1: Assembly in the original binary (left), and after symbolization (right)

2.4 Examples of code instrumentation

In this section we will go into more detail on a very common use-case of instrumentation, fuzzing, and explain AdressSanitizer, the instrumentation pass we implemented in the ARM port of RetroWrite-ARM.

2.4.1 Fuzzing

Automatic vulnerability discovery techniques are getting a lot of traction lately, mostly because software is getting ever more complex and large, and manual analysis and auditing do not scale. Fuzzing is certainly one of the most interesting automatic vulnerability discovery techniques. It relies on the semi-random generation of test cases to give as input to a target binary, trying to find a specific input that makes the binary get into an invalid or un- defined state, as it is a good indicator of a possibly exploitable vulnerability.

This technique got even more popular after the release of AFL [35], a fuzzer

that relies on coverage information to generate new test cases to maximize

the amount of instructions tested by each new input, and Honggfuzz [29], a

modern fuzzer used to efficiently test APIs thanks to its innovative persistent

fuzzing feature.

(23)

2.4. Examples of code instrumentation Most state-of-the-art fuzzers rely on instrumentation to improve vulnera- bility discovery, as it makes the fuzzing process much more efficient. In particular, some of the most popular instrumentation passes used to speed up fuzzing are the following:

• Coverage information: Coverage information helps the fuzzing engine by monitoring the execution path taken for each input test case. In this way, the fuzzing engine can generate inputs with the aim of maximiz- ing the amount of code executed by each test case, increasing the prob- ability of finding bugs. Coverage information is commonly obtained by inserting monitoring instrumentation at the start of each function or before each branch instruction.

• Memory Sanitization: This instrumentation pass adds a check before each instruction that reads or writes to memory to verify that the mem- ory access does not result in a stack or heap overflow. Originally de- veloped to debug memory corruption errors, memory sanitization has seen widespread use in fuzzing engines as it can halt execution and report an error as soon as a memory corruption is detected.

2.4.2 ASan

AddressSanitizer, or ASan in short, is one of the most common static memory

sanitization checks that can be added to a binary through a compiler pass,

which can be found in both the clang and gcc family of compilers. This

compiler pass helps finding bugs by actively checking for memory corrup-

tions, hooking calls to libc’s free and malloc functions. ASan is not only

used by developers to help debug their code, but it is also extensively used

by fuzzers, as ASan will detect a memory violation as soon as it happens,

letting the fuzzer know earlier and with more reliability when a bug was

found (otherwise, the fuzzer has to wait that the memory corruption causes

a crash).

(24)

2.5. The ARM architecture ASan works by introducing a new region of memory called shadow memory, with a size of exactly 1/8 of the whole virtual memory available to a process.

By keeping track of each call to malloc and free, ASan stores in the shadow memory a compressed layout of the valid memory in the original virtual space, and sets up red zones to highlight invalid or freed memory. Those red zones trigger a security violation and abort the process as soon as they are accessed. Despite its non-negligible overhead (Around 73% on average [27]), ASan is widely used thanks to the absence of false-positives, and for its usefulness in detecting memory corruption vulnerabilities which are still commonly found in C/C++ codebases.

2.5 The ARM architecture

We will provide a short summary of what are the main differences between x86 and ARM, with particular focus on the ones that proved to be source of non trivial problems during the development of RetroWrite-ARM.

• Fixed-size instruction set: Contrary to x86, the ARM instructions are all of the same size, fixed to the value of 4 bytes. A consequence of this is that a pointer cannot fit into a single instruction. To store a pointer in a register in ARM, there are two main options: the first is using a region of data where the pointer is hard-coded at compile time, called a literal pool; the second one is building the pointer in a multi-stage fashion by using arithmetic operations. While the first one is easier, it is also less performant, and compilers will always resort to the sec- ond when possible. This makes recovering information about global variable accesses very hard.

• Jump table compression: On x86, jump tables are stored as list of pointers

in a data section (usually .rodata), with one pointer for each case

of the jump table. Instead, on ARM, jump tables are stored as offsets

(25)

2.5. The ARM architecture from the base case. This is because the compiler compresses the jump table, and in most cases a single byte is enough to store the offset from the base case to for each case of the jump table. This is the source of many problems for static rewriting: first of all jump tables are harder to detect, as on x86 scanning the data sections for arrays of valid instruction pointers was a quite reliable way of detecting jump tables, while on ARM they are indistinguishable from random bytes; secondly inserting too much instrumentation between cases of the same jump table could lead to the offset not fitting into a single byte anymore, and breaking the whole jump table structure in memory. Finally, extracting the number of cases of a jump table is quite harder in ARM, since it is impossible to scan cases until an invalid pointer is found, as like stated before, jump table entries in ARM are indistinguishable from random bytes.

• Discontinuities in immediates: Some ARM instructions, like “ add ”, support having immediates as one of the operands. However, they do not ac- cept a standard range of immediates like in x86, but instead a specific set of values that may not be continuous. For example the “ add ” in- struction can use only immediates that can be expressed with a value of 8 bits scaled by a “ ror ” with a 4 bits operand.

• Alignment issues: The stack pointer register “ sp ” must always be aligned to 16 bytes. Failing to do so will trigger a SIGBUS error and crash the application.

• No push/pop: There are no instructions in aarch64 equivalent to the x86 push/pop. Instead, a push is performed by storing a register on the stack and manually decreasing the stack pointer, like “ str x0, [sp, #-16]! ”.

Similarly, a pop can be performed like this “ ldr x0, [sp], #16 ”.

• Multiple register stores/loads: The aarch64 architecture supports saving

(26)

2.5. The ARM architecture and loading two registers at once from memory with instructions such as “ stp ” and “ ldp ”. They are very often used by programmers and compilers thanks to the performance gain.

• Peak performance vs energy efficiency: While x86 is aimed towards max- imising performance and speed, one of the main objectives of the de- sign of the ARM architecture is maximising energy efficiency. This is the reason behind the simplicity of the instruction set, as the CPU can be smaller and less complex compared to x86 — and, ultimately, less transistors translate to less power consumed.

• Not enough mature tools: The popularity of ARM CPUs is still relatively

new and the tooling is not mature enough, as in fact we found bugs in

both the disassembler we chose to use (Capstone [5]) and the debugger

(GDB)

(27)

Chapter 3

Design

We will now go over the design goals of RetroWrite-ARM, we will explain which were the key issues that we had to face due to the quirks of the ARM architecture, and the solutions we adopted to overcome these problems both in the symbolization and in the instrumentation parts of RetroWrite-ARM.

3.1 Goals

Our goal is to develop a zero-overhead binary translator for aarch64 exe- cutables that enables powerful translation and overcomes challenges spawned by the ARM ISA. It should also support COTS software and scale well to large binaries. Finally, its implementation should be modular in order to avoid limiting any kind of instrumentation.

3.2 System architecture

RetroWrite-ARM follows the same structure as RetroWrite-x64 and is di-

vided into two main components: the symbolizer and the instrumentation

passes. The symbolizer takes care of parsing and analyzing a binary, substi-

tuting every reference in the target with assembly labels, plus some minor

tasks to keep the original functionality of the binary intact. Listing 2.1 shows

(28)

3.2. System architecture

Figure 3.1: Overview of the structure of RetroWrite-ARM

the output of the symbolization process on a small example assembly snip- pet.

One or more instrumentation passes can be enabled to apply transforma- tions to the resulting binary. For now, only a single pass is implemented (BASan), but many more can be easily added.

3.2.1 Differences with RetroWrite-x64

RetroWrite-ARM uses the same approach as RetroWrite-x64 for parsing the executables, although with different implementation details to support the ARM architecture (e.g., different handling for the relocations). The technique to distinguish between references and scalars introduced in RetroWrite-x64 is also the same.

Since this document focuses on the new challenges that the ARM architecture introduced, we will not go into details about the above algorithms, and point the reader to the original RetroWrite-x64 paper [11] for further reference.

The novelty in RetroWrite-ARM relies in the additional static analysis meth-

ods that we had to develop to support detection of pointer constructions

and jump tables. To the best of our knowledge, our work is the first at-

tempt to generate symbolized enlarged jump tables and symbolized pointer

(29)

3.3. Key Issues constructions. In the next section we will go into detail about the above challenges and how did we solve them.

3.3 Key Issues

The outstanding challenges of statically analyzing and instrumenting ARM binaries can be summarized as follows:

• Detecting and fixing pointer constructions.

• Detecting and symbolizing jump tables.

• Supporting extensive instrumentation by enlarging jump tables.

In the following pages we will get into detail for each one of those issues, and explain the reasoning behind our solution.

3.3.1 Pointer construction

The aarch64 instruction set is defined as fixed size, because every instruction is large exactly 4 bytes. This makes the CPU design simpler, helps keeping memory always aligned, and permits the CPU to fetch multiple instructions at once, since decoding is not necessary to determine instruction bound- aries. However, despite the many advantages of this characteristic, there are some drawbacks too, including not being able to store a pointer in a single instruction (as pointers have a size of 8 bytes). The aarch64 ISA provides two main solutions to this problem.

The first one consists in storing the pointers in a special read-only region

of memory, called a literal pool, and then load those pointers into a registers

using the special construct “ ldr <reg>, =pointer ”, a pseudo-instruction that

the assembler will translate with the correct memory address once pointer

has been stored in a literal pool. Since all “ ldr ” instructions are PC-relative,

and since the “ ldr ” instruction keeps 21 bits available to store the offset from

(30)

3.3. Key Issues the PC, the assembler will store pointer in a literal pool which is in the ± 1MB range of the “ ldr ” instruction. While this is a simple and straightforward approach, very useful in the case of hand-written assembly, this requires an additional memory access that may impact performance in the long run.

Furthermore, the assembly will fail if it is not possible to store a literal pool in the given range, such as in the case of a function larger than 2MB. In that case, it is up to the programmer to find a suitable spot for the literal pool, by manually specifying its location with the .ltorg assembly directive. It is often recommended to store literal pools directly after non-conditional jumps to avoid stepping over them during execution [20].

The second solution is to build pointers using multiple instructions and ba-

sic arithmetic primitives. aarch64 provides instructions such as “ adrp <reg>, pointer ”, which loads the base page of a pointer into a register. It is a PC-relative in-

struction, and targets pointers in the ± 4GB range. In other words, the

“ adrp ” instruction can point only to memory locations that are 4KB aligned.

Usually the instruction can be followed by an “ add ”, a “ sub ” or an offset- based load such as “ ldr <register>, [<base_page>, offset] ”. This second way, while more contrived and harder to read, is faster than the first one as it does not require a memory access, and also often benefits from custom hardware optimizations (such as in the Cortex A72, one of the most common ARM CPUs [7]).

The global variable problem

For the reasons stated above, compilers generally use pointer constructions

instead of literal pools when the code needs to access a global variable, pre-

ferring performance over assembly readability. Having each pointer value

separated in two different instructions makes the static analysis of a binary

substantially harder. Furthermore, compiler optimizations frequently ex-

acerbate the difficulty of analysis by reusing parts of some pointer values

(31)

3.3. Key Issues to build new ones, or reordering instructions around in such a way that a pointer can be built on two instructions which are kilobytes away from each other. In some extreme cases, by enabling the -O3 optimizations, we found instances of pointers built on two instructions that were on different functions, due to the compiler optimizing a macro in the C source code.

In the symbolization process (that will be explained in detail later), we need to know the value of every pointer used in the program, in order to correct it when we will add instrumentation later on. Thus we are required to develop an analysis technique that lets us recover the value of every single global pointer used in the binary. We will now shortly describe the ideas behind the solution we implemented.

Our solution for the global variable problem

At first, some basic static analysis is performed on the binary, in order to recover functions, control flow, basic blocks and disassembly of the .text section. After this, we scan the disassembly for each possible instance of pointer building in the binary. After analyzing common compiler patterns, we found out that the “ adrp ” instruction (which loads the base page address of a pointer) is an indicator of a possible start of a pointer building process.

After collecting all the possible instances of pointer building, the next step is to find out the final pointer value of each one. This turned out to be an extremely difficult task, as we soon found out that there are too many ways of how a pointer can be built. We implemented a pattern-matching solution at first, trying to detect common compiler patterns for pointer building;

while we correctly found out the value of the vast majority of pointers,

a single mistake could make the binary crash, and our solution was not

working on binaries of large sizes, as we inevitably failed to parse at least

one or two edge-cases.

(32)

3.3. Key Issues We later shifted to a different approach: instead of trying to find exact value of a pointer by pattern matching, we take the set of all possible sections a pointer could have and exclude wrong values until possible. Over 99% of the times, this approach leaves only a single section. We then need to symbolize only the initial “ adrp ” and keep the offsets from the relevant section exactly the same as they were in the original binary to make sure that any pointer built with that “ adrp ” will resolve correctly. The rest of the times, we fall back to the old pattern matching solution.

This final solution scales really well, as proved by the fact that we rewrote very large binaries and successfully ran them through long benchmarks. For more details on how the exclusion algorithm works, see the next chapter,

“Implementation”.

3.3.2 Jump table target recovery

There is a big difference in how jump tables in ARM are implemented com- pared to x86. In fact, in x86, a jump table is represented through a list of code pointers in the .rodata section. The assembly generated by the com- piler will simply load the pointer from the list indexed by the number of the case that is going to be executed, and jump to it.

On ARM, things are different: jump tables are stored as a list of offsets from the base case (case number 0) in memory. The compiler generates assembly that fetches the correct offset based on the case number from the list in memory, adds the offset to the base case, and jumps to the resulting value. Listing 3.1 shows an example of jump table access in aarch64. The first two instructions build a global pointer to where the jump table is stored in memory. In line 3 the offset to the corresponding case is loaded into register “ w1 ”, and then later added to the base case “ x0 ” on line 5.

Furthermore, jump tables in aarch64 are complicated by the fact that they

(33)

3.3. Key Issues

1 adrp x0, <jump_table_page_address>

2 add x0, x0, <jump_table_page_offset>

3 ldrb w1, [x0, w1, uxtw]

4 adr x0, <base case address>

5 add x0, x0, w1, sxtb 2 6 br x0

Listing 3.1: Example of a jump table in aarch64

are often compressed in memory. Since they store offsets, not pointers, and commonly jump table cases are very close to the base case, compilers usually avoid using the full 8 bytes of memory for each case (which would be normal in x86), but will use less if possible. For instance, if all offsets are less than 256, the compiler will use a single byte in memory to store each case.

Detection of jump tables

The first problem we had to face was the discovery of jump tables. While they have a very distinct pattern (a load from memory, followed by some arithmetic, and then an indirect jump), many other constructs share similar patterns (e.g., using a callback in a struct). We found out that a reliable way of detecting them is by backward-slicing every time the disassembler encountered an indirect jump, and then verifying if the value of the register used for the indirect jump could be represented with an expression which could be resolved statically and matched a very defined pattern (load 1/2/4 bytes from memory, load a base address, add the offset and then jump to the result).

To represent the value of a register as an expression, we developed a simple

pseudo-emulation engine that steps backwards from a given instruction, fol-

lowing control flow and building step by step the resulting expression, sim-

ilar to what a dumbed-down symbolic executor would output. The pseudo-

emulation engine is limited, supports circa 20 instructions, as emulating ARM

was out of the scope of the project and we only needed it for jump table

(34)

3.3. Key Issues detection. A detailed explanation of how it works is in the next chapter.

Detection of jump tables size

Another problem that quickly arose from the peculiarities of ARM jump ta- bles is that it is much harder to estimate the number of cases that a jump table supports, compared to x86. In fact, in x86, simple heuristics such as scanning memory for continuous sections of valid instruction pointers until an invalid one is found can be a valid heuristic. However, as stated before, in ARM jump tables are indistinguishable from random bytes, so it is impos- sible to use heuristics to understand the bounds of a particular jump table in memory.

We found that backward slicing is again a robust solution here too. After detecting a jump table, we can identify the instruction that takes care of loading the offset from memory, and from there we mark the register that holds the value of the number of the case that is going to be executed.

Backward-slicing until a comparison operation is performed on the marked register, bounding the number of cases to an absolute number, turned out to be a very reliable solution.

3.3.3 Enlarging jump tables

Another problem spawned from how jump tables are represented in ARM comes up when instrumenting a function that contains a jump table. In fact, it is very likely that adding too much instrumentation inside a single case could overflow one of the offsets that stored its distance from the base case.

Especially when maximum compression is used and offsets are stored in a single byte, it is very common to overflow multiple of them even with light instrumentation.

This was one of the hardest problems to fix, and we considered the following

(35)

3.3. Key Issues solutions:

• Expand the jump table in memory. Enlarge the .rodata section and move everything to make space in memory for the expanded jump table. While possible, this would have been be a drastic change that was not scalable or easily implemented.

• Create a new jump table in a new section, and patch the pointer build- ing code at the start of the jump table access code. While this was the easiest solution to implement, we discarded it because of the addi- tional space required and its poor scalability.

• Divide all the offsets by the same constant value. Normally, all offsets of a jump table represent the distance between a case and the base case expressed in bytes divided by 4. This is because each instruction is 4 bytes long, and it would not make sense to point inside an instruction.

In fact, in Listing 3.1, line 5, we can see how the offset is shifted by 2 to the left (so multiplied by 4). However, we can use the same tech- nique the compiler uses and store offsets divided by 8, 16 or more, and changing how much the offset is shifted to the left before being used, thus enabling us to store larger differences in a single byte.

The trade-off with this approach is that offsets can no longer point to a single instruction, but to a block of 2, 4 or more instructions, depending on how much enlargement was needed. To make sure that each offset points to the right instruction, some light nop-padding is applied between cases to make sure that alignment is correct every time.

We ended up using the last solution, as even if it was slightly more complex

to implement, it would help us keep the original memory layout of the

binary, which is a very desirable property in binary rewriting.

(36)

3.3. Key Issues 3.3.4 Control Flow broken by instrumentation

When adding substantial amount of instrumentation to a binary, some pc- relative branches can break, like the instruction “ cbz ”, which cannot jump to addresses farther than 1MB.

In this cases we fix the relevant instruction by making them point to a some additional instrumentation containing a trampoline to the original target of the branch.

3.3.5 Instrumentation register saving

We designed RetroWrite-ARM to support any kind of instrumentation, with- out sacrificing performance and functionality. We realized though that many different kinds of instrumentation require some intermediate calculations to be saved in registers. This was causing noticeable overhead in the instru- mentation, as registers needed to be saved on the stack and later restored at every instrumented location.

To avoid this additional overhead, we implemented a static analysis of reg-

ister usage for every function, with instruction-level granularity (i.e., the

result of the analysis is the set of registers that can be freely used without

saving them for every instruction inside a given function). The instrumenta-

tion can then use the set of free registers without worrying about hindering

the original functionality of the binary.

(37)

Chapter 4

Implementation

In this chapter we cover the implementation of the rewriter and of BASan, the memory sanitization instrumentation pass. We will also share details on the optimizations we implemented to minimize instrumentation overhead.

4.1 Symbolizer

Symbolization requires detection of every single pointer and control flow mechanism in the binary. In aarch64, this may prove to be harder than it looks, as pointer construction patterns are difficult to recover and jump tables are not as heuristics friendly as they are in x86. In the following subsections we will go over each problem and explain our approach to tackle it.

4.1.1 Detecting pointer constructions

Standard compilers (clang, gcc) that target aarch64 use a common pattern

for building pointers: an “ adrp ” instruction, loading the page of the desti-

nation address, and then either an “ add ” or similar arithmetic instruction to

fix the offset inside the page, or a memory operation like “ ldr ” or “ str ” that

include the offset inside the page (e.g., “ ldr x0, [x1, 256] ”).

(38)

4.1. Symbolizer

adrp x0, 0xab0000

add x1, x0, 256 ; pointer 0xab100 ldr x2, [x0, 512] ; pointer 0xab200 add x0, x0, 128 ; pointer 0xab080

Listing 4.1: Example of multiple pointers built from the same adrp instruction

adrp x0, 0xab0000 mov x1, x0

add x1, x1, 256 ; pointer 0xab100

Listing 4.2: Example of changing register during pointer construction

We implemented two different approaches and combined them together to successfully recover pointers in aarch64 binaries. The first one is based on pattern matching. We first build a list of possible pointer building locations, enumerating all instances of the “ adrp ” instruction. Next, we find all “ add ”,

“ ldr ”, or “ str ” instructions (or their variants) that use the register that was partially built with the “ adrp ”, and try to recover the original pointer by em- ulating the arithmetics involved in those instructions. This approach alone was not enough because of the following difficulties:

• Multiple pointers built with the same “ adrp ”: Listing 4.1 shows how sometimes the same “ adrp ” page loading instruction is used for mul- tiple pointer constructions, sometimes very far away from each other

• Moving base page register: another difficulty was that sometimes the register used to store the base page changed in the middle of the pointer construction, like in Listing 4.2

• Base register stack saving: in very large functions, sometimes the base registers were loaded at the start and saved on the stack, to be later restored and used for pointer building. An example is present in List- ing 4.3

We implemented a light data flow recovery algorithm that statically ana-

(39)

4.1. Symbolizer

adrp x0, 0xab0000 str x0, [sp, -16!]

...

ldr x3, [sp, 16!]

add x3, x3, 512 ; pointer 0xab200

Listing 4.3: Example of base page register stack saving

lyzed the control flow and the stack usage of a given function, following around the register used by the “ adrp ” and checking for its usage, to address all the difficulties stated above. However, it is particularly hard to support every single edge case, and missing a single pointer symbolization is fatal and will cause a crash when the pointer is dereferenced (which sometimes happens a while after the pointer is built, and can be very time consuming to detect and debug). While this pattern matching approach alone worked with the vast majority of instances of pointer construction, it was insufficient to completely symbolize all pointers and often failed on large binaries.

Our second approach took advantage of the fact that RetroWrite-ARM does not instrument data sections, and the vast majority of global variables point to a data section. Instead of trying to parse the pointer building patterns, we try to guess which section of the original binary an “ adrp ” could be pointing to. Since the “ adrp ” loads a base page, and a page offset is added, the sections that can be addressed by a single pointer construction are those that overlap the “ adrp ” address with a ± 1 KB range. Since all sections except .text are not instrumented, if we are able to narrow down the possible target of a pointer construction to a single section, we can symbolize the pointer by just adjusting the starting “ adrp ” to correctly address the same symbolized section as in the original binary, since offsets used by “ add ” or “ ldr ” will stay the same. For example, if we encounter the instruction

adrp x0, 0xab000 ” and the only section close enough is the .bss that starts

at address 0xab256, we can symbolize every pointer construction on “ x0 ” by

(40)

4.1. Symbolizer changing the above “ adrp ” to “ ldr x0, =(.bss - 256) ”.

This second approach is more stable, as it does not incur in any of the problems stated above. However, it was not always applicable, as espe- cially in smaller binaries multiple sections could be in the ± 1 KB range from the “ adrp ” destination address; in that case, we used some simple data flow analysis to exclude as many sections as possible. We found out that in around 99% of cases we are able to use this “ adrp ”-adjusting approach without needing to do any heuristics at all. In the case we are not able to determine which single section the “ adrp ” is pointing to, we fall back to the first pattern matching based approach.

4.1.2 Symbolization of pointers

After detection of a pointer construction in the target binary, it is still not trivial how to symbolize a pointer. There are two solutions to this problem:

using literal pools and using pointer construction.

Literal pools

A literal pool is a special region of memory in a binary that stores absolute addresses. It is widely used in ARM to overcome the challenge of not being able to store a pointer in a single instruction.

The ARM assembly specification [18] states that the assembler will store a pointer in a literal pool when using the following construct: ldr x0, =<pointer>.

This pseudo-instruction will be assembled with a pc-relative load to the

nearest literal pool that contains the full pointer address. The location of

the literal pool must be manually specified in assembly through the .ltorg

directive. Usually, literal pools are stored between functions in the .text

sections. Since the “ ldr ” pc-relative load can only target addresses in the ±

1 MB range, literal pools must be stored inside functions if they are larger

(41)

4.1. Symbolizer than 2 MB.

In our first implementation we used literal pools to symbolize pointers, but we detected noticeable overhead introduced even without instrumentation added. The runtime of symbolized binaries without instrumentation was around 5% higher when compared to the original binaries. The reason be- hind the additional overhead is twofold: first, each pointer retrieved through literal pools requires a memory access each time; secondly, literal pools oc- cupy precious space in the .text section causing more cache misses than necessary.

Pointer construction symbolization

To avoid the overhead introduced by the usage of literal pools, we decided to use pointer construction ourselves. The symbolization of a pointer construc- tion is composed of two parts: the symbolized “ adrp ” base page loading and the symbolized “ add ” for the page offset. An example of such process can be found in Listing ??. The “ adrp ” is symbolized by just substituting its ar- gument address with the symbolized label. The page offset part, instead, is symbolized through a special assembler directive that evaluates to the last 12 bits of the specified assembly label (and 12 bits are exactly enough to specify the offset inside a page).

0x400: adrp x0, 0xab000

0x404: add x0, x0, 256 ; pointer to 0xab100 .LC400: adrp x0, .LCab100 ; base page

.LC404: add x0, x0, :lo12:.LCab100 ; page offset

Listing 4.4: Example pointer construction in the original binary (above) and symbolized pointer

construction (below)

(42)

4.2. Jump Tables

4.2 Jump Tables

Switch statements in ARM binaries are stored as a list of offsets, instead of absolute addresses like in x86. This makes symbolizing them particularly tricky. First of all, detecting them is not easy: listing 4.7 shows how they do not have a particular pattern in memory. In this section we will go over what was our approach to finding them and how did we symbolize them without breaking their functionality.

0x400: adrp x0, 0x8000 0x404: add x0, x0, 3

0x408: ldrb w1, [x0, w1, uxtw]

0x40c: adr x0, 0x418

0x410: add x0, x0, w1, sxtb 2 0x414: br x0

0x418: movz x0, 1 ; case 0,1,2 0x41c: ret

0x420: movz x0, 10 ; case 3 0x424: ret

0x428: movz x0, 100 ; case 4 0x42c: ret

0x8003: .byte 0 ; case 0 0x8004: .byte 0 ; case 1 0x8005: .byte 0 ; case 2 0x8006: .byte 8 ; case 3 0x8007: .byte 16 ; case 4

Listing 4.5: Left: code for a performing a switch. Register w1 holds the case number that is going to be executed. The offset is loaded at 0x408, which is added to the base case address (loaded at 0x40c) and then jumped into (0x414).

Right: corresponding jump table in memory, with 5 cases each occupying a single byte in memory.

Cases can be repeated, and are impossible to distinguish from other data in memory.

4.2.1 Detection of jump tables

Our algorithm to detect a jump table pattern works as follows:

• Recover the complete control flow of each function, using the linear sweep technique.

• Mark all indirect jump locations, identified by “ br ” instructions.

• For each “ br ” indirect jump, backwards-slice the code to find all paths

that may lead to the “ br ”, with a maximum path length of 50 instruc-

tions. This upper bound is generous (in all the cases we analyzed

(43)

4.2. Jump Tables 15 instructions were enough) and prevents computationally expensive path explosions.

• Reverse-emulate every path, and store every possible (symbolized) value that the register of the indirect call can have.

• If the value that the register can have is the same for every path, and corresponds to a jump table symbolic expression, then mark the br instruction as part of a jump table construct.

To reverse-emulate every path that leads to the indirect call, we implemented a very limited aarch64 symbolic instruction emulator. It supports around 20 ARM instructions (all those that are common in jump table constructs, plus arithmetic instructions and a few memory-related ones). Figure 4.6 shows a very simple example of the output of this emulator (jump table constructs are often more nuanced and interleaved with other instructions).

After we get the symbolic value of the indirect jump register, we compare it to the standard jump table expression, which is the following:

base_case_addr + *(jump_table_base_addr + register_case_number * ?) << ?

The symbol ? is a wildcard for any (positive) integer value. base case addr is the address of case 0 in the jump table. jump table base addr is instead the address in memory of the jump table offsets. Lastly, register case number is a register with as value the number of the case that is going to be executed.

Finally, if the indirect call is recognized as a jump table, the last step is

determining how many cases the jump table is made of. We solved this by

backward-slicing from the instruction loading the case number (the “ ldr ”

at 0x408 in Figure 4.6) and looking for an upper-bound comparison with

a constant value on the register that holds the current case number to be

executed (w1). If the comparison is directly followed by a jump, than we

mark the jump target location as the “default” case and set the number of

(44)

4.2. Jump Tables cases of the jump table based on the constant of the comparison. Figure 4.6 shows an example of the output of our emulator when analyzing a “ br ” indirect jump.

0x3f8: cmp w1, 128

0x3fc: b.hi .default_case 0x400: adrp x0, 0x8000 0x404: add x0, x0, 3

0x408: ldrb w1, [x0, w1, uxtw]

0x40c: adr x0, 0x418

0x410: add x0, x0, w1, sxtb 2 0x414: br x0

Analyzing 0x414: br x0 x0 = x0

x0 = x0 + (w1 << 2) x0 = 0x418 + (w1 << 2)

x0 = 0x418 + (*(x0 + w1*1) << 2) x0 = 0x418 + (*(0x8003 + w1*1) << 2) Result:

Base case: 0x418

Jump table addr: 0x8003 Case number reg: w1 Number of cases: 128 Shift: 2

Listing 4.6: Above: example of a jump table pattern. Below: output of our symbolic emulator.

4.2.2 Jump Table symbolization

The symbolization of a jump table in memory is done using the assembler’s support for simple arithmetic on assembly labels. Since on ARM a jump table is a list of offsets from a base instruction, we symbolize that with differences between labels. An example of this can be seen in Figure 4.7.

Since the offsets in the symbolized version are calculated with assembly la-

bels, any amount of code can be added between cases, and the assembler

will make sure that the jump table will work correctly. This is one of the

cases where the benefits of using symbolization as a rewriting technique re-

ally shines, as it gives us the freedom of inserting arbitrary instrumentation

(45)

4.2. Jump Tables (even by hand) without having to worry about correcting references.

However, there is a catch: adding too much instrumentation could overflow the value used to store the offset from the base case. In the example in Figure 4.7, if there are more than 256 instructions between a case and the base case, the offset will overflow as it is stored in a single byte. In the next subsection we will cover how we actually support adding arbitrary amount of instrumentation.

0x8003: .byte 0 ; case 0 0x8004: .byte 0 ; case 1 0x8005: .byte 0 ; case 2 0x8006: .byte 8 ; case 3 0x8007: .byte 16 ; case 4

0x8003: .byte (.LC418 - .LC418) / 4 0x8004: .byte (.LC418 - .LC418) / 4 0x8005: .byte (.LC418 - .LC418) / 4 0x8006: .byte (.LC420 - .LC418) / 4 0x8007: .byte (.LC428 - .LC418) / 4 Listing 4.7: Left: jump table as stored in memory as found in the original binary. Right:

symbolized jump table in the output of RetroWrite-ARM.

4.2.3 Jump Table enlargement

When too much instrumentation between jump table cases is added, the value used to store the offset from the base case can overflow. To address this, we implemented support for using a larger divisor when storing assem- bly label differences. As an example, instead of storing (LC418 - .LC410) / 4 like in Figure 4.7, we can store (.LC418 - .LC410) / 8 to fit up to 512 instructions between .LC418 and .LC410. The same reasoning can be reapplied with higher powers of two.

However, using a divisor higher than 4 means losing precision in the ad-

dresses of the cases we want to represent. Since 4 bytes is the size of each

instruction, dividing by 4 means that every instruction can be targeted; di-

viding by 8 means that only one every two instructions can be targeted. To

avoid having jump table cases not targetable due to the loss of precision, we

insert nop padding before each case in order to make every case aligned and

(46)

4.3. Instrumentation (BASan) targetable, with the amount of nops depending on how high is the divisor (e.g., dividing by 8 means that each case must by 8-byte aligned, so using up to 1 nop before each case; dividing by 16 means using up to 3 nops, and so on). Since the number of nops inserted depends on alignment, we leave this task to the assembler using the “ .align ” directives.

After changing the divisor, we also need to change the indirect jump calcula- tions in the binary’s code to match the new shift value. Usually, the offset to be added is multiplied by 4 using an instruction like “ add x0, x0, w1, sxtb 2 ” (which shifts left by 2), as can be seen in Figure 4.6. We change the shift value according to how high we set the dividend in the symbolized jump table (the add instruction support shifting left up to 4, but we insert a standard “ lsl ” instruction before if it’s higher than 4).

Listing 4.8 highlights an example of this.

4.3 Instrumentation (BASan)

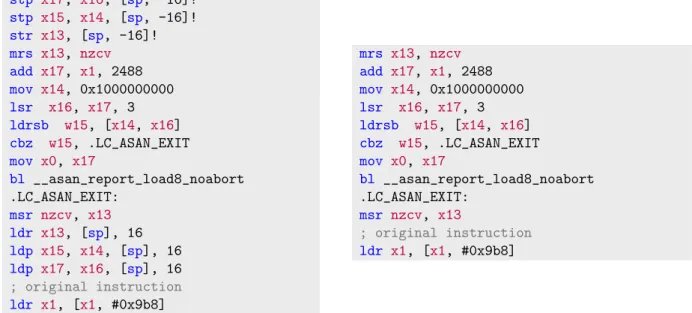
The ASan instrumentation was designed to be compatible with the Ad- dressSanitizer library provided by Google, libasan. We carefully selected shadow memory offsets and sizes to match those included in libasan. The library will hook on each call to malloc and free, writing in the shadow memory the available bytes that can be used. RetroWrite-ARM takes care of finding each access in memory and inserting instrumentation just before each access to check the relevant bytes of shadow memory and error out in case an overflow or other memory corruption was found.

Listing 4.9 shows the ASan checking algorithm in high level. To implement it

as an instrumentation pass, we manually wrote assembly code that matched

its functionality and could be adapted to both reads and stores. Different

versions of ASan snippets were developed depending on the size of the

Abbildung

Figure 3.1: Overview of the structure of RetroWrite-ARM
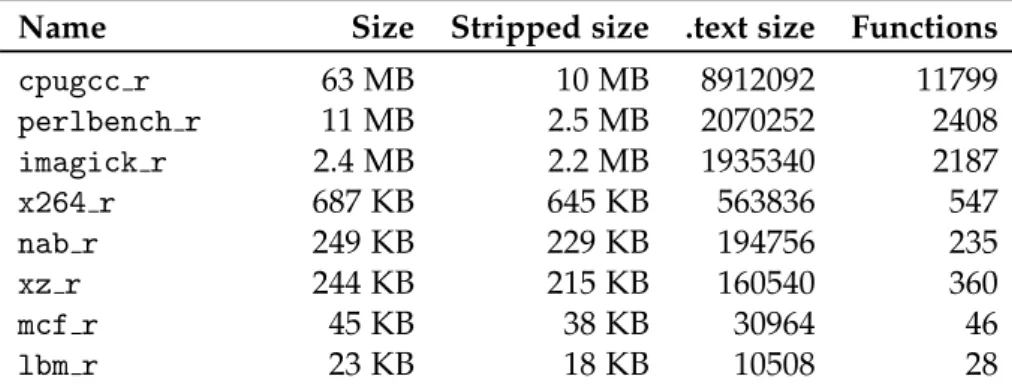
Table 5.1: Name and size of the SPEC CPU2017 benchmarks written in C.
Table 5.2: Overhead of RetroWrite-ARM on the Atlas machine without instrumentation com- com-paring the recovery of pointers by using literal pools and by using symbolized pointer building.
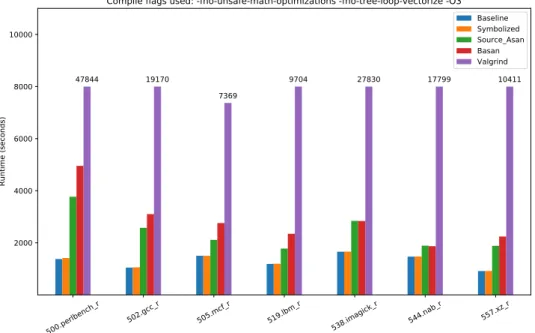
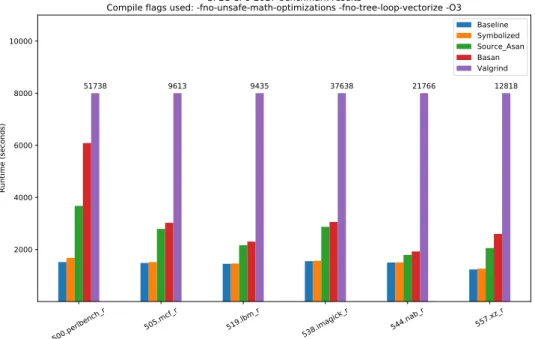
Figure 5.1: Benchmark runtime on the Atlas machine. The yaxis has been limited at 8000 for clear depiction of smaller values.
+7

Referenzen

ÄHNLICHE DOKUMENTE

c) Ich bin ursprünglich ein Mann, der dem Himmel gefügig und einem ruhigen Leben ergeben ist. Weil das Mingreich mit den Cahar und den Kalka mich allzu schwer beleidigt, kann ich

Contrary to on-farm sampling schemes, where sample size is determined before the start of the surveillance programme based on the desired confidence level (Schwermer et

This approach separates the ontology (used for query rewriting) from the rest of the data (used for query answering), and it is typical that the latter is stored in a

A set of existential rules ensuring that a finite sound and complete set of most general rewritings exists for any query is called a finite unification set (fus) [BLMS11].. Note

We then define a four step transformation: reasoning within an equivalence class are replaced by explicit equality steps in Section 4, n-ary operators are replaced by binary ones

“The  importance  of  translation  cannot  be underestimated.  It  enriches  and  broadens horizons  and  thus  enhances  our  world.  It helps  us  to 

(1994) studied finite, complete, string rewriting systems for monoids and proved that the existence of such a system presenting a monoid M implies a homotopical

Given a fixed total order on the propositional variables, a BDD can be trans- formed to an Ordered binary decision diagram (OBDD), in which the propositions along all paths occur