INTRODUCTION
Before and after photodocumentation is used in a va- riety of contexts. First and foremost, as a means of medi- colegal protection. Second, it documents the efficacy of a treatment. Photodocumentation is indispensable for stud- ies, lectures, or publications. It is also an effective marketing tool documenting the physician’s qualifications and exper- tise. Last but not least, it offers the patient insight into real- ized or expected treatment results.
1THE PHOTOGRAPHIC STANDARDS
Definition
In photography, there is a difference between under- standing the syntactic and semantic structure of a single
picture and understanding the “language” of a combina- tion of more than 1 image.
2We differentiate such combi- nations into the following classification:
I. A series of photographs deals with a theme, for exam- ple, a series about Yosemite National Park. The order of the photos is not significant and can be created by the photographer.
II. A sequence of photographs tells us a visual story.
III. A photographic timeline shows a change over time of the same subject within a fixed interval.
Medical and aesthetic photodocumentation falls into this category by demonstrating changes in body surface and/or contour in a given time frame after a medical/
aesthetic treatment or procedure.
Standards for Photographic Timelines
To create a photographic timeline, all photographic conditions should preferably remain constant to recog-
Copyright © 2017 The Authors. Published by Wolters Kluwer Health, Inc. on behalf of The American Society of Plastic Surgeons. This is an open-access article distributed under the terms of the Creative Commons Attribution-Non Commercial-No Derivatives License 4.0 (CCBY-NC-ND), where it is permissible to download and share the work provided it is properly cited. The work cannot be changed in any way or used commercially without permission from the journal.
DOI: 10.1097/GOX.0000000000001389
From the *Plastic and Reconstructive Surgery, Regensburg, Germany; †Globalhealth Academy for Aesthetic Medicine, Drensteinfurt, Germany; and ‡Dermatology and Dermatopathology, Miami and Palm Beach Gardens, Fla.
Received for publication February 9, 2017; accepted May 4, 2017.
Summary: In 1998, DiBernardo et al. published a very helpful standardization of
comparative (before and after) photographic documentation. These standards pre- vail to this day. Although most of them are useful for objective documentation of aes- thetic results, there are at least 3 reasons why an update is necessary at this time: First, DiBernardo et al. focused on the prevalent standards of medical photography at that time. From a modern perspective, these standards are antiquated and not always cor- rect. Second, silver-based analog photography has mutated into digital photography.
Digitalization offers virtually unlimited potential for image manipulation using a vast array of digital Apps and tools including, but not limited to, image editing software like Photoshop. Digitalization has given rise to new questions, particularly regarding appropriate use of editing techniques to maximize or increase objectivity. Third, we suggest changes to a very small number of their medical standards in the interest of obtaining a better or more objective documentation of aesthetic results. This article is structured into 3 sections and is intended as a new proposal for photographic and medical standards for the documentation of aesthetic interventions:
1. The photographic standards.
2. The medical standards.
3. Description of editing tools which should be used to increase objectivity. (Plast Reconstr Surg Glob Open 2017;5:e1389; doi: 10.1097/GOX.0000000000001389; Pub- lished online 17 August 2017.)
Lukas Prantl, MD*
Dirk Brandl, Dipl.-Ing.†
Patricia Ceballos, MD‡
A Proposal for Updated Standards of Photographic Documentation in Aesthetic Medicine
Disclosure: Supported by the German Research
Foundation (DFG) within the funding program Open Access Publishing. Mr. Brandl is a photography engineer and speaker of the NETWORK-Globalhealth Academy for Aesthetic Medicine, Germany. Dr. Prantl is head of the Plas- tic Surgery Department of Regensburg University, Germany.
Dr. Ceballos is a dermatologist and dermatopathologist from Miami and Palm Beach Gardens. The Article Processing Charge was paid for by the authors.
Photographic Documentation in Aesthetic Medicine Prantl et al.
XXX xxx
8
Plastic & Reconstructive Surgery-Global Open 2017
5
Special Topic
4May2017 9February2017
© 2017 The Authors. Published by Wolters Kluwer Health, Inc. on behalf of The American Society of Plastic Surgeons. All rights reserved.
17 August 2017
2017
PRS Global Open • 2017
nize changes of the subject, which has been documented.
These conditions are specified as follows: camera, distance between photographer and patient, camera perspective/
angle, background brightness and color, picture size, and lighting.
The aim of this article was not only to describe current photographic standards but also to propose optimal pa- rameters for aesthetic photodocumentation. Background color and lighting are 2 such parameters.
Camera
Let us first consider the camera. Modern digital cam- eras include a lot of software that generates an image that has already been changed by the software. Using the same camera and settings in a photographic timeline does not pose a problem. On the other hand, 2 different cameras will result in 2 different representations of the same sub- ject/reality, thereby reducing the accuracy of photodocu- mentation.
Distance between Photographer and Patient
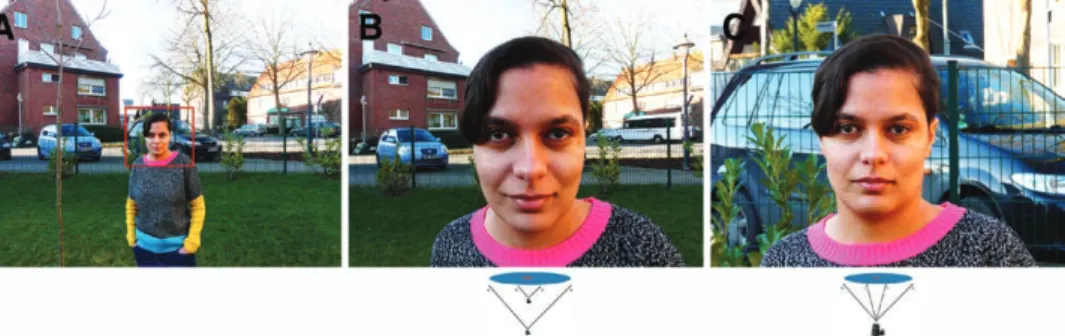
The most manipulated parameter is the distance be- tween photographer and patient. Figure 1 shows the changes in the 2-dimensional reconstruction of a 3-di- mensional reality. Observing the 2 faces (B, C) and also the background structures, one can easily recognize the distortion potential of changing distance on the final im- age. Therefore, the distance between photographer and subject should be marked and remain fixed, using the zoom feature as needed.
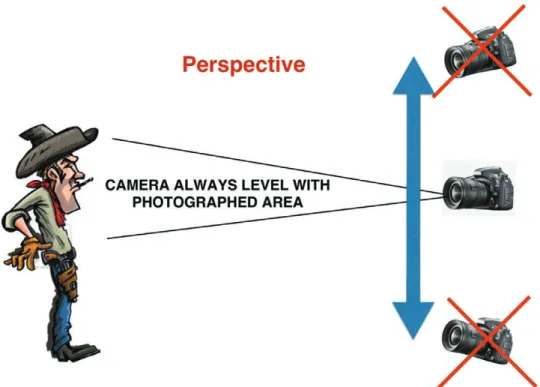
Camera Perspective/Angle
Camera perspective/angle is subject to manipulation.
A subject or patient may be photographed directly or from above or below. Changing the perspective interferes with photographic documentation.
Maintaining a fixed perspective or angle is paramount to reproducible aesthetic photodocumentation. The cam- era position must be at the same level as the subject or anatomic region. This means that the photographer has to move the camera in a vertical direction. Photograph- ing the knees means the camera must be moved down, whereas photographing the face requires an upward cam- era movement (Fig. 2).
Background Brightness and Color
Background brightness and color should remain con- stant in a photographic timeline. The distortion potential of brightness and colors
3was already demonstrated by cognitive psychology in the 1940s (Fig. 3). For medical and aesthetic photodocumentation, we recommend grey or dark blue backgrounds. Grey or dark blue backgrounds elicit natural skin tones best.
Picture Size
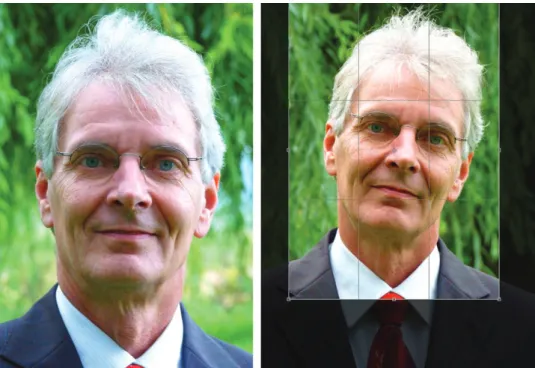
In PowerPoint presentations, you sometimes see before and after pictures in different sizes. This kind of presentation technique is inconsistent and should be avoided. The size of the 2 photographs and the size of the body area that is reproduced should be equal in both images. The only legitimate exception is a smaller size of photographs that show different steps until the final result. The same image section need not be creat- ed during the process of making the photograph. It can be adjusted afterward with Photoshop or other software (Fig. 4). The format of the photographs (square, por- trait or landscape format) should always be the same.
Lighting
Let us discuss a rather difficult subject, namely the light- ing conditions. Maintaining the exact same lighting con- ditions is only possible when outside daylight is excluded.
Because outside lighting is continuously changing, repro- ducing it is nearly impossible. This means the room has to be darkened and artificial light used. Most modern cameras have an integrated flash. Unfortunately, the quality of illumi- nation and the light direction are suboptimal using a flash.
This leads us to the best lighting conditions, which are valid for 90–95% of all motifs. Figure 5 shows our recommendation for the creation of good lighting con- ditions. Instead of 1 light source, we recommend 2, 1 to the left and 1 to the right of the camera position, arranged at a 45-degree angle and slightly above the position of the patient. Not only is the direction of the light important to avoid shadows but also diffusion of the light source causing “light softness” improves the quality of photodocumentation. A cloud diffuses the sunlight. In a room, you can use translucent and opal glasses, which are able to diffuse direct light. Instead of
Fig. 1. a, Same distance as in Fig 1c, photographed with a wide angle of the zoom as reference for the comparison. B, Demonstrates distortion of the 2D image when the distance is changed. c, Demon- strates consistent representation of the 2D image when the distance is not changed.
glass, an opal film can also be used. So called daylight light showers, used in many offices, may be purchased.
The color temperature of the artificial light sources should be daylight (5,500 Kelvin). We discourage the use of 2 flashes. Modern cameras do not need much luminous intensity, 10,000 lumen of each source being sufficient, and the camera speed should be set at 200 International Standards Organization (ISO)/American Standards Association (ASA) (ASA and ISO are origi- nally a scale for film speed, now used to describe the speed of the electronic sensor of the camera; both ISO and ASA have the same scaling).
Very rare indications require photography under dif- ferent lighting conditions. In cases where you want to show a change in the skin surface, for example, in cellulite or facial pore size, you need backlight conditions. Backlight means that your light source is in front of the camera. A frontal 180-degree angle is not useful; a 135-degree angle is recommended instead.
THE MEDICAL STANDARDS
Besides standards belonging to the photographic part, we also have to consider and standardize the medical background.
Fig. 2. The perspective can be reproduced by holding the camera in a horizontal position.
Fig. 3. The yellow color of both squares is identical although they look different because of different background colors.
PRS Global Open • 2017
Patient Preparation Face
All makeup and jewelry must be removed for all pho- tographic documentation, including the posttreatment pictures. A before and after photographic session for a sci-
entific presentation cannot be rendered otherwise! In oth- er words, pretreatment photographs without makeup and posttreatment photographs including makeup should be avoided. This does not mean that you cannot shoot a third supplemental photograph of the patient wearing makeup.
Fig. 4. adjustment of 2 different picture sections by the photoshop tool.
Fig. 5. optimal lighting arrangement.
The hair should be fixed with a clasp at the back so that the whole face is visible. If the patient wears glasses, you should always photograph with and without glasses.
Any and all clothing concealing portions of the head and neck such as hats or scarves should be removed.
Body
Photographing the body mandates a decision regard- ing inclusion of undergarments in the pictures. Under optimal circumstances, the patient would agree to being photographed without undergarments. However, this is not always possible and, in certain cultures, strictly forbidden. If undergarments are included, they should be black and as inconspicuous as possible. It is recom- mended that the doctor’s office stock disposable under- garments for this purpose. The minimum requirement to ensure consistent photodocumentation is that the pa- tient wears the same undergarments of his or her choos- ing in all photographs.
Anatomic Landmarks
The 1998 standards of DiBernardo et al.
1are very clear and still correct. Whatever you try to treat has to be docu- mented, and a beholder of the pictures must be able to recognize the anatomic part. If the photographed section is too small, one cannot recognize the anatomic part; con- versely, if the photographed area is too broad, one cannot appreciate any changes. The adjacent anatomic regions have to be included in the photograph, not as a whole, but partly. They serve as anatomic landmarks or reference points. Treating the orbicular part of the face means that the nose and forehead have to be present in the picture.
If a breast augmentation is planned, the breasts are your motif and you need to include clavicles, shoulders, arms, and upper abdomen. The upper legs should include the knees and the lower abdomen.
Different Views of the Patient
Depending on the anatomic region, you may have to shoot more than 1 picture. For facial documentations, you need 3–5 different views as shown in Figure 6. The chest area also requires between 3 and 5 pictures. Even more views are needed when documenting treatment of the hip area. The greatest recommended number of images, that is, 8, can be seen in Figure 7. In general, we can state that during the session the patient has to move both face and body together in a circular movement.
Head Tilt
Without using a stand to fix the position of the face, it is not possible to reproduce the same position without us-
ing a reference line. The Frankfurt line (horizontal line be- tween the corner of the mouth and the earlobe) has been used as a reference line for decades. In our opinion, this line moves the face too far upward. A realistic documen- tation of submental fat is not possible using the Frankfurt line. Therefore, we propose the use of another reference line, which we have called the Network line,
4as it is rec- ommended by the members of the NETWORK-Lipolysis organization (Fig. 8) who have documented many patients with submental fat problems. A stand to fix the position is not the best choice, as this aid can be seen in the picture and a double chin cannot be documented. A virtual refer- ence line cannot be seen and helps to fix the position in the same manner.
Posture
Even small changes in posture may alter the documen- tation of treatment results. The photodocumentation of a fat reduction of the abdomen (e.g., by liposuction, cryo- lipolysis, or injection lipolysis) can be affected by the pa- tient’s breathing alone! The body position should always be upright and the patient should exhale before the pho- tograph is taken.
Facial Expression
Facial expression should always be neutral. A neu- tral expression before treatment followed by a smiling expression after treatment or vice versa is not recom- mended.
Before treatment with botulinum toxin A, a number of photographs with different expressions including smil- ing and frowning can be helpful in identifying the correct injection points.
EDITING TOOLS
Editing software developed during the process of digi- talized photography can greatly enhance the quality of photographs. The faces we see on the front cover pages of fashion magazines show only virtual faces, modified by fil- ters, retouch, and morphing tools. Nevertheless, software such as Photoshop or Affinity can help us in contrary to increase objectivity.
In 1998, when DiBernardo et al.
1published their ar- ticle, the normal kind of photodocumentation was black and white film (B/W). B/W pictures are sometimes still appropriate, particularly when documenting changes in contour. Any photographic software can easily perform a transformation from color to B/W.
As previously mentioned in the photographic stan- dards, in the section “Posture,” the editing of the exact sec-
Fig. 6. Different positions of the patient for facial documentation.
PRS Global Open • 2017
tion of 2 different photographs made at the same distance from the patient can be performed on a computer (Fig. 4).
The conditions of a photographic shoot are never identi- cal (light, speed, automatic setting, and so on), and some- times even the complexion of a patient will have changed after a holiday at the beach. Therefore, it is advisable to bring the 2 sets of pictures into “alignment” in terms of brightness, color, and contrast. These are editing tools that can and should be used because they increase objec- tivity (Table 1). If the change in complexion, for example, through mesotherapy treatment or peeling, is the purpose of the documentation, adjustment of the skin color should not take place. In case the pictures are used for marketing purposes to present treatment results to other patients, it is often necessary to mask, for example, the eye region of the face with a black bar to respect the anonymity of the patient.
The use of filters (except sharpening filters in case of haziness) and retouching and morphing tools are to be strictly avoided.
DISCUSSION
Before and after pictures of medical or aesthetic interventions should give the best (most objective and unbiased) impression of the results to an inde- pendent observer. To accomplish this goal, the clinic or office team (all members of the staff involved in photodocumentation) has to be trained in the photo- graphic and medical standards for producing compa- rable photographs, that is, meaningful documentation of treatment results compared with the clinical situa- tion preceding the intervention. “Adjustments” which compensate for variable photographic conditions are permitted and should always be conducted through the use of editing software for section, color, bright- ness, and contrast.
Although today some companies (Canfield; Quantifi- care, Canada; Fotofinder, Germany) have developed new automatic units for 3D and 2D photodocumentation, thorough knowledge of the basic photographic stan-
Table 1. ToolsTool Usable Not Usable
Section X
Sharpness (X)
Intensity X
Contrast X
Brightness X
Morphing X
Color fog X
Retouching X
Filter X
Masking X
Fig. 7. Maximum number of patient positions.
Fig. 8. NeTWoRK line.
dards is essential. The above-referenced units require an investment of 10,000–50,000 U.S. dollars. Such an invest- ment might be acceptable for bigger clinics but would be onerous for an office of average size. At the moment, those types of units are perfect for producing objective measurements of fine changes in volume, elasticity, or pore size. These kinds of measurements are fantastic for evidence-based studies, but do we need them for the pre- sentation of treatment results? Another problem of those soft- and hardware combination units is the aesthetic presentation/layout. The picture of the patient has to be extracted from the background and then a black 2D background is added. This kind of montage technique always produces pictures that look surreal. If the pho- tographs are intended for marketing and advertising purposes, the artistic and aesthetic aspects of the images should also be considered.
Lukas Prantl, MD, PhD Center of Plastic-, Hand- and Reconstructive Surgery University of Regensburg Franz-Josef-Strauß-Allee 11 Regensburg, Germany - 93042 E-mail: lukas.prantl@klinik.uni-regensburg.de
REFERENCES
1. DiBernardo BE, Adams RL, Krause J, et al. Photographic stan- dards in plastic surgery. Plast Reconstr Surg. 1998;102:559–568.
2. Schrader V. Die Grenzen des Mediums, unpublished manu- script, 1983.
3. Arnheim R. Art and Visual Perception: A Psychology of the Creative Eye. Los Angeles: University Press Group Ltd; 2004. ISBN-10:
0520243838, ISBN-13: 978-0520243835.
4. Brandl D. Fotodokumentation in der ästhetischen Medizin und Dermatologie. Drensteinfurt: Lichtblick GmbH, ed. 2015. Apple iBook Store.