Frankfurt University of Applied Sciences
Cloud Computing
AZURE DevOps
Under the guidance of:
Prof. Christian Braun
Submitted by:
Obayomi Dolapo Anthony - 1294064 Gaurav Kapadiya -1319237 Julius Komla Duphey - 1327753
Divya Athyala - 1272659
1
TABLE OF CONTENTS
I. Introduction . . . . iv
II. SERVICES OF AZURE DEVOPS. . . . v
2.1 Azure Repos . . . . v
2.2 Azure Pipelines . . . . vi
2.3 Create Build Pipelines . . . . vi
2.4 Deploying Applications with Azure DevOps . . . . vii
III. DEPLOYING AZURE KUBERNETES WEB SERVICE . . viii
3.1 Requirements and Process . . . . viii
3.2 Running the Web App locally on Windows . . . . ix
3.3 Dockerizing the Web App . . . . x
3.3.1 Running the Web App on a Docker Container Locally x 3.4 Pushing the image to azure container registry . . . . xi
3.4.1 Requirements and Process . . . . xii
3.5 Creating and Deploying the Kubernetes Cluster . . . . xiv
3.6 Deploying the Web App to the AKS Cluster . . . . xv
IV. DEPLOYING APPLICATION TO AZURE APP SERVICE xvii 4.1 Prerequisites and Process . . . . xvii
4.1.1 Testing the Deployed App . . . . xviii
V. DEPLOYING AN APPLICATION TO VM-DEPLOYMENT GROUP . . . . xix
5.1 Prerequisites and Process . . . . xix
5.1.1 Test Deployment . . . . xx
VI. DEPLOYING AN APPLICATION TO VIRTUAL MACHINE SCALE SET . . . . xxi
i
6.1 Prerequisites to deploy on VMSS . . . . xxi
6.2 Process . . . . xxi
6.2.1 Creation of Custom VM Image . . . . xxii
6.2.2 Test Deployment . . . . xxii
VII. DEPLOYING AZURE DOCKER WEB SERVICE . . . . xxiii
7.1 Requirements and Process . . . . xxiv
7.2 Setting a service connection from the YAML files . . . . xxv
VIII. FUTURE WORKS . . . . xxix
IX. CONCLUSION. . . . xxx
REFERENCES . . . . xxx
ii
List of Figures
3.1 Deployments on Local host . . . . x
3.2 Dockerizing the Web App . . . . xii
7.1 Mapped image detached to the local host . . . . xxv
7.2 The service connection wizard . . . . xxvi
7.3 Deployment Token . . . . xxvi
7.4 Container Image . . . . xxvii
7.5 Deployment of Web Service . . . . xxviii
7.6 Containerised Web Service . . . . xxviii
iii
Chapter I
Introduction
The demand to operationalize IT infrastructure to scale up and deliver applications and other related services at high velocity has been an essential drive in the Tech industry. DevOps and cloud computing or other relevant Cloud services are much more efficient in addressing complications that usually arise during one phase of the Service Life Cycle to the other.
Our team focused on Azure DevOps as the cloud service of our choice. We utilized the features of Virtual Machines prior for our services to run on different operating sys- tems, We also used Azure DevOps Software As A Service (SAAS) and the deployment component it offers such as repository which serve as an application directory.
We also made use of Github as our versioning control system, where we personalized our application; and also using the command line, we were able to containerized our application with Docker and Kubernetes then proceeded in pushing our various application to Azure DevOps and loaded it into Azure DevOps Repository and Azure Container Registry for further Pre-production.
Finally, before our application was deployed to the cloud was our release pipelines performing various test to ensure if our application meets all requirements. After a few steps to confirm these processes by pipeline a build report was generated to confirm that our application is ready for deployment.
iv
Chapter II
SERVICES OF AZURE DEVOPS
2.1 Azure Repos
Azure Repos is a version control service that can be used to manage the code in your project. This helps you for tracking changes and creating updated versions in the project code. Every time the implementation is edited, this version control takes snapshots of the files and saves them permanently. It helps to save your work and maintain the consistency across the teams in code coordination. It keeps the history of development while bugs are being fixed and new features are being added and it also helps in the rollback option to get back to any previous version of your implementation[1]. Azure Repos has support for two types of version control
• Team Foundation Version Control (TFVC): centralized version control
• Git: Distributed version control
Git Repository in Azure Repos is a standard one . You can use any clients and tools of your choice, such as Git for Windows, Mac, Visual Studio and Visual Studio Code. Connect to any of the development environments IntelliJ, Visual Studio or even Command Line. Review the code with pull requests,Usage of forks for code isolation etc can be performed.
TFVC is a centralized version control system. Team members have one version of each code file on the development machines And all the previous data is maintained
v
on the server. Path based branches are created on the server. Creating a project, Workspace configuration, Code reviews etc are the services offered by this feature.
Any of the client IDE’s can be used for this.
2.2 Azure Pipelines
This service builds, tests and deploy the projects and shares them across different ecosystems. This has a feature of continuous integration (CI) and continuous delivery (CD) which helps to constantly build and deploy code to any target [2]. Azure pipelines support the following scenarios:
• It can work with any platform or language.
• Deployment is possible to any kind of target parallel.
• Azure Deployment Integration is possible.
• Build possible on windows, Linux, MAC
• Integration with GitHub and possible to work with open projects.
2.3 Create Build Pipelines
In creating a build component the following are a perquisite to follow:
• Git or any other repository where your code stands
• An Azure DevOps organization Process:
• Open a Project in Azure DevOps organization
• Select New Pipeline and follow steps on wizard to find the code from Github.
vi
• Select the repository and continue.
• Approve and Install on your selected repository.
.
We have used a .NET Apps for our project so the below process is performed ac- cordingly. Select Configure and ASP.Net Core or any other according to the type of application. In the new pipeline, add the task in the YAML file that appears , according to your jobs in the pipeline. Select Save and run to run your file. Once you add jobs to your YAML configuration, It creates a pipeline with your project code.
Build Pipeline is successfully completed when you see all the jobs are complete in your project code.
2.4 Deploying Applications with Azure DevOps
Azure DevOps enables you to deploy any application to any other cloud services or on any platform. In our project we were able to deploy applications to different ser- vices like Azure App service, Virtual Machine , Azure Web Apps. Azure Kubernetes Service, Stand alone Kubernetes service, Docker Container service.
vii
Chapter III
DEPLOYING AZURE KUBERNETES WEB SERVICE
In research into how kubernetes as formed an integral part in web development and majorly containerizing most app by running small micro-service and make software development easy, we have research into how well this can be deployed to various applications and also given detailed step-by-step ways to deploy Azure kubernetes to an application of any written language[7].
3.1 Requirements and Process
For the purpose of this demonstration, we would be using an already created ASP.net project on Github https://github.com/DolapoOba/dotnet-docker.git [6]To run this project, few things needs to be installed on the local machine
• Netcore 5.0 SDK
• Netcore 5.0 CLI
• .Net Framework
• Powershell or any administrative command line tool
viii
3.2 Running the Web App locally on Windows
1. First, We clone or download the app from github. Using the Powershell [6]
• git clone https://github.com/DolapoOba/dotnet-docker.git
2. Navigate to the cloned or downloaded folder at on Powershell
• /dotnet-docker/samples/aspnetapp/aspnetapp
3. To finally run the app locally on the localhost run
• dotnet run
4. To view the web app go to your browser and type the url
• http://localhost:5000
5. To cancel navigate back to the Powershell and type CTRL+C to stop the Web services
In the picture above, the web app essentially carries out 3 major task
• It shows if the current app has been containerized i.e on Docker or Kubernetes
• Its show the amount of CPU cores running on the local machine
• And memories used and also available to run other processes
In the above demonstration, we can annotate that the app is currently stating that the present application is not running on any container for other users to access it externally. To do this we need to dockerised the application and build an image where we would use the docker commands to run the ASP.net services in a container.
ix
Figure 3.1: Deployments on Local host
3.3 Dockerizing the Web App
The following process needs some requirements to successfully achieve these tasks.
• Docker Desktop: This has to be installed on the computer and also would be needed for later purpose. Docker Desktop provides also a standalone Kubernetes Single node which after generating the image of the Web app would also deploy Kubernetes to it and finally Azure Kubernetes Service also
• Powershell
3.3.1 Running the Web App on a Docker Container Locally
1. First we need run Powershell and navigate to the cloned or downloaded folder at on
• /dotnet-docker/samples/aspnetapp/
2. Inside this folder, we can see the dockerfile which contains the information and instructions on how our application should be running in the container from which
x
we would generate the image of the web app from. To know if we have this type in the directory on the Powershell
• LS Dockerfile
3. Thereafter, inside the same directory we can build the image of the dockerfile.
The below command means we are building the image asp netapp01 in our locally installed docker desktop which has to be running to build the image
• Docker build . -t aspnetapp01:local
4. To verify the build process the docker hub should the view that the local image aspnetapp01 has been built.
5. Finally, to view the web app that was built and we need to expose it to a local port thereafter tagging it to the aspnetapp running on docker. In this process we are going to create a container for the image to run locally.
• Docker run -d -p aspnetap01:local
The image created in the local is now containerized in an auto generated name while building and it’s exposed to the port 80.
6. To confirm if we have successfully deployed docker, to our web app Navigate to any browser installed on the systems and type
• http://localhost:5000
The web app automatically detects a deployed container on the application which in the case is the docker running on a WSL Linux OS on the local host.
3.4 Pushing the image to azure container registry
For the web application to be shared to other people and also accessed on other devices an external load balancing container has to be created [7].
xi
Figure 3.2: Dockerizing the Web App 3.4.1 Requirements and Process
• Installed Azure CLI
• Azure subscription account
• Powershell
1. First, Access login to an azure account from the CLI is required to authenticate details from the built image of the application. To carry this task out a redirection to the Azure service account is required from the Powershell
• az login
A subscribed account details is shown with Name, tenant Id, state of which the account is and also tagged Id to the account.
2. All azure resources reside in an azure resource group. Groups are create to form an alliance with other components in the services to be created. Creating groups
• az group create -n aspnetapp01 -l () australiaeast
xii
For this project the name aspnetapp01 was create and then given a location Australia east.
3. To containerise the web app, We need to create Azure Container Registry (ACR).
ACR allows the storage and managment of images for all types of container deploy- ments. In order to achieve this we need the name of the registry, the resource group we have created and the SKU. The SKU is containing the storage area of the registry, the maximum layer size, read and write operation and bandwidth. Also we have 4 types of SKU: Basic, Standard and Premium and the difference is majorly the storage capacity of the container varying from 10Gb, 100Gb, 500Gb respectively [8].
• az acr create -n aspnetapp01acr -g aspnetapp01 australiaeast - -sku standard
To verify the ACR creation for our application aspnetapp01,
• az acr list -o table
4. Now to push the image built to the ACR, Access is needed to login into the Azure Container registry and to do this we use command below. Also prequisite to give access is, a docker deamon running on the system and this case the docker hub we installed
• az acr login -n aspnetapp01acr
5. Before implementing the pushing of the image to the registry, there is a need to tag our local image on our local host to the login server name of the container registry.
To view the login server name we create for the ACR, we use the command below then and copy the login server which would use later to tag the image and also to view the docker image list on our local machine we use the ¡docker image list¿ [9]
• az acr list -o table
xiii
6.Thereafter, the tagging of the local image with the login server created with com- mand below with aspnetapp01acr.azurecr.io/aspnetapp01:v1
• docker tag aspnetapp:local aspnetapp01acr.azurecr.io/aspnetapp01:v1
and then view the docker images on the system
• docker image list
Successfully tagging the local image to the login server gives both same image ID 7. Finally, the push command can be initiated with tagged docker image to the ACR with
• docker push aspnetapp01acr.azurecr.io/aspnetapp01:v1
3.5 Creating and Deploying the Kubernetes Cluster
We can do this by creating a kubernetes cluster and then use the locally built image on the created registry and create an identity of the app which is called the azure service principal containing all the login details and call functions of the container after registrations. To create a service principal
• az ad sp create-for-rbac - -skip-assignment
Save the appId, password and tenant Id and assign roles to the service
• az role assignment create –assignee the appid - -role Reader
• az role assignment delete –assignee the appid - -role Contributor To view the role
xiv
• az role assignment list
Then create the cluster with the AppId and password connected to the service prin- cipal
• az aks create –name aspnetapp01cluster - -resource-group aspnetapp01 - -node- count 1 –generate-ssh-keys service-principal the appid –client-secret password
This takes some time to create and then we grab our Azure kubernetes cluster cre- dentials to verify we are connected to our AKS cluster
• az role get-credentials - - name aspnetappcluster - -resource-group aspnetapp01
To view the cluster
• kubectl get nodes
3.6 Deploying the Web App to the AKS Cluster
For us to push our application to the AKS cluster we need to make some changes in the YAML file that we used to build the image of the web app before we deploy.
Same also applies to this process of deploying the application to the cluster created.
In attempting to do this we navigate to the dotnet-docker file and open the aspne- tappdeploy.yml file. In edit this file we formerly was using the local image to deploy the app but because we are trying to connect to the external cluster we revert to the image of the single node azure kubernetes service cluster service which is the asp- netapp01acr.azurecr.io/aspnetapp01:v1 In this command we make sure we give the current image name and tag which is aspnetapp01 and with tag v1. Also changes in the service type have to be made from nodeport port to load balancer in the case of external requests to hit our app.
Finally, we can finally deploy the application to the cluster using xv
• kubectl apply -f (the name of the YAML file )
use
• kubectl get service - - watch
view the service that is currently running on kubernetes.
Finally, we can see the application running on the container under kubernetes service and then we can see the external IP to which to connect and view our app once again anywhere.
• http://20.53.11.6
xvi
Chapter IV
DEPLOYING APPLICATION TO AZURE APP SERVICE
A basic continuous pipeline has to process a stage or a deployment phase. A stage is made up of jobs. A job is a series of steps that defines how to build, test, or deploy your software.
4.1 Prerequisites and Process
• Microsoft Azure Subscription
• Azure DevOps pipeline
You need to select a production environment where the users access your application.
In this case its Azure App service. Your CI build pipeline created above handover the artifacts to the release pipeline and then deploy the application to Azure.
• Go to Release in pipeline – Create new Pipeline
• Select Azure App Deployment Template and Apply.
• Select Addto attach your build artifacts.
• Choose Continuous deployment icon in the Artifacts section, check that the continuous deployment trigger is enabled, and add a filter to include the master branch.
xvii
• Open thetasksand add stage of your deployment and enter the Azure subscrip- tion and App Service name and create release.
• Open the YAML file and add the jobs for the deployment along with the Azure App service connection and subscription with selected environment.
• Make sure the agent output is successful to see if the deployment is completed.
• You can automate the trigger by selecting time and schedule for your deploy- ment for next versions.
• If the option is to automated release trigger for different versions, Schedule the release and check for the Agent Job to be successful and release triggers accordingly. Below are the release pipelines for our deployment.
4.1.1 Testing the Deployed App
• Login to Azure portal - Select theAzure App service
• Open theResource Applist and check for the deployed service if it’s successfully added.
• Test Link: http://svstestapp.azurewebsites.net
xviii
Chapter V
DEPLOYING AN APPLICATION TO VM-DEPLOYMENT GROUP
Azure DevOps provides service to deploy an application to any Virtual machine of Windows or Linux
5.1 Prerequisites and Process
• Virtual Machine (Linux, windows)
• Powershell or Azure CLI interface for registration token with administrative rights on machine.
• Azure DevOps organization
1. Go toEnvironmentAddnew EnvironmentSelectVM OSand Provide Environment name and basic details.
2. Go to Deployment Group and click on Create new deployment group with envi- ronment created
3. Create Service connection to the Virtual Machine by registering it with Azure DevOps in administration mode by using the personal token in the deployment pool.
4. Run in Powershell CLI to register the access token.
5. A directory is created on the main drive of a virtual machine as an agent once you are successful in registering the environment.
xix
6. Answer the security setting for extracting zip files and System administration authority.
7. It shows successful registration and that the service is started once it’s successful.
8. Go toAzure DevOps– Go to Release Pipeline– AddTasks- - Remove the default agent job.
9. Add Deployment group job by filtering it in the search and add related tasks for installation. In this project .zip files need to be extracted and transformed and an installation command has to be given in the command prompt after extraction and save all the jobs.
6. It shows successful registration and that the service is started once it’s successful.
9. Go toRelease pipelineand create it based on the deployment group created above in the previous deployment process.
5.1.1 Test Deployment
1. Go to the virtual machine and check the folder of azure agent created. Deployed app should be successfully installed. Call the service using the domain name of the virtual machine
• Example: http://LPA-H-NB-118/SvsTestAppService
2. If a virtual machine is registered in Azure portal, trigger the service from the resource list.
xx
Chapter VI
DEPLOYING AN APPLICATION TO VIRTUAL MACHINE SCALE SET
A Virtual Machine scale set is used to deploy applications and auto-scale Virtual Machines.For this VM’s are in a scale set. You can manage the scale set on Azure Portal [9].
6.1 Prerequisites to deploy on VMSS
• Azure Subscription account
• Azure Devops organization with ‘Azure VM Image Builder DevOps task’ in- stalled in the organization. This is useful to convert all the build artifacts of the application into a VM image, that can be installed and able to configure the application
• Powershell ISE or CLI
6.2 Process
• Create a build pipeline for the application from Git or TFVC repository.
• Customize the pipeline YAML file according to the project and add the artifacts and publish them to inject them into a VM image.
xxi
6.2.1 Creation of Custom VM Image
For this you need to create a resource group, storage account and an image gallery.
You can use Powershell command line or Azure CLI for this purpose. In our project, we have opted for Powershell ISE. Below is the link to the PS1 script with all the required commands for creating resource group storage accounts and load balancing etc.
• https://github.com/DivyaAthyala/PowershellVMSS
1 Create a resource group
2. Create a storage account and image gallery to create the machine image definition and create load-balancer. You can create it on azure portal as well.Below are the Powershell commands that we used to create them.
3. After creation of resource groups and storage accounts, create a custom Machine image by adding an Image builder task to the configuration YAML files.
4. Run the pipeline to create the image. Go to azure portal where VMSS is created and check the overview of the image.
4. Add deploy task to the virtual machine scale set to your YAML configuration.
5. Set up release deployment schedule and trigger the deployment in Azure DevOps, as we have done for other app services.
6.2.2 Test Deployment
The Powershell command gives the public IP address after the run is successful and application is deployed.With the address, you can access the Application on the web.
Here ‘demo-vmss’ is the resource group name. Use the public IP address to access the website
xxii
Chapter VII
DEPLOYING AZURE DOCKER WEB SERVICE
Docker is container management software container, images, volumes. Docker image contains blueprints, instructions of maintaining and building a container (It has mul- tiple stages). A container is a running stance of docker image, in short when your blueprint is run it is a container. The benefits are simplicity, collaboration, flexibility, totality. The aim to the part of this project was deploying a web service and hosting on Azure Cloud, the steps below shows the step-by-step process taken to achieve this objective.
First of all, Install docker, For Windows OS the use/install a virtual machine respected by your local machine and install Linux subsystem. Thereafter, to install docker on Linux and can run all the commands through the terminal. Furthermore, Using the CLI to clone and pull the web service. If the OS is MAC, then installation of Docker Xdesktop is sufficient and can run all the commands through the terminal, on the command line to also pull the resources of the web service.
In this task, A web app was personalized to suit requirements. Also, Docker Container was built using Ubuntu CLI and the container was mapped with a port on our local machines for DNS compliance. The Webservice was then migrated to Azure DevOps Repos for which a YAML file was created to set the service connection from Azure DevOps to Azure Portal. An Azure subscription was added to the connection for the app to be hosted. On the Azure portal a Resource group was created, in the resource group consisting of four components necessary for the web service hosting,
xxiii
which include, Application insights, App service plan Container Registry and App service
7.1 Requirements and Process
• Installed Docker Desktop Application
• For Windows OS, Installed Virtual Machine with respect to your local machine and Installed Linux subsystem
• For MAC, Install docker desktop directly
• Account with cloud Service (portal.azure.com)
1. Considering the ASP.Net Web application, CLI of Ubuntu with Docker installed for containerizing the images on local machine. the below command shows the current version installed to run Docker services
• docker - -version
2. To clone a repository, the following command shows a github ASP.net web service cloned on to the local machine. Using the command git clone [3]
• git clone https://github.com/Jduphey/aspnet-core-docker-demo.git
3. Thereafter, a container was built with the help of a created docker file which was initiated. Web service of the applications will be placed in the container to help in continuous integration and continuous delivery. To access the docker file, navigate to the dockerfile in the cloned or downloaded project
• docker build -t mikepf.azurecr.io/node-docker-demo
4. Displaying current running containers on the local machines requires and the built images
xxiv
• docker images
The image of the container built and has a tags it to an ID, this ID helps us to perform certain operations on the container such as renaming the container, stopping or starting or removing the container
5. Mapping the image built to the local host docker container
Figure 7.1: Mapped image detached to the local host
• docker run -d -p 8080:300/ (container path)
The above image is been mapped to port 8080 attached to run on a local host to enhance DNS communication with our local platform.
7.2 Setting a service connection from the YAML files
YAML (a recursive acronym for ”YAML Ain’t Markup Language”) is a human- readable data-serialization language. It is commonly used for configuration files and in applications where data is being stored or transmitted. YAML targets many of the same communications applications as Extensible Markup Language (XML) but has a minimal syntax which intentionally differs from SGML.To set a service connection in Azure DevOps, a subscription key is required to enable our pipeline to communicate externally to our web service on the Azure Client Server. The subscription key was named ‘AzureSC’ in the YAML file above. Navigate to the project folder and source for ’azure-piplines.yml’ and edit with any compiler
• In the Cloud Console, go to the Create service account key page.
• From the Service account list, select new service account.
xxv
• The Service account list, select new service account.
• Click Create. A note appears, warning that this service account has no role.
• Click Create without role. A JSON file that contains your key downloads to your computer.
Figure 7.2: The service connection wizard
A deployment token was auto generated from a Powershell CLI. This token is needed for the application to be on the cloud as an ID.
Figure 7.3: Deployment Token
The pipeline session created was responsible for continuous integration and delivery of the application.
xxvi
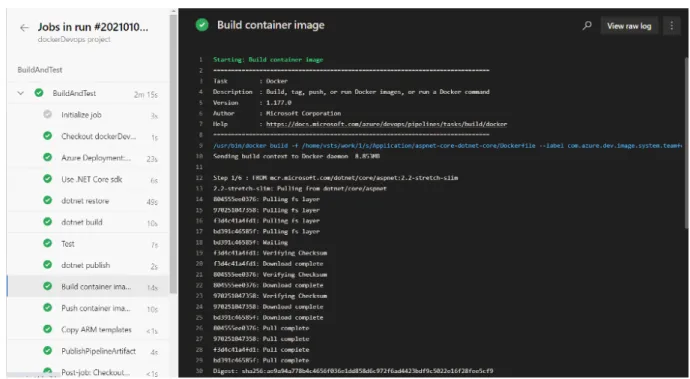
Figure 7.4: Container Image
After verifying the accuracy of the service connection, values being able to communi- cate with the service key set in the YAML file a connection was well established and our web service.
The web service Container image is created and all build stages was initiated and deployed externally on Azure cloud portal. Deployment of web service was completed on DevOps.
The figure above is created a container registry created with details which include resource group name ,subscription type, login server and creation date [4].These com- ponents are unique identities that make monitoring of the container and creating new versions of the web service easier.
To access the Web service hosted in the cloud of Azure
• https://cswebappdocker009.azurewebsites.net
xxvii
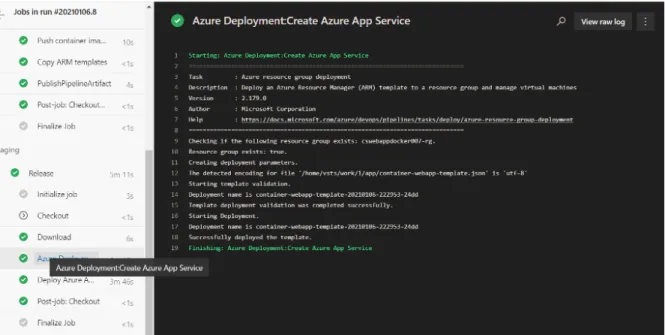
Figure 7.5: Deployment of Web Service
Figure 7.6: Containerised Web Service
xxviii
Chapter VIII
FUTURE WORKS
In deployment of the web app, few challenges were faced and mostly in scaling the pods from a single node which is a worker node to a 3 node kubernetes cluster. All focusing on how we can update our application and re-push the image to the container.
Generally, more research has to go into the monitoring and retesting of the deployment and in constant resolution to kill all files and configuration up and running while also letting kubernetes contain a service connection to which more of our deployment is secured.
In light of this, Azure DevOps also plays a formidable role in our continuous inte- gration and deployment into an external container and more research as to which we can deploy has to be looked into.
xxix
Chapter IX
CONCLUSION
In this project we have worked on services provided by Azure Devops . Our main focus is to utilize this SaaS platform to deploy applications in different environments.
For this we have chosen environments including App Services, Docker, Kubernetes cluster, Virtual Machines to demonstrate the deployment.We have used a free version to perform these tasks.
This Report starts with a brief understanding of features of Azure Devops following with a complete set of instructions to perform deployment of applications on different cloud services and environments. We found Azure Devops to be very efficient in terms of source control integration, CI/CD, YAML backend, tracking of various tasks. One major issue that we experienced during this project is its limited documentation, as it has an existing paid version with more extended services. For small and open source projects, there are some limitations with the free subscription. Although, if this is opted for an organization with fully paid resources and support, then this would be really helpful for DevOps tasks.
xxx
REFERENCES
[1] Microsoft Services ”Azure devOps documentations by Microsoft services”
“https://docs.microsoft.com/en-us/azure/devops/?view=azure-devops” , [Ac- cessed on November, 2020].
[2] Microsoft Services ”Deployment of web app by Microsoft services”, https://docs.microsoft.com/en-us/azure/devops/pipelines/apps/cd/deploy- linuxvm-deploygroups?view=azure-devopsviewFallbackFrom=vststabs=java [Accessed on December, 2020]
[3] Github Repository”Azure Webapp”, https://github.com/Jduphey/AzureWebApp [Created in December, 2020]
[4] Azure Portal ”Azure DevOps Project on Docker”,
https://dev.azure.com/jkdupheyApp [Created in November, 2020]
[5] Github Repository ”Deploying Applications on Virtual Machines scale set”, https://github.com/DivyaAthyala/PowershellVMSS [Created in January, 2021]
[6] Github Repository ”Deploying Azure Kubernetes Services”, https://github.com/DolapoOba/dotnet-docker.git [Created in January, 2021]
[7] M. Nair ”Azure Kubernetes Service: The Big Picture”, Pluralsight https://app.pluralsight.com/library/courses/azure-container-service-big-
picture/table-of-contents [Accessed in January, 2021]
[8] M. D. Vries ”Deploying ASP.NET Core Microservices Using Kubernetes and AKS”, Pluralsight https://app.pluralsight.com/library/courses/deploying- asp-dot-net-core-microservices-kubernetes-aks/table-of-contents [Accessed in Jan- uary, 2021]
[9] A. Nocentino ”Provisioning Microsoft Azure Virtual Machines”, Pluralsight https://app.pluralsight.com/library/courses/microsoft-azure-virtual-machines- provisioning/table-of-contents [Accessed in January, 2021]
xxxi