Frankfurt University of Applied Sciences
Semester Project (Cloud Computing)
WS 2020/21
Edge-Computing Framework (EdgeX)
Referent: Prof. Dr. Christian Baun
Submitted by: Jan Wagner (1290974)
jan.wagner2@stud.fra-uas.de
Daniel Helmer (1101678)
helmer@stud.fra-uas.de
Dominic Gibietz (1100239)
gibietz@stud.fra-uas.de
Date of submission: 22
ndJan, 2021
Contents
1 Introduction 1
2 Foundation 1
2.1 EdgeX and the Internet of Things . . . . 1
2.2 EdgeX Foundation Services . . . . 2
2.2.1 Core Services Layer . . . . 3
2.2.2 Supporting Services Layer . . . . 3
2.2.3 Application Services Layer . . . . 4
2.2.4 Device Services Layer . . . . 4
2.2.5 Additional useful services . . . . 4
3 Implementation 5 3.1 Use case and system architecture . . . . 5
3.2 Implementation on a Virtual Machine . . . . 7
3.2.1 Installation of Docker and docker-compose . . . . 7
3.2.2 Installation of EdgeX . . . . 7
3.2.3 Running EdgeX . . . . 8
3.3 Implementation on Raspberry Pi . . . . 10
3.3.1 Installing Raspberry Pi Operating System(OS) . . . . 10
3.3.2 Implementation of Raspberry-Node . . . . 12
3.3.3 Implementation of Raspberry-EdgeX gateway . . . . 14
3.4 Creating of devices and variables . . . . 16
3.4.1 Creating the Device Profile . . . . 16
3.4.2 Creating the variables . . . . 16
3.4.3 Look up stored devices and other data . . . . 18
3.5 Export EdgeX Foundry data . . . . 19
3.5.1 Creation of a Kuiper data source . . . . 20
3.5.2 Creation of Kuiper rules . . . . 20
3.6 Amazon Web Services . . . . 22
3.6.1 AWS DynamoDB . . . . 23
3.6.2 AWS Lambda implementation . . . . 24
3.6.3 AWS Gateway API implementation . . . . 28
References 32 A Appendix 36 A.1 Code for Raspberry-Node . . . . 36
A.2 Code for Raspberry EdgeX Bash file . . . . 38
A.3 Code for Raspberry Profile . . . . 40
A.4 Code for AWS Lambda GetAllEdgeDeviceEntries . . . . 41
A.5 Code for AWS Lambda PutNewTemperatureEntry . . . . 42
A.6 Code for AWS Gateway API resource policy [1] . . . . 42
A.7 Script for getting all DynamoDB entries . . . . 43
A.8 Script for creating new DynamoDB entry . . . . 43
A.9 Python 3 HTTP server [2] . . . . 43
1 Introduction
EdgeX Foundry is an open source software framework at the edge of the network that connects all kind of Internet of Things (IoT) devices and interacts with them. It is serving between physical ”things” and applications or clouds. With that, EdgeX makes it easy to monitor IoT devices, collect data from devices or send instructions to them, move the data to a cloud to store or analyze them and more. EdgeX provides multiple protocols to connect IoT devices, like MQTT, REST or BLE. It allows to encrypt, transform, filter or format the data before forwarding it to an external source over different protocols, like MQTT. Data is usually not stored in the EdgeX Gateway itself for a long time. EdgeX consists of several microservices, some of which can be optionally switched on or off. For example, rules can be created that automatically execute an action when the rule is ful- filled (if-then). [3, 4]
Figure 1: The EdgeX gateway between the ”things” and the IT-System. Source: [3]
2 Foundation
2.1 EdgeX and the Internet of Things
The purpose of the so called Internet of Things (IoT) is to connect sensor (actor) networks with the internet. Doing so makes them easily accessible from anywhere and anytime. The
”things” in the term Internet of things can be virtual or physical things. Many specialized versions of the IoT exist, for instance the Industrial Internet of Things (IIoT), the Arti- ficial Intelligence Internet of Things (AIIoT) or the Internet of Robotic Things (IoRT).
In all variations, it remains a common concept to connect the local (sensor)network via a gateway with the internet. The general structure of the IoT is shown in figure 2. Often the edge devices are not more then smart sensors. Since these have limited resources, remote resources need to be used. [5]
As mentioned, EdgeX Foundry is meant to connect a network of physical edge devices
Figure 2: ”General technical concept of the IoT” [5]
with the internet. Therefore it basically acts as the gateway in the IoT infrastructure. In the EdgeX Foundry documentation the communication with the physical nodes is called
”south end” or ”south side” communication and the communication with the web services
”north end” or ”north side” communication. Furthermore this nomenclature will be used in this document. [3]
2.2 EdgeX Foundation Services
EdgeX Foundry is a collection of open source micro services, which are organized into 4 layers: [3]
• Core Services Layer
• Supporting Services Layer
• Application Services Layer
• Device Services Layer
All layers are ”passed through” from the south (device layer ), through the core and support layer, to the north (application layer ). Also there are two underlying services for Security and System Management. To start specific services with docker, the docker compose service names are needed, which can be found in the official documentation. [6]
The most important services are described below.
Figure 3: Visualisation of the EdgeX platform architecture. Source: [7]
2.2.1 Core Services Layer
These services are, as the name implies, the ”core” to the EdgeX functionality. Here resides the EdgeX configuration, the collected sensor data and the knowledge of the connected ”things”. [8]
• Data: Stores the sensor data on the edge system until data gets moved ”north”.
The open source in-memory structure store ”redis” (see section 2.2.5) is used for data storage. Other services (within and outside of EdgeX) access the sensor data only through the core data service. [8]
• Command: Enables the communication of commands or actions to the devices.
Requests can be sent from north to south. Allows GET (request data) and PUT (take action or actuate the device) commands. [8]
• Metadata: Has the knowledge of the devices and sensors and how to communicate with them (used by services like Data and Command). Also uses ”redis” (section 2.2.5) to store its knowledge about the devices and values. [8]
2.2.2 Supporting Services Layer
These services perform tasks such as logging, scheduling or sending notifications/alarms.
The edge analysis also takes place here. These services can be considered optional and
are not required. [9]
• Scheduler: Provides a ”clock” that fires operations at specified times (interval).
For example to clean up old sensed events that have been successfully exported out of EdgeX. [9]
• Notifications / Alarm: Send out an alert or notification (to another system or to a person). For example, when sensor data is detected outside of certain parameters.
[9]
• Rules engine / Kuiper: Implementation of data analytics with if-then condi- tional actuation at the edge based on collected sensor data. Kuiper allows fast data processing on the edge and write rules in SQL. The rules engine is based on three components: Source, SQL and Sink. [9] More detailed information about the Kuiper rules engine can be found in the documentation [10] or under section 3.5.
2.2.3 Application Services Layer
This layer and its service is used to filter or transform collected sensor data and then send it to a recipient of your choice, e.g. cloud providers like Amazon IoT Hub, Google IoT Core, Azure IoT Hub. Data can be prepared (transform, filter, ...) and groomed (format, compress, encrypt, ...) before being sent to an endpoint. [11]
2.2.4 Device Services Layer
This layer interacts with the devices and sensors. Various protocols, such as REST, MQTT or even SNMP, are available for the south-side connection. The services not only collect data from the devices, but also get status updates, transform the data before sending them to the next layer or discover devices. After installation and running of EdgeX the REST and virtual services are starting by default. Other protocols must be added additionally. Protocols like MQTT or SNMP are already implemented and just need to be ”re-enabled”. More information about the available protocols and which ones are under development can be found in the EdgeX-Wiki ([12]). [13]
2.2.5 Additional useful services
• Redis: Is an open source in-memory data strucutre store, which is used as a
database, cache and message broker. EdgeX uses Redis (Geneva release) as the
default database for sensor data as well as for metadata about the devices or sen-
sors that are connected. [14]
• Consul: Is an open source project used as registry service in EdgeX. It provides na- tive features for service registration, service discovery, and health checking. There- fore it also provides a web user interface dashboard, which enables to see what services are running or if there are any errors. All other services are expected to register with Consul when they start. [15, 16]
3 Implementation
3.1 Use case and system architecture
Since there are multiple variations of IoT, the possible use cases are manifold. For instance an IIoT solution could be developed. For IIoT extensive monitoring of sensor values from industrial machines is often required. In a simple threshold applications machines could be shut down, if certain temperature values become critical for the system. The requirements for this use case would be to collect temperature values from multiple devices and act on a threshold. Storing of the collected data for future data analysis could also be of interest.
Therefore a cloud service is most likely to be used, since resources are limited on the edge.
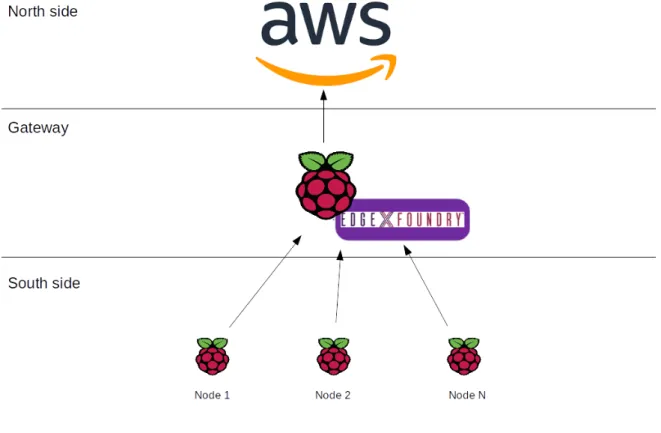
Generally speaking such a system is required to get data from multiple nodes, reacts on a threshold and have a connection to a cloud service. Such a system could also be the base of a AI recognition system, that collects data on the edge and performs the classification in the cloud. For security purposes often only the IoT gateway gets connected with the internet, while the sensor nodes are connected via a local network. Therefore the gateway should be located close to the edge devices, possibly be one by its own. For that reason, this installation guide addresses the deployment of EdgeX on an edge device. It also demonstrates the often needed infrastructure of multiple edge devices sending data to the gateway which are the forwarded to a cloud service.
As physical nodes multiple Raspberry pi 3+ were used, since they were available. Any other edge device could also be used as long as it supports one of the communication protocols that EdgeX works with. Initially the Raspberry pi 3+ was considered as gateway as well. EdgeX Foundry states the following minimal requirements: [17]
• Minimum 1GB Memory
• 64bit CPU
• Minimum 3GB of storage (at least 32GB recommended)
• Operating systems:
– Windows 7-10
– Ubuntu Desktop (14-20) – Ubuntu Server (14-20) – Ubuntu Core (16-18) – Mac OS X 10
The Raspberry pi 3+ just fulfills the minimum requirement of memory. In trials mul- tiple services of EdgeX started only partially or not at all. Therefore the Raspberry pi 4 with 4 GB memory was chosen for the EdgeX implementation.
For then cloud service Amazon Web Services (AWS) was picked due to its good docu- mentation and free trials.
The final system architecture is visualized in figure 4
Figure 4: Deployed system architecture
3.2 Implementation on a Virtual Machine
EdgeX can run on any platform supporting Docker and docker-compose. See section 3.1 for the official platform requirements. For this implementation example Ubuntu 20.04 was used.
Note: To assign the virtual machine an IP address in the local network, the VM network should be bridged. So it is possible to communicate directly with the VM. In Virtual- Box this can be set under the VM settings → ”Network” → ”Attached to:” → ”Bridged Adapter”. Otherwise ports must be forwarded. [4]
3.2.1 Installation of Docker and docker-compose
To install Docker and Docker Compose the following steps need to be performed: [4]
1. Get the newest system updates
• sudo apt update
• sudo apt upgrade 2. Install Docker-CE [4]
• sudo apt install apt-transport-https ca-certificates curl software-properties-common
• curl -fsSL https://download.docker.com/linux/ubuntu/gpg | sudo apt-key add - 3. Install docker-compose
• sudo apt install docker-compose
3.2.2 Installation of EdgeX
The EdgeX microservices are controlled by a docker-compose file (YAML format). Ports and dependencies can be edited in this file. Also microservices can be activated and deactivated here. To start the EdgeX microservices the ”docker-compose” command has to be executed in the same folder as the file. [4]
1. Create a directory for the docker-compose file [optional]
• mkdir edgex
• cd edgex
2. Download the docker-compose.yml file (last checked on 06.12.2020)
• wget https://raw.githubusercontent.com/edgexfoundry/developer-scripts/
master/releases/geneva/compose-files/docker-compose-geneva-redis-no-secty .yml -O docker-compose.yml [4]
Older releases can be found in the official Github repository [18].
3. Pull the newest docker container and list them
• sudo docker-compose pull
• sudo docker image ls
3.2.3 Running EdgeX
The following commands can be used to start EdgeX, as well as check that all services are running.
1. Start EdgeX with docker-compose
docker-compose commands must be executed in the same folder as the docker- compose.yml file.
• sudo docker-compose up -d
”-d” lets EdgeX run in the background and thus prevents the console output of the services.
2. View running mincroservices
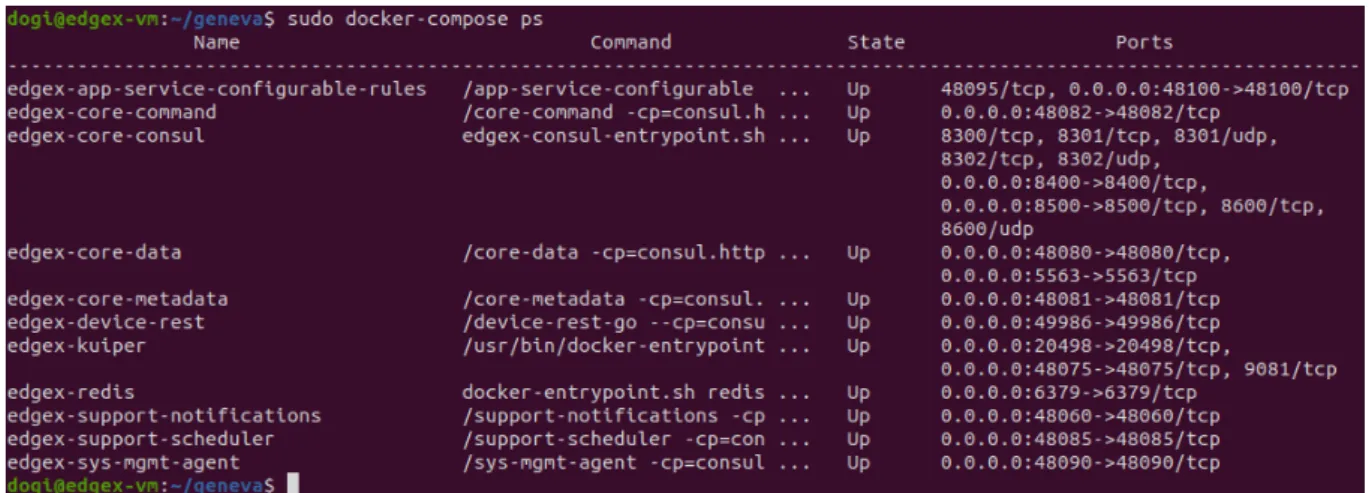
• sudo docker-compose ps
With the ’docker-compose ps’ command the used ports of each microservice are listed. The ports are defined in the docker-compose.yml. Alternatively, the URL
’http://localhost:8500/ui/dc1/services’ can be called in the browser (replace local-
host with EdgeX gateway ip address for external use). This is available when the
service ’consul’ has been started. All running services and possible errors can be
viewed there. [4]
Figure 5: View of all running microservices in the console
Important: To be able to communicate with EdgeX from another device, the IP ad- dresses in the docker-compose.yml file must be changed from ”127.0.0.1” to ”0.0.0.0” (to allow all IP addresses) or a specific ip address that should have access, otherwise it is only possible to communicate with EdgeX locally, on the VM itself.
To stop EdgeX, the following commands has to be executed in the same folder as the docker-compose.yml file: [4]
1. Stop the services:
• sudo docker-compose stop 2. Stop and remove the services:
• sudo docker-compose down
3. To stop services, which were removed from the docker-compose.yml file:
• sudo docker-compose down --remove-orphans
3.3 Implementation on Raspberry Pi
The following shows the implementation on the Raspberry Pi. First the node is set up on which the data is generated. To generate a real use case, system data are gathered and send to the EdgeX device. Then the implementation of the EdgeX environment on a Raspberry is described. For the use case that two Raspberry devices are to be used to transfer the data, one will act as Node and one as EdgeX device.
Note: The script to read out the data is attached in appendix A.1. It can be used for multiple nodes, but small changes are necessary. The script can be used on any Raspberry Pi with a Linux operating system installed. The EdgeX environment is only executable on a Raspberry Pi 4 as mentioned in section 3.1.
3.3.1 Installing Raspberry Pi Operating System(OS)
The following section describes the installation of the Raspberry Pi operating system. If a basic understanding with the procedure of a Raspberry Pi is available, this chapter can be skipped. It can be continued with the chapter Implementaion of Raspberry-Node.
Note: Installing EdgeX on a Raspberry Pi is similar to installing it on a virtual ma- chine. However, EdgeX requires a 64 bit operating system. It must be downloaded from the following URL:
https://downloads.raspberrypi.org/raspios_arm64/images/raspios_arm64- 2020-05-28/2020-05-27-raspios-buster-arm64.zip
The 64 bit operating system is only executable on the Raspberry Pi 4 and the Rasp- berry Pi 3+. If an older Raspberry Pi is used to send and generate data, the 32 bit operating system must be installed. You can choose between an operating system with and without a graphical user interface. In general, an operating system without graphical user interface is sufficient for the implementation of the existing script.
The operating system with user interface can be downloaded from the following URL:
https://downloads.raspberrypi.org/raspios_armhf/images/raspios_armhf- 2020-12-04/2020-12-02-raspios-buster-armhf.zip
The operating system without user interface can be downloaded from the following URL:
https://downloads.raspberrypi.org/raspios_lite_armhf/images/raspios_lite_armhf-
2020-12-04/2020-12-02-raspios-buster-armhf-lite.zip
The following steps are identical for both operating systems. Only points 8 and 9 are omitted for the operating system without user interface.
1. Download of Raspberry Pi image.
2. Flash Operating System on Raspberry Pi card with balenaEtcher or Win32DiskImager.
Win32DiskImager can be downloaded from following URL:
https://www.chip.de/downloads/Win32-Disk-Imager_46121030.html
3. Open flashed card and insert into the boot partition a textfile named:
• ssh.txt
this file must be empty.
4. Plug the card into your Raspberry Pi.
5. Now the Raspberry must be connected to the power and the internet. Then Putty must be downloaded on a computer in the network. With this you can access the Raspberry Pi via SSH on port 22 without mouse and keyboard. Putty can be downloaded from following URL:
https://www.chiark.greenend.org.uk/~sgtatham/putty/latest.html
6. In Putty the IP address of the Raspberry Pi must be entered. This can be found via the graphical user interface of the router.
7. After the connection via Putty is established, you can log in with Username and Password.
Login informations:
• Username: pi
• Password: raspberry
Now the system updates can be installed first.
• sudo apt update
• sudo apt upgrade
8. Now the graphical user interface can be activated via the Software Configuration
Tool. The following command takes you to the mentioned menu:
• sudo raspi-config
9. Under the point 5 Interfacing Options the graphical remote access to the Raspberry Pi can be enabled in the menu under point P3 VNC. After that, access via VNC viewer is possible. This allows unrestricted access to the Raspberry via graphical user interface. VNC Viewer is available for Windows, macOS and Linux. It can be downloaded from the following URl:
https://www.realvnc.com/de/connect/download/viewer/linux/
3.3.2 Implementation of Raspberry-Node
Numerous protocols are available for communication. Two well-known ones are REST and Bluetotth Low Energy (BLE). However, BLE is still in the development phase. For this reason, REST communication was chosen.
1. Get the newest system updates
• sudo apt update
• sudo apt upgrade
2. Choose a location for the script. Write your own script to send the data (Or random data) or use the predefined script in appendix A.1. Open a text file with any editor.
In the following as an example the editor Nano.
• sudo nano Rpi send.py
Then copy the predefined script into the textfile.
3. Now you need to change the ip adress in line 16. Write into this variable the ip address of the EdgeX device.
• ip adress edge device = ”*.*.*.*”
4. If multiple nodes are to be used, the program code in the additional devices must be adapted. The following graphic shows the section that must be changed. The section starts at line 72 and ends at line 82.
In the addresses of the additional nodes their specific names must be entered. The following nomenclature is recommended:
• Raspi Device 1 → Raspi Device 2 → Raspi Device 3 → Etc....
Figure 6: Addresses of the variables
This must also be changed in the EdgeX device. But more about that later in chapter 3.4.2.
5. After the script has been modified it can be exited and started with the following command. The script is only executable after the EdgeX Gateway has been started.
• sudo python Rpi send.py
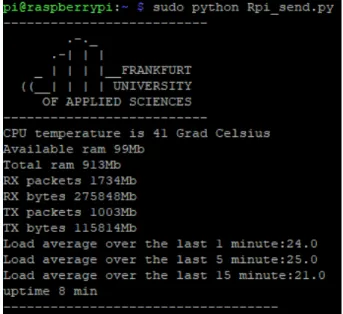
6. After the script is started, the following values are output to the console. The
Figure 7: The sent data of the Raspberry Node
continuous loop causes the system data to be sent to the EdgeX device again every 5 seconds.
The CPU temperature is sent in degrees Celsius. The total RAM of the Raspberry
Pi and its available RAM are transmitted. In addition, the previous Internet traffic
via the LAN interface.
Note: If the Raspberry Pi is connected via wifi, the program code must be modified accordingly.
The load of the Raspberry Pi is formed by means of an average value. The load is determined over the last 1, 5 and 15 minutes. The load average is given as a percentage. The uptime shows the operating time in minutes.
7. To change the system values of the Raspberry Pi, a continuous loop can be executed in the background which increases the system load and the processor temperature.
To execute it, the following command must be entered into the console.
• for i in 1 2 3 4; do while : ; do : ; done & done
8. The following command can be used to monitor the system load.
• top
The following graphic appears.
Figure 8: Utilization of the Raspberry
To terminate the processes they must be terminated by the following command.
After the kill command the respective process must be named. As an example, here is the command to kill the first process.
• sudo kill 4470
3.3.3 Implementation of Raspberry-EdgeX gateway
This section describes the installation of Docker. This is similar to the installation of Docker on the virtual machine. [19]
Note: The Raspberry Pi 4 has a quad-core Cortex-A72 processor from ARM with 64
bit and 1.5 GHz. The installed operating system is based on Debian. This has to be
taken care of during the installation.
1. You have to uninstall the possibly old versions. [19]
• sudo apt-get remove docker docker-engine docker.io containerd runc
Note: For installing on Raspberry Pi using the repository is not yet supported. We need to use convenience scripts.
2. Install Docker using the convenience script: [19]
• curl -fsSL https://get.docker.com -o get-docker.sh
• sudo sh get-docker.sh
After Docker has been successfully installed, the function can be tested with a hello world image. If everything works, Docker should show a welcome message. With the following command the check can take place: [19]
• sudo docker run hello-world
Installing Docker-Compose
After installing Docker it is necessary to install Docker Compose. Because this is done on the Raspberry Pi in a different way than to the virtual machine.
1. Installing the required components to make Docker Compose runnable. Execute these three commands one after the other. [20]
• sudo apt-get install -y libffi-dev libssl-dev
• sudo apt-get install -y python3 python3-pip
• sudo apt-get remove python-configparser 2. Docker Compose can then be installed. [20]
• sudo pip3 -v install docker-compose
3. Now the installation of Docker and Docker Compose is complete. Skip to 3.2.2 Installation of EdgeX . From this point on, the procedure is again the same as for the virtual machine. The procedure described there can be used with the Raspberry Pi.
Note: Before data can be received, the variables must be created. This is done in
the next chapter 3.4 Creating of devices and variables.
3.4 Creating of devices and variables
To be able to send data to the created EdgeX gateway, a digital representation of devices and variables must first be created. Devices are described with a device profile, which can then be used to create device instances. A real device then sends data to its digital counterpart, using the ID or name of the digital device. The following descriptions and commands were applied on a Raspberry Pi 4.
3.4.1 Creating the Device Profile
To use devices with EdgeX, a profile must be created. This must be in the same directory as everything else before. Again, an empty document must be created to create the profile.
For this purpose there is again a predefined script in the appendix.
1. If the correct directory is not specified, you must navigate to it.
• cd edgex
2. Create an empty file with the name Raspi Device Profile.yaml.
• sudo nano Raspi Device Profile.yaml
3. Copy the content of the attached script in the appendix A.3 into the file.
4. Save and close the file.
3.4.2 Creating the variables
When all services are started and running, abstract descriptions of the variables, which are sent in the data from the devices, can be created. This can only be done after the services have been started.
Bash file
Attached in appendix A.2 is a bash file. The Bash file automatically creates the variables
implemented in this report. It also starts Docker and creates the devices. Multiple
devices can be created by modifying the file. The modification is done in analogy to
the modification in chapter 3.3.2 Implementation of Raspberry-Node. The content of the
bash file can be inserted into a text file of the Raspberry. The bash file must be in the
same directory as the docker-compose file. The procedure is as follows:
1. If the correct directory is not specified, you must navigate to it.
• cd edgex
2. Create an empty file with the name start.sh.
• sudo nano start.sh
3. Copy the content of the attached script in appendix A.2 into the file.
4. Save and close the file.
5. To execute the file, the bash file must now be called.
• bash start.sh
6. After the bash file has been successfully executed, you should see a prompt to start the work.
Enter manually
If the individual variables are to be entered manually, the following procedure should be followed:
1. Each information that is transferred from the Raspberry Node must be defined at the EdgeX gateway. As an example the declaration of the CPU temperature is shown here. The variable must be created according to the following scheme. [4]
curl --location
--request POST ’http://localhost:48080/api/v1/valuedescriptor’
--header ’Content-Type: application/json’
--data-raw’
”name”: ”CPU Temperature”,
”description”: ”CPU Temperature in Celsius”,
”min”: ””, ”max”: ””,
”type”: ”Int64”,
”uomLabel”: ”CPU Temperature”,
”defaultValue”: ”0”,
”formatting”: ”%s”,
”labels”: [ ”environment”, ”CPU Temperature”]’
2. For each information the variable must be adapted accordingly. Therefore also the
file of the node and the file Raspberry Device Profile must be adapted.
3. The following command loads the device profile for the Raspberry: [4]
curl --location --request POST ’http://localhost:48081/api/v1/deviceprofile/ uploadfile’
--form ’file=@”./Raspi Device Profile.yaml”’
4. The last step missing is the creation of the devices. With this command the Rasp- berries are configured. For each node that is used, a configuration must be made.
With the following command the devices can be created. For the use of multi- ple nodes, the devices must be adapted accordingly. As described in the previous chapter 3.3.2 Implementation of Raspberry-Node. [4]
curl --location
--request POST ’http://localhost:48081/api/v1/device’
--header ’Content-Type: application/json’
--data-raw ’”name”: ”Raspi Device 1”,
”description”: ”Raspberry Pi 1”,
”adminState”: ”unlocked”,
”operatingState”: ”enabled”,
”protocols”: ”example”: ”host”: ”dummy”, ”port”: ”1234”, ”unitID”: ”1”,
”labels”: [”UpTime”, ”Load1”, ”Load2”, ”Load3”, ”RX packets”, ”RX bytes”,
”TX packets”, ”TX bytes”, ”RAM Total”, ”RAM”, ”CPU Temperature sensor”,
”DHT11”],
”location”: ”Berlin”,
”service”: ”name”: ”edgex-device-rest”,
”profile”: ”name”: ”Raspi Device”’
Now the Raspberry Pi is configured and can be used as a gateway.
3.4.3 Look up stored devices and other data
All created devices, variables, as well as received data can be viewed. For this purpose, the console or alternatively the program ”Postman” can be used. However, Postman is not available for Raspberry devices. But the commands can also be sent from other devices, if the ip addresses in the docker-compose.yml are not set to local (127.0.0.1).
The following commands are only a few available commands. The following commands can be executed locally. Alternatively, the URLs can be entered into the browser. For an external call, the ”localhost” must be replaced with the IP address of the EdgeX gateway.
Helpful commands are:
• List of created devices: [4]
curl -X GET ’http://localhost:48082/api/v1/device’ | jq
• List of created variables: [4]
curl -X GET ’http://localhost:48080/api/v1/valuedescriptor’ | jq
• List of all received data: [4]
curl -X GET ’http://localhost:48080/api/v1/reading’ | jq
• List of the last 10 received data of a specific device: [21]
curl -X GET ’http://localhost:48080/api/v1/event/device/{DEVICE NAME}/10’ | jq
• Display number of received data: [4]
curl -X GET ’http://http://localhost:48080/api/v1/event/count’
• Remove device with ID or name
curl -X DELETE ’http://localhost:48081/api/v1/device/id/{(device id here)}’ or curl -X DELETE ’http://localhost:48081/api/v1/device/name/{(device name here)}’
3.5 Export EdgeX Foundry data
For exporting data to the north side, one can choose between using the Application service and the rules engine. By using the latter, data can be filtered before they are exported.
Since the Geneva release, EdgeX Foundry uses EMQ’s Kuiper as rules engine. The service consists of the three components: Source, SQL and Sink.[22]
For debugging purposes it might become necessary to alter the default settings of EdgeX services. Their configuration files are located within their corresponding docker containers.
For navigating through the directory within a container, a shell can be opened in the running container. This can be achieved by using this command:
sudo docker exec -it < containername > /bin/sh
Kuipers configuration for instance can be changed in the file /etc/kuiper.yaml. This way the logging level of EdgeX services can be changed as well. The log files can be shown by the command: [4]
sudo docker logs < servicename >
Rules, streams and also devices can be managed in a visual way as well. For that purpose the Golang UI interface needs to be included in the docker-compose file by adding these lines: [4]
u i :
c o n t a i n e r n a m e : edgex − u i − go hostname : edgex − u i − go
image : nexus3 . e d g e x f o u n d r y . o r g : 1 0 0 0 4 / d o c k e r − edgex − u i − go : m a s t e r n e t w o r k s :
edgex − network : n u l l p o r t s :
− ” 0 . 0 . 0 . 0 : 4 0 0 0 : 4 0 0 0 / t c p ” r e a d o n l y : t r u e
It is vital to keep the indentation schema, when making these entries. Best practice is to compare the entries with the once below and above.
3.5.1 Creation of a Kuiper data source
The Source is the data stream, from where the data are fed into the rules engine. In the EdgeX implementation, Kuiper listens per default to the message bus at port 5566, which is used by the Application service for publishing its messages. This default setting can be altered in the configuration file located at etc/sources/edgex.yaml. [23]
A stream can be created by sending the following POST message body to Kuiper’s REST- API at < EdgeX IP >: 48075/streams: [23]
{
” s q l ” : ” c r e a t e s t r e a m r a s p b e r r i e s ( ) WITH (FORMAT=”JSON” , TYPE=”edgex ” ) ”
}
The id of this stream is ”raspberries” and it contains data in json format with types that are specified by EdgeX value descriptors, which is specified by the FORMAT and TYPE parameter. Custom value types are translated in types that can be interpreted by Kuiper either during runtime or compilation. All created streams can be listed by sending a GET request to the same resource.[24][23]
3.5.2 Creation of Kuiper rules
The two remaining components of Kuiper (SQL and Sink) are defined in the rules them- selves. Same as for the stream, Kuiper’s REST-API can be used for handling the rules.
In case of rules, the target resource for the POST request is < EdgeXIP >: 48075/rules.
The following rule has the ID ”criticalTemperature”: [25]
{
” i d ” : ” c r i t i c a l T e m p e r a t u r e ” ,
” s q l ” : ”SELECT t e m p e r a t u r e , meta ( D e v i c e ) AS d e v i c e FROM r a s p b e r r i e s WHERE ( meta ( d e v i c e )=\” R a s p i D e v i c e 1 \”
OR meta ( d e v i c e )=\” R a s p i D e v i c e 2 \ ” ) AND t e m p e r a t u r e > 8 0 ” ,
” a c t i o n s ” : [ {
” r e s t ” : {
” dataTemplate ” : ”{\ ” c o n t e n t \ ” : \ ” j s o n . \ ” ,
\” Temperature \ ” : { { . t e m p e r a t u r e } } ,
\” D e v i c e \ ” : \ ” { { . d e v i c e } } \ ”} ” ,
” method ” : ” p o s t ” ,
” s e n d S i n g l e ” : t r u e ,
” u r l ” : ” h t t p :// < IP >: 8 0 0 0 ” ,
” r e t r y I n t e r v a l ” : 0 }
} , {
” l o g ” : {}
} ] ,
” o p t i o n s ” : n u l l }
Apart from the data that are transported through the message bus, additional meta data can be extracted [26]. The presented rule will select an entry of the type ”temperature”
from the stream along with its meta data ”device”, which is the device id. The rule filters for the device ids ”RaspiDevice1” and ”RaspiDevice2” when either of them has been receiving a temperature value above 80 ° C. In either case the rule executes what is listed in the ”actions” section. So far it is not possible to filter for the data type of the device. This field is not included in the meta data.[25] [26]
The keyword ”rest” determines that Kuiper shall use the REST-Sink. The action creates a POST request that contains the data defined in ”dataTemplate”. The option ”sendSingle”
specifies that all data are send in a single message. The ”retryInterval” is set to 0 and
therefore this POST request will only be executed once, even if it fails. For debugging
purposes it proved useful to use an http server as target of the rules. The presented rule targets an http server that listens to port 8000. The source code for the used server is attached in appendix A.9. The URL needs to be exchanged with the address of the AWS Gateway API for the final deployment.[25]
When created, the rule directly runs. To stop the rule, a POST request has to be send to < EdgeXIP >: 48075/rules/ < ruleID > /stop and for making it run again: <
EdgeXIP >: 48075/rules/ < ruleID > /start. To delete either a stream or a rule a DELETE request has to be send to the resource of the rule/stream. [27].
3.6 Amazon Web Services
For the north end implementation, AWS was chosen. This service from Amazon contains a collection of web services, each for a specific task. The four services that were used are called Gateway API, Lambda, IAM and DynamoDB. For this project they interact as visualized in figure 9. The IAM service is used to control access to service resources and was used for the implementation of the lambda rules. Therefore it is explained in subsection 3.6.2 and is not displayed in the overall service topology.
Figure 9: AWS service topology [28][29]
With the Gateway API service, one can create an Gateway, such that the implementa- tion on AWS can be accessed by a program on another machine. Since EdgeX supports a REST-API for north side communication, a REST-API is created with Gateway API.[30]
The Lambda service provides an environment in which custom code can be executed.
Its role in this architecture is to extract the entries of messages that came through the Gateway API and to store them in a NoSQL data bank which is implemented via the DynamoDB service.[31][32][33]
AWS has several physical server locations to choose from. In this project all services are
using the location eu-central-1, since this is the nearest. Regardless which location is chosen it is important to keep it consistent over all used services. Otherwise additional settings might be necessary.
When this document was created, all used services were covered by the free trier of ama- zon. The API Gateway service had 1 million API calls per month free for the first 12 month after the registration. The Lambda service had 1 million executions free per month and DynamoDB had 25 GB of free storage. The latter two had no time limitations. Gen- erated costs and usage of the services were monitored through the cost explorer service [34]. [35]
This project focused on a proof of concept for the presented use case in section 3.1 and AWS was chosen exclusively due to its numerous documentations and tutorials. Therefore it cannot be said that AWS is a good choice in general for storing IoT data. It highly depends on the specific use case and its scope.
3.6.1 AWS DynamoDB
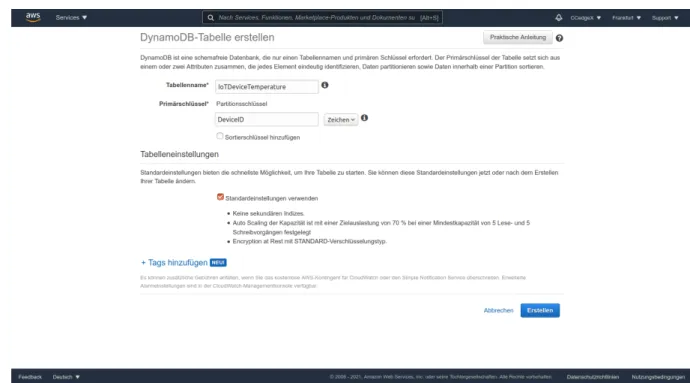
Firstly the database needs to be created. Type ”DynamoDB” In the AWS Managment console and select the very first option of the service: ”Create table”. Choose ”IoTDe- viceTemperatures” as name of the table and ”DeviceID” as primary key as shown in figure 10. Next activate the option ”Autoscaling” such that the read-write capacity is managed dynamically. Select the ”Use default settings” option, so that DynamoDB creates a role for that purpose automatically. At the very bottom of the page the ”create” button can be found.[31]
So far the created table has only the property ”DeviceID”. Further columns are created
automatically when an entry is generated.
Figure 10: Set values for new AWS DynamoDB table 3.6.2 AWS Lambda implementation
For accessing the created DynamoDB table, lambda functions are needed. However lambda functions cannot access the created table initially. For that purpose a corre- sponding lambda execution role has to be created. Access the IAM service over the management console, select ”Roles” on the left hand menu (as marked in figure 11) and click the button ”create role”. [31]
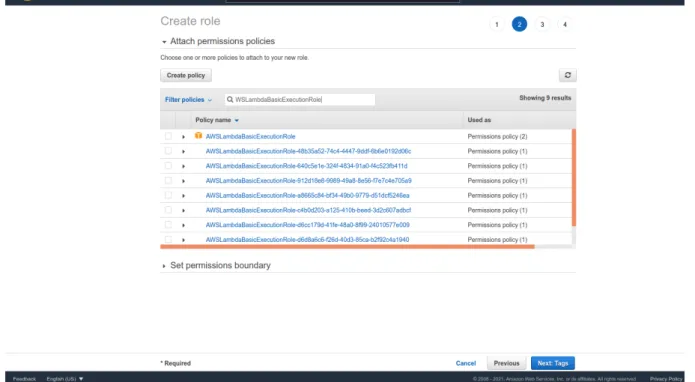
Keep ”AWS service” selected and choose Lambda (see figure 12) as the service this role is designated for. Then click on ”Next: Permissions” and enter ”AWSLambdaBasicExe- cutionRole” in the search bar as seen in figure 13. Select the listed role with that name and go on ”Next”. [31]
For this use case, Tags are not used. Therefore the next side does not need any entries.
Now give the role the name ”IoTDeviceTemperatureAccess” and click ”Create role”.
For giving this role more specific rights, select the newly created role and click on ”Add inline policy” as marked in figure 14.
In the upcoming view enter DynamoDB in the service search bar and add ”GetItem”
and ”PutItem” in the Action search bar as seen in figure 15. [31]
Then go to the resource section and click on add ARN (Amazon Resource Name). This
ARN is a unique identifier of the DynamoDB table we want to give access to. It can be
Figure 11: Create a new IAM role
Figure 12: create new Lambda service role
found in the overview tab in the description of the IoTDeviceTemperatures table (see figure 16).[31]
Once added click on ”Review policy”, give it the name ”DynamoReadWriteAccess”
and click on ”Create policy”.[31]
Figure 13: Create new Lambda basic execution role
Figure 14: Add inline policies to the IoTDeviceTemperatureAccess role
Now the actual lambda functions can be created. Enter ”Lambda” in the management
console and select the AWS Lambda service. Now click on the ”Create function” button
Figure 15: Add read and write access to a defined DynamoDB table
Figure 16: ”Amazon Resource Name of the IoTDeviceTemperatures table”
and enter ”PutNewTemperatureEntry” as name. Lambda functions support multiple
different programming languages. In this case JavaScript was used, therefore the selected
runtime must be Node .js. In the role-dropdown, select ”Choose an existing role” and
select the newly created ”IoTDeviceTemperatureAccess” role (as seen in figure 17).
Figure 17: Create a lambda function using the DynamoReadWriteAccess policy Paste the code from the appendix A.5 into the index.js file. When the script is triggered, it will receive an event object that contains a json body with the entries ”DeviceID” and
”Temperature”. After these two values are extracted, they are inserted in the DynamoDB table ”IoTDeviceTemperatures”. It also gives back a response object, that contains the http response status.[31]
Perform the same steps for creating the lambda function ”GetAllEdgeDeviceEntries” but use the script in appendix A.4. The only difference in this script is, that it scans the
”IoTDeviceTemperatures” table and returns all entries in the response body.
3.6.3 AWS Gateway API implementation
The Gateway API service supports RESTful-APIs as well as Websocket APIs. A RESTful API can be created by following these steps: [30]
• In the AWS-Managment console select the API Gateway service.
• Select the button ”Create API” and select REST API (see figure 18).
• Choose the API-Name as ”EdgeXSensorData” and keep the endpoint setting on regional. Select create API.
• Create the wanted resources and add all methods that shall be supported by them.
• Implement some kind of access protection.
• Deploy the API.
Figure 18: Create a RESTfull API with Gateway API
In this tutorial the root-resource ”sensordata” which supports the methods ”GET”
and ”POST” needs to be created. For creating the resource select the ”Action” button and choose the option ”Create resource” (see figure 19). Keep the ”configure as proxy resource” as well as the ”Enable API Gateway CORS” unchecked and select the button
”Create resource”. [30]
Figure 19: Create a Resource, a Method or Deploy API
Subsequently each of the possible HTTP methods can be defined. First select the resource ”sensordata”, then press the ”Action” button and choose ”create method”. A dropdown selection will appear below the resource, where the HTTP method can be se- lected. For this use case the GET and POST methods needs to be implemented. Select either of the methods and define it in the upcoming view. Keep the integrationstype on
”Lambda-function” and select ”eu-central-1” as location as shown in figure 20. When any character is typed in the Lambda-function field, the lambda functions from that region are listed. For the GET method choose the ”GetAllEdgeDeviceEntries” and for the POST method the ”PutNewTemperatureEntry” lambda function.[30]
Figure 20: Create the HTTP Method HEAD
Once deployed, anyone could access the resource provided by the API Gateway service.
Since only a certain amount of accesses is free it is highly advisable to use some kind of access regulation. Amazon recommends to use the IAM service for this purpose. For this project however, resource policies were used. They are more straight forward, since the access can be limited to one or multiple IP addresses. The negative aspect is that IP ad- dresses of a personal router changes from time to time and therefore these guidelines have to be updated frequently. To implement a policy, select the ”Resource policy” option on the left hand side (as marked in figure 21), among the options from the EdgeXSensorData API. Paste the code form appendix A.6 in there and enter the ip addresses that shall have access through this gateway.[1]
Finally select the button ”Action” and choose ”Deploy API” (figure 19). As a stage
Figure 21: Set Gateway API resource policy
name choose ”EdgeXCollectedData”. After ”create stage” was selected a description of the stage is presented, including a URL for accessing this API.
For testing purposes, the python scripts located in appendix A.8 and appendix A.7 can be
used for either creating a new entry or getting all existing. Before they are executed, the
url in the script has to be set to the Gateway API URL with the ”sensordata” resource
at the end.
References
[1] Amazon Web Services, Inc. How do i use a resource policy to allow certain ip addresses to access my api gateway rest api?, . URL https://aws.amazon.com/de/
premiumsupport/knowledge-center/api-gateway-resource-policy-access/.
[Accessed on 2021-01-15].
[2] Miel Donkers. Simple python 3 http server for logging all get and post requests. URL https://gist.github.com/mdonkers/63e115cc0c79b4f6b8b3a6b797e485c7. [Ac- cessed on 2021-01-19].
[3] EdgeX Foundry. Edgex foundry documentation - introduction, . URL https://
docs.edgexfoundry.org/1.2/. [Accessed on 2021-01-18].
[4] EdgeX Foundry. Edgex foundry - hands on tutorial, . URL https://docs.
edgexfoundry.org/1.2/examples/LinuxTutorial/LinuxTutorial/. [Accessed on 2021-01-18].
[5] Anatol Badach. Internet of things – iot. 2014. doi: 10.13140/RG.2.1.5157.5527.
[6] EdgeX Foundry. Edgex foundry documentation - container names, . URL https:
//docs.edgexfoundry.org/1.2/general/ContainerNames/. [Accessed on 2021-01- 19].
[7] EdgeX Foundry. Edgex foundry documentation - service layers, . URL https:
//docs.edgexfoundry.org/1.2/#edgex-foundry-service-layers. [Accessed on 2021-01-18].
[8] EdgeX Foundry. Edgex foundry documentation - core services, . URL https:
//docs.edgexfoundry.org/1.2/microservices/core/Ch-CoreServices/. [Ac- cessed on 2021-01-19].
[9] EdgeX Foundry. Edgex foundry documentation - supporting services, . URL https://docs.edgexfoundry.org/1.2/microservices/support/Ch- SupportingServices/. [Accessed on 2021-01-18].
[10] EdgeX Foundry. Edgex foundry documentation - kuiper rules engine, . URL https://docs.edgexfoundry.org/1.2/microservices/support/Kuiper/
Ch-Kuiper/. [Accessed on 2021-01-18].
[11] EdgeX Foundry. Edgex foundry documentation - application service, . URL https://docs.edgexfoundry.org/1.2/microservices/application/
ApplicationServices/. [Accessed on 2021-01-19].
[12] EdgeX Foundry. Edgex foundry wiki: Device services - existing and work under- way, . URL https://wiki.edgexfoundry.org/display/FA/Device+Services+- +existing+and+work+underway. [Accessed on 2021-01-19].
[13] EdgeX Foundry. Edgex foundry documentation - device services, . URL https://
docs.edgexfoundry.org/1.2/microservices/device/Ch-DeviceServices/. [Ac- cessed on 2021-01-19].
[14] Redis Labs. Redis.io homepage. URL https://redis.io/. [Accessed on 2021-01-19].
[15] EdgeX Foundry. Edgex foundry documentation - web user interface, . URL https://docs.edgexfoundry.org/1.2/microservices/configuration/Ch- Configuration/#web-user-interface. [Accessed on 2021-01-21].
[16] HashiCorp. Consul - explore the consul ui. URL https://learn.hashicorp.com/
tutorials/consul/get-started-explore-the-ui. [Accessed on 2021-01-21].
[17] EdgeX Foundry. Edgex foundry documentation: Platform requirements, . URL https://docs.edgexfoundry.org/1.2/general/PlatformRequirements/. [Ac- cessed on 2021-01-19].
[18] EdgeX Foundry. Edgex github repository, . URL https://github.com/
edgexfoundry/developer-scripts/tree/master/releases. [Accessed on 2021- 01-19].
[19] Docker Docs. Install docker engine. URL https://docs.docker.com/engine/
install/ubuntu/. [Accessed on 2020-12-12].
[20] Rohan Sawant. Installing docker and docker compose on the raspberry pi in 5 sim- ple steps. URL https://dev.to/rohansawant/installing-docker-and-docker- compose-on-the-raspberry-pi-in-5-simple-steps-3mgl. [Accessed on 2020-12- 12].
[21] EdgeX Foundry. Edgex foundry walkthrough - query events / read-
ings, . URL https://docs.edgexfoundry.org/1.2/walk-through/Ch-
WalkthroughReading/#walkthrough-query-eventsreadings. [Accessed on
2021-01-20].
[22] EdgeX Foundry. Edgex foundry documentation kuiper rules engine, . URL https://
docs.edgexfoundry.org/1.2/microservices/support/Kuiper/Ch-Kuiper/. [Ac- cessed on 2021-01-19].
[23] EMQ Technologies Co. Stream specs. URL https://docs.emqx.io/en/kuiper/
latest/sqls/streams.html#data-types. [Accessed on 2021-01-19].
[24] EdgeX Foundry. Edgex source, . URL https://github.com/emqx/kuiper/blob/
master/docs/en_US/rules/sources/edgex.md. [Accessed on 2021-01-19].
[25] EMQ Technologies Co. Kuiper has officially become the edgex rule engine, . URL https://www.emqx.io/blog/kuiper-becomes-edgex-rule-engine. [Accessed on 2021-01-19].
[26] EdgeX Foundry. How to use meta function to extract addtional data from edgex message bus?, . URL https://github.com/emqx/kuiper/blob/master/docs/en_
US/edgex/edgex_meta.md. [Accessed on 2021-01-19].
[27] EMQ Technologies Co. Rules management, . URL https://docs.emqx.io/en/
kuiper/latest/restapi/rules.html#create-a-rule. [Accessed on 2021-01-19].
[28] Amazon Web Services, Inc. How to use the new amazon dynamodb key di- agnostics library to visualize and understand your application’s traffic patterns, . URL https://aws.amazon.com/de/blogs/compute/introducing-amazon-api- gateway-private-endpoints/. [Accessed on 2021-01-19].
[29] Chan Ryan, Elhemali Mostafa, Malligarjuna Padma. How to use the new amazon dy- namodb key diagnostics library to visualize and understand your application’s traffic patterns. URL https://aws.amazon.com/de/blogs/database/how-to-use- the-new-amazon-dynamodb-key-diagnostics-library-to-visualize-and- understand-your-applications-traffic-patterns/. [Accessed on 2021-01-19].
[30] Amazon Web Services, Inc. Tutorial: Hello world rest-api mit lambda-proxy- integration erstellen, . URL https://docs.aws.amazon.com/de_de/apigateway/
latest/developerguide/api-gateway-create-api-as-simple-proxy-for- lambda.html. [Accessed on 2021-01-15].
[31] Amazon Web Services, Inc. Aws lambda und dynamodb — aws serverless tuto- rial — part i, . URL https://www.youtube.com/watch?v=VGerk8hrP9U&list=PLD_
RqipW0-9uDz_KkexA5eGwd3cm3maq7. [Accessed on 2021-01-19].
[32] Amazon Web Services, Inc. Amazon dynamodb, . URL https://aws.amazon.com/
de/dynamodb/. [Accessed on 2021-01-19].
[33] Amazon Web Services, Inc. Using aws lambda with amazon api gateway, . URL https://docs.aws.amazon.com/lambda/latest/dg/services-apigateway.
html. [Accessed on 2021-01-19].
[34] Amazon Web Services, Inc. Fakturierungs- und kostenverwaltungs-dashboard, . URL https://console.aws.amazon.com/billing/home?#/. [Accessed on 2021-01-15].
[35] Amazon Web Services, Inc. Kostenloses kontingent f¨ ur aws, . URL https://
aws.amazon.com/de/free/?all-free-tier.sort-by=item.additionalFields.
SortRank&all-free-tier.sort-order=asc. [Accessed on 2021-01-15].
A Appendix
A.1 Code for Raspberry-Node
1 #−−−−−−−−−−−−−−−−−−−−−−−−
2 # .−.
3 # .−| | |
4 # | | | | FRANKFURT
5 # ( ( | | | | UNIVERSITY
6 # OF APPLIED SCIENCES
7 #−−−−−−−−−−−−−−−−−−−−−−−−
8 # V e r s i o n : 1 . 1
9 # A u t h o r s : D o m i n i c G i b i e t z , Jan Wagner , D a n i e l H e l m e r
10 # S t u d e n t r e s e a r c h p r o j e c t i n t h e m a s t e r ’ s p r o g r a m i n A l l g e m e i n e I n f o r m a t i k 11 # o f t h e D e p a r t m e n t o f Computer S c i e n c e and E n g i n e e r i n g
12
13 import s y s , t i m e , r e q u e s t s , j s o n , s u b p r o c e s s , r e , o s 14 from g p i o z e r o import CPUTemperature
15
16 i p a d r e s s e d g e d e v i c e = ”∗.∗.∗.∗” 17
18 p r i n t( ”−−−−−−−−−−−−−−−−−−−−−−−−−−” )
19 p r i n t( ” .−. ” )
20 p r i n t( ” .−| | | ” )
21 p r i n t( ” | | | | FRANKFURT ” )
22 p r i n t( ” ( ( | | | | UNIVERSITY ” ) 23 p r i n t( ” OF APPLIED SCIENCES ” ) 24 p r i n t( ”−−−−−−−−−−−−−−−−−−−−−−−−−−” ) 25
26
27 while True : 28
29 # CPU t e m p e r a t u r e
30 cpu = i n t( CPUTemperature ( ) . t e m p e r a t u r e )
31 p r i n t( ”CPU t e m p e r a t u r e i s ”+ s t r( cpu )+ ” Grad C e l s i u s ” ) 32
33 # Memory u s e
34 s = s u b p r o c e s s . c h e c k o u t p u t ( [ ” f r e e ” , ”−m” ] ) 35 l i n e s = s . s p l i t ( ’\n ’ )
36 RAMav = l i n e s [ 2 ] . s p l i t ( ) [ 3 ] 37 RAMto = l i n e s [ 1 ] . s p l i t ( ) [ 1 ]
38 p r i n t( ” A v a i l a b l e ram ”+ s t r( l i n e s [ 2 ] . s p l i t ( ) [ 3 ] ) + ”Mb” ) 39 p r i n t( ” T o t a l ram ”+ s t r( l i n e s [ 1 ] . s p l i t ( ) [ 1 ] ) + ”Mb” ) 40
41 # N e t w o r k t r a f f i c
42 o u t p u t = s u b p r o c e s s . Popen ( [ ’ i f c o n f i g ’ , ’ e t h 0 ’ ] , s t d o u t=s u b p r o c e s s . PIPE ) . communicate ( ) [ 0 ] 43 r x b y t e s = r e . f i n d a l l ( ’RX p a c k e t s ( [ 0−9 ]∗) ∗ b y t e s ( [ 0−9 ]∗) ’ , o u t p u t ) [ 0 ]
44 t x b y t e s = r e . f i n d a l l ( ’TX p a c k e t s ( [ 0−9 ]∗) ∗ b y t e s ( [ 0−9 ]∗) ’ , o u t p u t ) [ 0 ] 45 p r i n t( ”RX p a c k e t s ”+ s t r( r x b y t e s [ 0 ] ) + ”Mb” )
46 p r i n t( ”RX b y t e s ”+ s t r( r x b y t e s [ 1 ] ) + ”Mb” ) 47 p r i n t( ”TX p a c k e t s ”+ s t r( t x b y t e s [ 0 ] ) + ”Mb” ) 48 p r i n t( ”TX b y t e s ”+ s t r( t x b y t e s [ 1 ] ) + ”Mb” ) 49
50 # R a s p i l o a d
51 l o a d=o s . g e t l o a d a v g ( )
52 p r i n t( ” Load a v e r a g e o v e r t h e l a s t 1 m i n u t e : ” + s t r( l o a d [ 0 ]∗1 0 0 ) ) 53 p r i n t( ” Load a v e r a g e o v e r t h e l a s t 5 m i n u t e : ” + s t r( l o a d [ 1 ]∗1 0 0 ) ) 54 p r i n t( ” Load a v e r a g e o v e r t h e l a s t 15 m i n u t e : ”+ s t r( l o a d [ 2 ]∗1 0 0 ) ) 55
56 # R a s p i u p t i m e
57 s = s u b p r o c e s s . c h e c k o u t p u t ( [ ” u p t i m e ” ] ) 58 l o a d s p l i t = s . s p l i t ( ’ l o a d a v e r a g e : ’ )
59 l o a d f i v e = f l o a t( l o a d s p l i t [ 1 ] . s p l i t ( ’ , ’ ) [ 1 ] )
60 up = l o a d s p l i t [ 0 ]
61 u p p o s = up . r f i n d ( ’ , ’ , 0 ,l e n( up )−4) 62 up = up [ : u p p o s ] . s p l i t ( ’ up ’ ) [ 1 ] 63 p r i n t( ” u p t i m e ”+s t r( up ) )
64
65 # CPU i n f o
66 # f = o s . p o p e n ( ’ c a t / p r o c / c p u i n f o ’ )
67 # c p u = f . r e a d ( )
68
69 p r i n t( ”−−−−−−−−−−−−−−−−−−−−−−−−−−−−−−−−−−−” ) 70
71 # A d r e s s e s f o r v a r i a b l e s
72 urlCPUTemp = ’ h t t p ://% s : 4 9 9 8 6 / a p i / v1 / r e s o u r c e / R a s p i D e v i c e 1 / CPU Temperature ’ % i p a d r e s s e d g e d e v i c e
73 urlRAM = ’ h t t p ://% s : 4 9 9 8 6 / a p i / v1 / r e s o u r c e / R a s p i D e v i c e 1 /RAM’ % i p a d r e s s e d g e d e v i c e
74 urlRAMto = ’ h t t p ://% s : 4 9 9 8 6 / a p i / v1 / r e s o u r c e / R a s p i D e v i c e 1 / RAM Total ’ % i p a d r e s s e d g e d e v i c e 75 u r l R X p a c k e t s = ’ h t t p ://% s : 4 9 9 8 6 / a p i / v1 / r e s o u r c e / R a s p i D e v i c e 1 / R X p a c k e t s ’ %
i p a d r e s s e d g e d e v i c e
76 u r l R X b y t e s = ’ h t t p ://% s : 4 9 9 8 6 / a p i / v1 / r e s o u r c e / R a s p i D e v i c e 1 / R X b y t e s ’ % i p a d r e s s e d g e d e v i c e
77 u r l T X p a c k e t s = ’ h t t p ://% s : 4 9 9 8 6 / a p i / v1 / r e s o u r c e / R a s p i D e v i c e 1 / T X p a c k e t s ’ % i p a d r e s s e d g e d e v i c e
78 u r l T X b y t e s = ’ h t t p ://% s : 4 9 9 8 6 / a p i / v1 / r e s o u r c e / R a s p i D e v i c e 1 / T X b y t e s ’ % i p a d r e s s e d g e d e v i c e
79 u r l L o a d 1 = ’ h t t p ://% s : 4 9 9 8 6 / a p i / v1 / r e s o u r c e / R a s p i D e v i c e 1 / Load1 ’ % i p a d r e s s e d g e d e v i c e 80 u r l L o a d 2 = ’ h t t p ://% s : 4 9 9 8 6 / a p i / v1 / r e s o u r c e / R a s p i D e v i c e 1 / Load2 ’ % i p a d r e s s e d g e d e v i c e 81 u r l L o a d 3 = ’ h t t p ://% s : 4 9 9 8 6 / a p i / v1 / r e s o u r c e / R a s p i D e v i c e 1 / Load3 ’ % i p a d r e s s e d g e d e v i c e 82 u r l u p = ’ h t t p ://% s : 4 9 9 8 6 / a p i / v1 / r e s o u r c e / R a s p i D e v i c e 1 /UpTime ’ % i p a d r e s s e d g e d e v i c e 83
84 # E d g e h e a d e r s
85 h e a d e r s = {’ c o n t e n t−t y p e ’ : ’ a p p l i c a t i o n / j s o n ’} 86
87 # S e n d d a t a
88 r e s p o n s e = r e q u e s t s . p o s t ( urlCPUTemp , d a t a=j s o n . dumps ( cpu ) , h e a d e r s=h e a d e r s , v e r i f y =F a l s e ) 89
90 ## Commented o u t f o r p r e s e n t a t i o n ##
91 # r e s p o n s e = r e q u e s t s . p o s t ( urlRAM , d a t a=RAMav , h e a d e r s=h e a d e r s , v e r i f y =F a l s e ) 92 # r e s p o n s e = r e q u e s t s . p o s t ( urlRAMto , d a t a=RAMto , h e a d e r s=h e a d e r s , v e r i f y =F a l s e )
93 # r e s p o n s e = r e q u e s t s . p o s t ( u r l R X p a c k e t s , d a t a= r x b y t e s [ 0 ] , h e a d e r s=h e a d e r s , v e r i f y =F a l s e ) 94 # r e s p o n s e = r e q u e s t s . p o s t ( u r l R X b y t e s , d a t a= r x b y t e s [ 1 ] , h e a d e r s=h e a d e r s , v e r i f y =F a l s e ) 95 # r e s p o n s e = r e q u e s t s . p o s t ( u r l T X p a c k e t s , d a t a= t x b y t e s [ 0 ] , h e a d e r s=h e a d e r s , v e r i f y =F a l s e ) 96 # r e s p o n s e = r e q u e s t s . p o s t ( u r l T X b y t e s , d a t a= t x b y t e s [ 1 ] , h e a d e r s=h e a d e r s , v e r i f y =F a l s e )
97 # r e s p o n s e = r e q u e s t s . p o s t ( u r l L o a d 1 , d a t a=j s o n . dumps ( i n t ( l o a d [ 0 ]∗1 0 0 ) ) , h e a d e r s=h e a d e r s , v e r i f y = F a l s e )
98 # r e s p o n s e = r e q u e s t s . p o s t ( u r l L o a d 2 , d a t a=j s o n . dumps ( i n t ( l o a d [ 1 ]∗1 0 0 ) ) , h e a d e r s=h e a d e r s , v e r i f y = F a l s e )
99 # r e s p o n s e = r e q u e s t s . p o s t ( u r l L o a d 3 , d a t a=j s o n . dumps ( i n t ( l o a d [ 2 ]∗1 0 0 ) ) , h e a d e r s=h e a d e r s , v e r i f y = F a l s e )
100 # r e s p o n s e = r e q u e s t s . p o s t ( u r l u p , d a t a=j s o n . dumps ( up )∗1 0 0 , h e a d e r s=h e a d e r s , v e r i f y =F a l s e ) 101
102 t i m e . s l e e p ( 5 )
![Figure 2: ”General technical concept of the IoT” [5]](https://thumb-eu.123doks.com/thumbv2/1library_info/4258134.1565025/5.892.220.676.161.516/figure-general-technical-concept-iot.webp)
![Figure 3: Visualisation of the EdgeX platform architecture. Source: [7]](https://thumb-eu.123doks.com/thumbv2/1library_info/4258134.1565025/6.892.161.735.169.540/figure-visualisation-edgex-platform-architecture-source.webp)

![Figure 9: AWS service topology [28][29]](https://thumb-eu.123doks.com/thumbv2/1library_info/4258134.1565025/25.892.110.790.680.858/figure-aws-service-topology.webp)