How to set up a basic private cloud environment with OpenNebula
Team: University of Applied Sciences Frankfurt
Marcel Fiebig SS19 – Master Information Technology
Vincenzo Angrisano Cloud Computing
Luca Jordan Prof. Baun
Christoph Gombert 26.06.2019
Content
1. Project Goal and Environment ... 3
2. Set up Masternode with Frontend ... 3
Install Components ... 3
Starting the Frontend ... 3
3. Set up Workernode with KVM ... 5
Install Components ... 5
Establish an SSH communication pipeline between Master and Worker ... 5
Network configuration ... 5
4. Register Workernode ... 6
5. Deploy VM ... 6
1. Project Goal and Environment
This guide provides a complete step-by-step tutorial to set up an OpenNebula private cloud environment with one masternode and one workernode.
The masternode can manage multiple worker nodes including network, storage and more. This environment can easily be extended by more workers if needed. Workernodes provide resources to host VMs. These resources can easily be assigned as needed. You will use the frontend which will be installed on the masternode to manage your worker node and hosted VMs.
In our project setup we used Ubuntu 18.04 as operating systems (OS). Therefore, slight differences could exist in the following commands, depending on your OS.
In our project setup we used VMWare Player Workstation to create VMs for master and worker nodes.
This enables nested virtualization on the VMs. Furthermore, KVM was used as hypervisor for the VMs on the worker node.
2. Set up Masternode with Frontend
Install Components
To start we need to download and install the necessary software components for the masternode. We use the sudo su command to execute all following commands with sudo privileges.
sudo su
wget -q -O- https://downloads.opennebula.org/repo/repo.key | apt-key add -
echo "deb https://downloads.opennebula.org/repo/5.8/Ubuntu/18.04 stable opennebula" >
/etc/apt/sources.list.d/opennebula.list apt update
apt-get install opennebula opennebula-sunstone opennebula-gate opennebula-flow /usr/share/one/install_gems
Starting the Frontend
A default password is generated for the frontend. You can find it in the following file after "oneadmin:"
which is the default username.
nano /var/lib/one/.one/one_auth
To change the password for the created linux user “oneadmin”, execute the following command (as root).
passwd oneadmin
Next start OpenNebula and the frontend (called “Sunstone”) service.
systemctl start opennebula
systemctl start opennebula-sunstone
To access the frontend open a browser and enter your masternode on Port 9869, which is used by default by OpenNebula. If you are working on the machine, just use localhost as computername.
http://<rechnername>:9869
You will see the login prompt. Use oneadmin and the password which you received earlier.
Login: oneadmin, <generated password>
Figure 1 - Sunstone Login Form
You can change the default password of the webfrontend user in the user management section.
Figure 2 - Change password of oneadmin or other users
3. Set up Workernode with KVM
Depending on the hypervisor you want to use for your VMs you need to set up your worker node.
Install Components
sudo su
wget -q -O- https://downloads.opennebula.org/repo/repo.key | apt-key add -
echo "deb https://downloads.opennebula.org/repo/5.8/Ubuntu/18.04 stable opennebula" >
/etc/apt/sources.list.d/opennebula.list apt-get update
apt-get install opennebula-node service libvirtd restart
passwd oneadmin
Establish an SSH communication pipeline between Master and Worker
Your master needs to be able to access the worker through SSH passwordless. To enable this, login to your master and exchange communication keys with all worker nodes. Use the oneadmin user that the saved file has correct access rights. To make this step easier you can set the oneadmin password on all machines to the same string.
su oneadmin
ssh-keyscan <frontend-rechnername> <workernode-rechnername> >>
/var/lib/one/.ssh/known_hosts
scp -rp /var/lib/one/.ssh <workernode-rechnername>:/var/lib/one/
-> confirm with your password previously setted Test the SSH connection via terminal to be sure it works.
Network configuration
Moreover, a bridge is needed on the worker node. In order to have a working network on the new VMs, the bridge must be created. One can do it in the /etc/network/interfaces file.
Here you must add the following text in order to have a working bridge (based on DHCP).
auto br0
iface br0 inet dhcp
bridge_ports <network interface name>
Make sure that the network interface name (e.g. “eth0”) is the one of your LAN connection. Also remember the name of the bridge, in this case “br0”, which you may use in the Sunstone webfrontend for more advanced settings.
To check wether the bridge is working, you may use:
brctl show
4. Register Workernode
You can do this step using the frontend:
Infrastructure -> Hosts
To add the worker use the plus symbol and enter the computername of the worker. If this step was successful the state should be ‘ON’ after several seconds.
Figure 3 - Add worker node as Host
5. Deploy VM
Firstly, download a VM image from the OpenNebula AppStore via Sunstone-Frontend or upload an own image.
Figure 4 - Apps that can be downloaded
Figure 5 - Available images that were downloaded
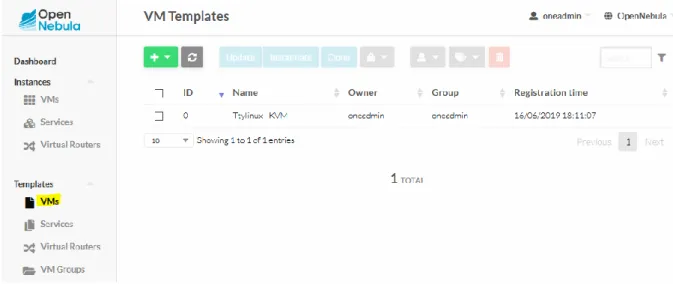
Afterwards click on VM Templates. You may use the predefined VM templates which are generated automatically if downloaded in the App Store. Otherwise, you can create an own VM template.
Figure 6 - VM Templates
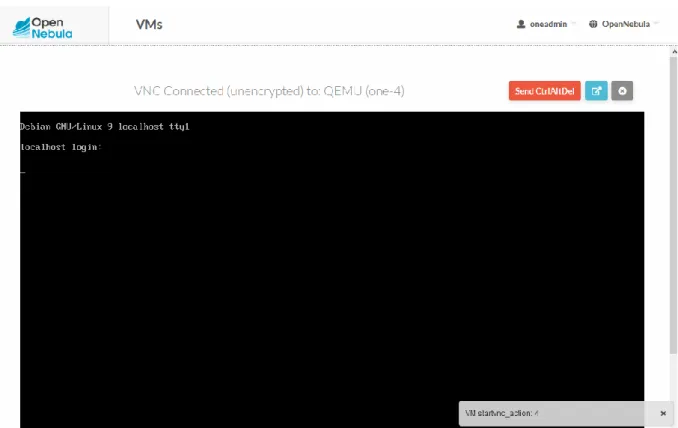
To create a VM use the button “Instantiate”. Your VM will be listed in the “VMs” section in “Instances”
and have the state ‘Pending’ until you deploy it on a specific host. After deploying you can access via VNC in the browser.
Figure 7 - Running VM
Figure 8 - Accessing the VM via VNC