Deployment of Private Cloud with IaaS OpenNebula
Cloud Computing WS 20/21
Under the guidance of
Prof. Dr. Christian Baun
Submitted by:
Anagha Satheesh Dixith - 1323304 Chowdhury, Tamanna - 1322677 Rajeswari Aparna Nanduri - 1323032
Table of Contents
Abstract ... 2
I. Introduction ... 2
II. OpenNebula ... 2
1. OpenNebula Front-end installation ... 3
III. Hypervisor ... 8
1. KVM ... 8
2. LXD ... 10
3. Firecracker ... 12
IV. Node Installation ... 14
1. Test-Drive ... 14
2. Steps in Installing KVM ... 15
3. Steps installing LXD: ... 19
4. Steps Installing Firecracker... 20
V. Verifying Installation ... 20
VI. Set-up Infrastructure and Service ... 26
1. Open Cloud Host Setup ... 26
2. Open Cloud Networking ... 26
3. Open Cloud Datastores ... 27
VII. Advanced Features ... 28
VIII. Findings & Conclusion ... 28
IX. References ... 28
Abstract
OpenNebula is an open-source platform for delivering simple yet feature-rich solution to build and manage different cloud deployment methods[14]. In this paper, we will be discussing procedure to build a basic private cloud and steps to follow to deploy a virtual machine on a host machine while providing basic understanding of each of those specific terms that are used in building a solution[10]. We will be discussing few tips and tricks to avoid failures that we faced during our attempts.
I. Introduction
Cloud computing is a model that provides services such as computing power, software, and storage over the Internet by third-party cloud providers. Microsoft, Google, Amazon, etc are the well-known cloud providers. Infrastructure as a Service (IaaS) is one of four types of cloud services. It provides compute, storage, network resources to consumers on-demand. Most of the providers are using Pay-as-you-go model as their billing model. Without the need for a cluster of physical systems, IaaS can manage to build complex cloud architectures. Amazon EC2 (Elastic Cloud Computing) and S3 (Simple Storage Service) are some typical examples[9].
IaaS offers flexibility to users to scale as they need depending on the workload. Pay-as-you go model charges consumers based on the number of resources used by them [11]. Hence this is perfect fit for this service. These prices play a major role in selecting the vendor. IaaS is basic cloud service that gained popularity in early 2010s. Its popularity continues till date with rapid development in this field by the advent of MicroVMs, containers, serverless, etc.
Open-Source cloud services has contributed a lot to development of new technologies.
Different open-source cloud platforms are emerging day by day. So, choosing the most suitable one is a difficult task to deal with because every cloud platform has its specific characteristics.
OpenNebula is one of the leading open-source cloud platforms. It can manage heterogeneous datacentre infrastructure and can build public, private, or hybrid implementations of IaaS.
II. OpenNebula
OpenNebula provides a scalable and comprehensive management option to simplify the complex operations related to large data. It aims to provide a flexible transformation of existing complex infrastructure into an open IaaS cloud. Figure 1 shows the architecture and the main components of OpenNebula [2].
The architecture is flexible and easy to integrate multiple network infrastructures, storage, etc. OpenNebula does not have any specific infrastructure requirements. It is implemented on a plugin model that allows the system integrators to customize the virtualization, authentication, authorization, storage, information, and remote cloud services. A bash script manages every action, and the script can be modified to a custom script or can also be plugged into other scripts. Also, this script is supported in any of the operating systems [9].
There are three layers: Drivers layer, Core layer and Tools layer as shown in Figure 1.
Drivers layer: Many important components of OpenNebula are stored in this layer. This layer wraps up the primary infrastructure as a separate service and communicates directly with the primary operating system. The main job of this layer is to create virtual machines (VMs), start
or shut them down. This layer is also responsible to allocate storage for the VMs and monitor the status of the VMs as well as physical machines [2].
Figure 1: OpenNebula Core Architecture [2]
Core layer: The core layer is the central layer, and it manages the full life cycle of a virtual machine. It also works on allocating a dynamic IP address for a VM [2].
Tools Layer: To manage the virtual machines, there are some interfaces provided by the tools layer. There is the Command-line interface (CLI), the Browser API to help the users to manage and communicate with the VMs. The functionality provided by the core layer is managed by a scheduler. This layer also provides a cloud interface that lets the external users share the same functionalities [2].
In our project we have used OpenNebula version 5.4. For the OpenNebula to work well, we need to decide on a hypervisor that we will use on our cloud infrastructure. The OpenNebula 5.4 provides support for Kernel-based Virtual Machine (KVM). Our goal is to use OpenNebula with KVM to manage virtualization, manage computing, storage, and networking on cloud. In our deployment process, we will integrate OpenNebula with KVM and it will have complete control over the virtual and physical resources [1]. The infrastructure will provide features for storage management, resource, and availability management.
In OpenNebula it is also possible to add multiple hypervisors. Heterogeneous multi-hypervisor environment can be deployed by a single OpenNebula instance.
1. OpenNebula Front-end installation
i. Pre-requisites:
Front-end:
• 4 GB RAM
• 20 GB
• OS: Red Hat Enterprise Linux-7, 8; CentOS-7.8; Ubuntu Server 16.04 (LTS), 18.04 (LTS), 20.04 (LTS), 20.10, Debian 9,10.
• Root user or sudo user access.
Sunstone:
• Web browsers and versions: Chrome 61.0 - 67.0, Firefox 59.0 - 61.0, IE11.0 Database:
• MariaDB or MySQL: All Linux OS mentioned in Front-end.
• PostgreSQL 9.5+: All Linux OS mentioned in Front-end except RHEL/CentOS 7
• SQLite: Default DB, no configuration is needed.
ii. Installation-Steps:
Step 1: Once logged into the Ubuntu 20.04 instance, run the following command to update the base system with the latest available packages.
$ apt-get update -y
This step is optional, as it comes with default SQLite that needs no separate configuration.
Step 2: Install and configure MariaDB
To install MariaDB database server onto your OpenNebula front-end instance, use the following command.
$ apt-get install mariadb-server -y
Once the installation is done, we must secure the MariaDB using the following command.
$ mysql_secure_installation
Run the following command to check whether MariaDB is running or not. It will ask for the Ubuntu password followed by the MySQL password. As the MySQL password is initially empty just press enter.
$ sudo mysql -u root -p
Output:
Welcome to the MariaDB monitor Your MariaDB connection id is 47
Step 2a: Create a database and user for the OpenNebula using the below command.
MariaDB [(none)]> CREATE DATABASE opennebuladb;
Output:
Query OK, 1 row affected (0.001 sec)
MariaDB [(none)]> GRANT ALL PRIVILEGES ON opennebuladb.* TO 'oneadmin' IDENTIFIED BY 'oneadmin’
Output:
Query OK, 0 row affected (0.001 sec)
Step 2b: Now flush all the privileges and exit from the MariaDB using the below command.
MariaDB [(none)]> FLUSH PRIVILEGES;
Output:
Query OK, 0 row affected (0.001 sec)
Step 2c: Now we can restart the MariaDB service and check its status using the following command.
$ systemctl restart mariadb
$ systemctl status mariadb
Step 3: Acting as sudo user or root user, import the repository key and add the OpenNebula repository to the system using
$ wget -q -O- https://downloads.opennebula.org/repo/repo.key | sudo apt-key add –
$ echo “deb https://downloads.opennebula.org/repo/5.4/Ubuntu/20.04 stable opennebula” | sudo tee
/etc/apt/sources.list.d/opennebula.list
Step 4: Install all the OpenNebula-Frontend package using the following command:
$ sudo apt update
$ sudo apt install opennebula opennebula-sunstone opennebula-gate opennebula-flow
Step 5: Some OpenNebula components require Ruby libraries. Hence OpenNebula provides the script that installs the required gems along with some development library packages. It can be done using the following command and press enter to start the Ruby installation [7].
$ sudo /usr/share/one/install_gems
Step 6: The next step is to configure OpenNebula DB. To do this we have to open the oned.conf file and edit the MySQL DB settings as follows. After saving the changes close the file.
$ sudo gedit /etc/one/oned.conf
LISTEN_ADDRESS = "0.0.0.0"
#DB = [ BACKEND = "sqlite" ]
# Sample configuration for MySQL DB = [ BACKEND = "mysql",
SERVER = "localhost", PORT = 0,
USER = "oneadmin", PASSWD = "password", DB_NAME = "opennebuladb", CONNECTIONS = 50 ]
Step 7: OpenNebula authentication credentials will be stored in one_auth file. These are generated automatically during installation. To login to Sunstone or frontend and make changes as one user, CLI prompts for this authentication. The password can be changed according to the user requirement.
$ sudo cat /var/lib/one/.one/one_auth oneadmin:ahhui89okyg
Step 8: The next step is to check the UFW Status whether we have an Active UFW Firewall.
We need to allow specific ports required by OpenNebula using.
$ sudo ufw allow proto tcp from any to any port 9869
Output:
Skipping adding existing rule
Skipping adding existing rule (v6)
Step 9: Now we are ready to start the OpenNebula service. We can also enable it to start on boot with the following command:
$ systemctl start opennebula
$ systemctl enable opennebula
$ systemctl start opennebula-sunstone
$ systemctl enable opennebula-sunstone
Step 10: We can now check the status of the OpenNebula using the below command:
$ systemctl status opennebula
$ systemctl status opennebula-sunstone
Step 11: To verify the installation of the OpenNebula, after it has started for the first time the below command can be used.
$ su - oneadmin -c "oneuser show"
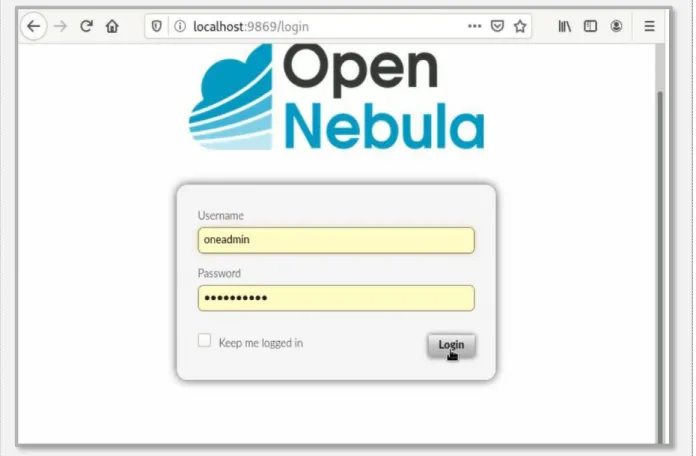
Step 12: You can access sunstone at https://localhost:9869 . Upon login, the user will be directed to OpenNebula login page as shown in Figure 2. The username is oneadmin and the password is the in /var/lib/one/.one/one_auth file in the front-end.
Figure 2: OpenNebula Login Page
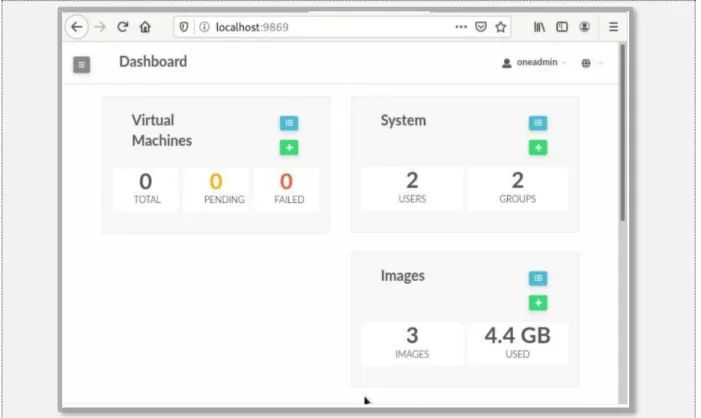
Once logged in, we will be able to see the OpenNebula dashboard as in Figure 3.
Figure 3: OpenNebula Dashboard
III. Hypervisor
In simple terms, Hypervisor is software that creates and runs Virtual Machines (VMs). It isolates hypervisor Operating system and resources from Virtual machines and enables management of VMs. It considered the resources like CPU, storage and memory as a pool and manages scheduling of these resources such that VMs and Physical hardware can make efficient use of resources. We were able to run multiple operating system alongside each other with the help of hypervisors.
There are two types of hypervisors,
• Bare Metal or Native: They run directly on the host hardware to manage its resources.
Ex: KVM, Hyper-V, vSphere etc
• Hosted Hypervisors: They are like applications that run on conventional Operating System. They schedule resources against resources. Ex: Virtual Box, VMware etc.
1. KVM
KVM depends on the Quick Emulator (QEMU) and receives all the management tools from it.
KVM uses x86 VT extensions so that virtual machines can make system calls. A set of Linux kernel modules are used for providing VT support. [3]. In the Fig. 4 we can see that KVM can easily run on a Linux kernel that has the KVM modules already installed. [9].
There is a Copy-on-write (QCOW) disk image format already built in the QEMU and supported by KVM. For disk I/O operations, it allows a ‘snapshot’ mode. There is a temporary file where all the disk writes are directed in ‘snapshot’ mode and there are no constant changes in the original disk image file. One disk image can run multiple VM’s since this way it can mitigate the huge storage requirements. Hence, it becomes easy to destroy a virtual cluster and delete images from the disk[3].
Figure 4: KVM System Architecture [9].
The standard Linux TUN/TAP is the supported platform for KVM. KVM supports this model for Ethernet bridging. Every single VM can get its own networking resources using this model.
Other than that, it allows to make the VM identical with a physical machine.
i. Installing KVM:[5]
a. Check if KVM is installed:
● In Ubuntu 18.04 or 20.04 following command is used, Output will be self- explanatory statements can be any one column of the below table.
$ kvm-ok
Outputs can be :
INFO: /dev/kvm exists
KVM acceleration can be used.
INFO: Your CPU does not support KVM extensions KVM acceleration can NOT be used
● In the case of Debian, Xen is an alternative to KVM, hence Qemu (emulator) is used along with libvirt daemon.
$ apt show qemu-system-x86
Note: Qemu will enable KVM virtual machine usage only for systems that support it. Users will not be notified in case the system does not support it.
b. KVM Installation:
i) Checking if your processor supports virtualisation is recommended. It can be done using following command:
$ egrep -c '(vmx|svm)' /proc/cpuinfo
• if output is 0, No virtualisation is supported.
• if output is >0 then virtualisation is supported.
ii) It is recommended to use 64-bit Kernel, check that with command:
$ uname -m
Output: X86_64 is considered a 64-bit kernel.
iii) After we get confirmation that your processor supports virtualisation then use the following command that also installs some dependencies.
$ sudo apt install -y qemu qemu-kvm libvirt-daemon libvirt-clients bridge-utils virt-manager
iv) To check if libvirtd daemon is running,
$ sudo systemctl status libvirtd
v) Check if KVM modules are loaded successfully,
$ lsmod | grep -i kvm
if output has ‘kvm_intel’ then KVM modules should be considered as loaded successfully.
vi) One can add Users to libvirtd and install virt-manager, but they are optional.
2. LXD
LXD is an open-source container management extension for the Linux Containers (LXC). LXD not only improves the existing LXC features but also provides new functionalities and features to build and manage the Linux containers. It delivers a unified user experience around the Linux systems which are running inside containers or virtual machines and can be managed with a single command line tool.
LXD is a representational state transfer application programming interface (REST API). It communicates with the LXC through a liblxc library[8]. It also offers a system daemon so that the applications can access LXC and has a template distribution system to help faster container creation as well as operation.
Some of the important features of LXD are:
1) High scalability
2) Powerful command line interface (CLI)
3) Improved security in unprivileged container settings and resource restrictions 4) Improved control over compute resources
5) Higher network and storage capabilities
6) Live migration of containers that are running between hosts
The containers in LXD comprise of many elements such as a file system, device references like network interfaces and disks, a set of configuration options that include configuration options and profiles, properties such as container’s persistent or ephemeral state and also snapshots that capture the run time details [8].
i. Installing LXD:
Step 1: To ensure all security updates are installed on Ubuntu either using the apt or apt-get command,
$ sudo apt update
$ sudo apt upgrade
Step 2: To install the stable branch of LXD, run the following command.
$ sudo apt install lxd
Add user to the LXD group for management purpose using the below command
$ sudo adduser {USERNameHere} lxd
$ sudo adduser abcd lxd
The group membership is applied only at the next login, or when a new ssh session started [6].
Hence, either we need to close and re-open your user/ssh session or use the following newgrp command to apply for group memberships immediately
$ newgrp lxd
The membership details can be verified using the id command and can be tested with the below command.
$ lxc list
Step 3: After the installation of LXD, it is now time to set up the LXD server. We must also configure the networking and the storage option such as directory, ZFS.
$ sudo lxd init
Now, we must answer a series of questions on how to configure the LXD server along with the networking and storage option. The choice must be made according to the user’s choice. The information can be verified by the following commands
$ lxd profile list
$ lxc profile show default
$ lxc network list
$ lxc network show lxdbr0
$ lxc storage list
$ lxc storage show nixcraftzfs
Step 4: The next step is to list the built-in LXD image for various Linux distros and can be done by the following command:
$ lxc image list images:
$ lxc image list images: | grep -i ubuntu
Step 5: Our first Linux container can be creating using,
$ lxc launch images:{distro}/{version}/{arch} {container-name-here}
For Ubuntu Linux 20.04 container, we can use
$ lxc launch images:ubuntu/xenial/amd64 ubuntu-xenial-c3
$ lxc launch images:ubuntu/bionic/amd64 ubuntu-bionic-c4
$ lxc launch images:ubuntu/focal/amd64 ubuntu-focal-c5
3. Firecracker
Firecracker is new open-source virtualisation technology developed by amazon web services and used in services like AWS Lambda and AWS Fargate[4]. It was built for improving customer experience in those services.
Firecracker is a Virtual machine Monitor based on a Kernel based Virtual Machine. This helps in deploying lightweight Virtual Machines called MicroVMs. MicroVMs provide more security than Traditional Virtual Machines. It is of minimalistic design that excludes guest operation and unnecessary devices. OpenNebula 5.12 currently provides support for Firecracker.
Figure 5 describes the benefits of using Firecracker introduces a lot of benefits as it will be helpful in direct access of DockerHub containers on MicroVMs with Auto Scaling. Users can directly access the DockerHub images from marketplaces and can customise MicroVMs according to requirements along with scaling functionality[16]. It also helps in realising OpenNebula’ s promise of Mixed Hypervisors i.e., KVM and Firecracker both can be used on the same host.
All features available for traditional Virtual machines are also available to MicroVMs from OpenNebula 5.12. Features namely Networking, VNC access, contextualisation.
Figure 5: OpenNebula Services
Security is increased in MicroVMs because of an auxiliary tool named “jailer”. It isolates MicroVMs from Linux based user security barriers like chroot etc. This is another line of defence as it isolates the process inside the hypervisor in case virtualisation is compromised.
i. Installing Firecracker:
Firecracker needs KVM, all steps involving KVM should be used as well. In addition to that we need to enable write permissions to KVM.
Download Firecracker using curl command:
$ curl -LOJ
https://github.com/firecrackermicrovm/firecracker/releases/download/
v0.11.0/firecracker-v0.11.0
The following steps are optional, these are used for our ease of use.
$ mv firecracker-v0.11.0 firecracker
$ chmod +x ./firecracker
$ sudo mv ./firecracker /usr/local/bin/
Check for installed version with
$ firecracker --version
Output: firecracker 0.11.0
IV. Node Installation
After proper front-end installation and verification, we will be moving to node installation.
First step of node installation would be selecting a hypervisor according to compatibility of the physical or virtual device. OpenNebula supports several hypervisors. They are KVM, LXD, Firecracker and vCenter. Not all devices are compatible with all hypervisors. Depending on the hypervisor steps to install nodes will differ.
1. Test-Drive
Before diving into node installation, we recommend that device should be tested for compatibility. This can be done in few minutes by the help of miniOne[15]. miniONE a deployment tool. We can run all necessary components of OpenNebula with single run.
This is not for production but more of test-run for OpenNebula.
i. Requirements:
• 4 GB RAM
• 20 GB
• free space on diskx86-64 Intel or AMD processor with virt. capabilities
• default installation of the operating system with the latest updates
• privileged user access (root)
• openssh-server package installed.
• Physical Host or virtual machine (LXD) ii. Commands:
Depending up on hypervisor tags should be given,
For KVM:
# wget
'https://github.com/OpenNebula/minione/releases/latest/download/mini one'
$ sudo bash minione
For LXD:
# wget
'https://github.com/OpenNebula/minione/releases/latest/download/mini one'
$ sudo bash minione –lxd
For Firecracker:
# wget
'https://github.com/OpenNebula/minione/releases/latest/download/mini one'
$ sudo bash minione --firecracker
As per our project is concerned, we used KVM hypervisor which is compatible with our device.
All the steps below should be done in a Host system that may or may not be the server where the front end was installed.
2. Steps in Installing KVM i. Prerequisites:
OpenNebula every version has extended its support to different operating systems.
Latest OpenNebula 5.12 supports the following:
OS: Red Hat Enterprise Linux-7, 8; CentOS-7.8; Ubuntu Server 16.04 (LTS), 18.04 (LTS), 20.04 (LTS), 20.10, Debian 9,10
ii. Get OpenNebula Repositories:[10]
Depending on the OS, we need appropriate commands for adding repositories. we used Ubuntu and Debian hence those commands will be presented. Execute following commands as root or sudo user.
Get repository key: we used community download for our project.
# wget -q -O- https://downloads.opennebula.io/repo/repo.key | apt- key add -
for Ubuntu 18.04
# echo "deb https://downloads.opennebula.io/repo/5.12/Ubuntu/18.04 stable opennebula" > /etc/apt/sources.list.d/opennebula.list
# apt-get update
for Debian 10:
# echo "deb https://downloads.opennebula.io/repo/5.12/Debian/10 stable opennebula" > /etc/apt/sources.list.d/opennebula.list
# apt-get update
iii. Installation of node:
$ sudo apt-get update
$ sudo apt-get install opennebula-node
$ sudo systemctl libvirtd restart # debian
$ sudo service libvirt-bin restart # ubuntu
iv. Password-less SSH configuration:
After Successful node installation, we need to configure the hosts we added to the front-end.
Connections that are needed to establish are,
● from Front-end to Front-end,
● from Front-end to hypervisor Host,
● from Front-end to hypervisor Host with another connection within to another Host (for migration operations),
● from Front-end to hypervisor Host with another connection within back to Front- end (for data copy back).
When we installed front-end in server, oneadmin user will be generated a key pair in /var/lib/one/.ssh/id_rsa and /var/lib/one/.ssh/id_rsa.pub, the public key is also added into /var/lib/one/.ssh/authorized_keys. If previous installations produced these keys, they won’t be touched. For new installations this will be stored for the oneadmin from /usr.share/one/ssh into /var/lib/one/.ssh/config.
Up until OpenNebula 5.12, Front-end should share this key among its hosts, but this can be achieved by a dedicated SSH authentication agent that shares the private key of front-end to its hosts. But for the sake of previous versions, we will be providing commands.
Step-1:
Make sure you are logged in as oneadmin from Front-end:
# su - oneadmin
Step-2:
The known_hosts file is used to store all host names along with Front-end.
$ ssh-keyscan <frontend> <node1> <node2> <node3>...
>>/var/lib/one/.ssh/known_hosts
Step-3:
Distribute Configuration individually to each node:
i. Public key of oneadmin user
$ ssh-copy-id -i /var/lib/one/.ssh/id_rsa.pub <node1>
ii. Distribute known_hosts generated in step b)
$ scp -p /var/lib/one/.ssh/known_hosts <node1>:/var/lib/one/.ssh/
iii. Distribute private key of oneadmin (Optional for 5.12)
$ scp -p /var/lib/one/.ssh/id_rsa <node1>:/var/lib/one/.ssh/
Step-4:
Verify SSH configuration for each of the categories mentioned above.
For example: Call node1 and make calls to the front end and other nodes to see everything is configured properly.
$ ssh <node1>
$ ssh <frontend>
$ exit
$ ssh <node2>
$ exit
$ exit
v. Network Configuration:
It can be achieved by adding bridges in /etc/network/interfaces/ on hosts only not needed in Front-end.
auto br0
iface br0 net dhcp bridge_ports enp0s3
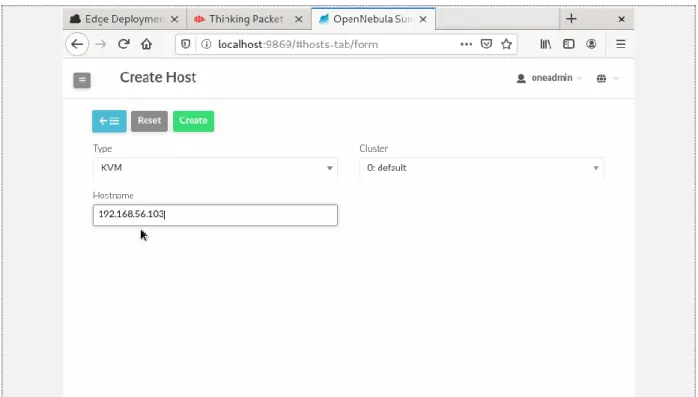
vi. Adding Host in/to Front-end:
This can be done both from CLI and from Sunstone. Figure 6 is screenshot from Front-end Sunstone:
Figure 6: Create Host
After adding host, host will be in INIT state and takes a couple of minutes to move to state of ON or might need to refresh the hosts page. That can be seen in Figure 7.
Figure 7: Host initialisation
One can check host machines in CLI as well using following command.
$ onehost list
ID NAME CLUSTER RVM ALLOCATED_CPU ALLOCATED_MEM STAT
6 192.168.56.103 default 0 0 / 400 (0%) 0/ 3.5G (0%) on
4 10.0.2.15 default 0 0 / 200 (0%) 0/ 4.8G (0%) on
If in any case there is an ERROR as status instead of ON or INIT, please check if the host machine is on and working or check the installation of SSH Configuration.
Figure 8: Error in Adding Host This error screen was taken when my host was switched off.
3. Steps installing LXD:
i. Prerequisites:
OpenNebula every version has extended its support to different operating systems. Latest OpenNebula 5.12 support to:
• OS: Ubuntu Server 16.04 (LTS), 18.04 (LTS), 20.04 (LTS), 20.10, Debian 10.
• LXD version: Support for LXD = 3.0.x either snap or system package ii. Get OpenNebula Repositories: [10]
Installing LXD is almost like that of KVM, only change is in installation phase command.
For Ubuntu 18.04
use LXD installed as snap (from OpenNebula 5.8.2):
$ sudo apt-get install opennebula-lxd-snap opennebula-node-lxd
For Ubuntu >= 19.04 and Debian >= 10
$ sudo apt-get install opennebula-node-lxd
iii. Password-less SSH configuration:
Same steps as KVM needs to be followed.
iv. Network Configuration:
Same steps as KVM needs to be followed.
4. Steps Installing Firecracker
i. Prerequisites:
OpenNebula every version has extended its support to different operating systems. Latest OpenNebula 5.12 support to:
OS: Red Hat Enterprise Linux-7, 8; CentOS-7.8; Ubuntu Server 16.04 (LTS), 18.04 (LTS), 20.04 (LTS), 20.10, Debian 9,10
ii. Get OpenNebula Repositories: [10]
Installing Firecracker node is like that of KVM, only change is in installation phase command.
For Debian/Ubuntu:
$ sudo apt-get update
$ sudo apt-get install opennebula-node-firecracker
iii. Password-less SSH configuration:
Same steps as KVM needs to be followed.
iv. Network Configuration:
Same steps as KVM needs to be followed.
V. Verifying Installation
Depending on the hypervisor used in node installation verification steps will be different[10].
To verify installation of KVM/LXD node installation:
Goal: Able to deploy a virtual machine in a host machine.
Requirement: Need internet connection to import images from marketplace and host to which we want to deploy VM should be in ON state.
Step-1:
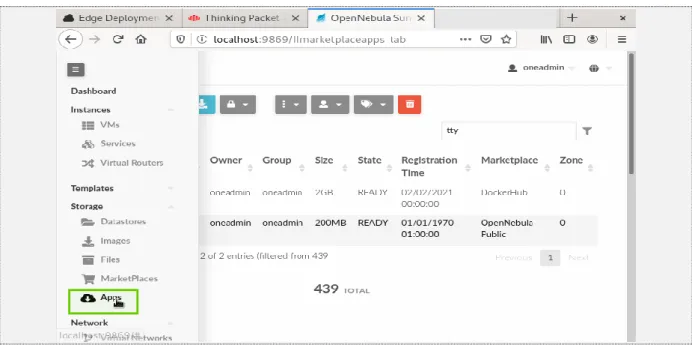
We need to import an image into our cloud by selecting an image with a compatible hypervisor.
As in Figure 9, Click on Apps Tab from storage list of main menu.
Figure 9: Locate apps tab in main menu
Figure 10: Importing Image to Cloud
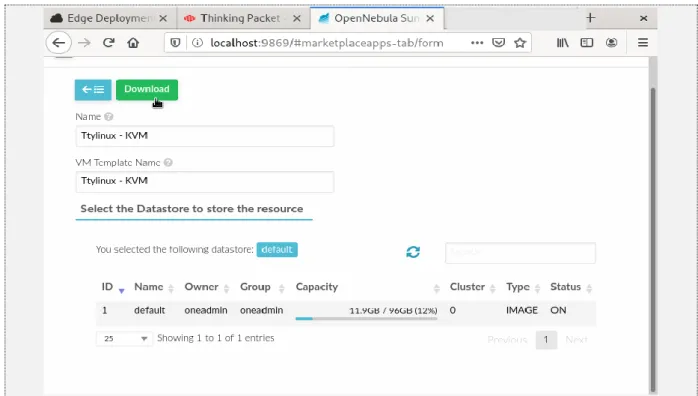
Type the desired image name or search through the long list of images available. Later select the required image and click on import to cloud image or to your local machine depending on the requirement, here we used import to cloud as our location as highlighted in Figure 10.
Figure 11: Configure VM
After selecting our location, we need to name the image and select the datastore to which image should be stored. Later click on the download button to get the image into the images tab like in Figure 11.
Step-2:
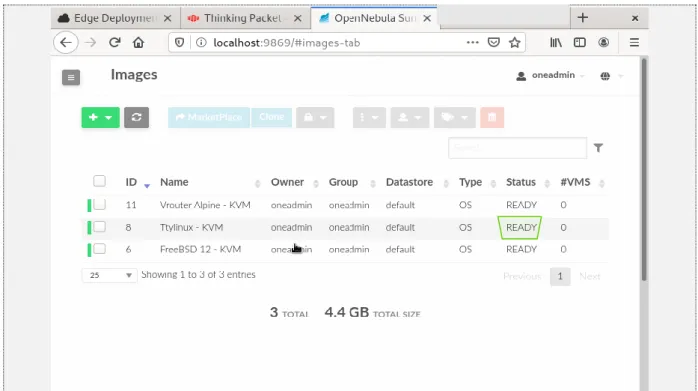
As in Figure 12, To check if an image is added to your cloud, navigate to Storage -> Images from main menu.
Figure 12: Locate images tab in main menu.
Figure 13: Check desired image status
Check if the status of the image is READY as highlighted in Figure 13.
Step-3:
Figure 14 shows to select templates tab in main menu and select VMs option as highlighted.
Figure 14: Selecting VM image
Upon selecting VMs option we will be landing in the VM Template page, where we need to select the VM template you want to instantiate and click on instantiate button as shown in Figure 15 so that we can give VM a name and can select host and/or datastore like in Figure 16.
Although for initial verification, recommended settings can be kept but we can configure the virtual machine as per our requirements for attributes like Memory, physical processor, virtual processor, and Disk space.
Figure 15: Instantiate desired VM Template.
Figure 16: Configure VM
We can schedule events for virtual machines. Events might be reboot, terminate, resume and so on. We can also assign virtual machines to virtual machine Groups.
Step-4:
This step is to test VNC access, As shown in Figure 17, click on VMs in Instances Tab as highlighted with a green box and check if the instance is in RUNNING status.
Figure 17: Select Virtual Machine tab in Main menu
Figure 18 highlighted VNC with a green box, click on it to launch a Virtual Machine.
Figure 18: Launch VNC
If the launch fails, then you need to investigate Log file for a detailed report on why the deployment failed.
VI. Set-up Infrastructure and Service
We have successfully enabled private cloud. we can configure our cloud depending up on individual requirements. This requires three steps explained in below sub-sections.
1. Open Cloud Host Setup
Prerequisite: Host can be added either by CLI or by Sunstone.
Depending on the hypervisor used in node installation, corresponding driver is installed and is enabled by OpenNebula. We can configure host in sunstone which is almost self- explanatory[13].
2. Open Cloud Networking
Prerequisite: Host should be configured as described in Open Cloud Host Setup either by CLI or by Sunstone.
To add a network to VM, we can do it through Front-end as well. Move to the Network tab in the main menu.
As shown in Figure 19,click on Create to create a new Network in Virtual Networks dialog and fill in the details of your network, like the Bridge, or the Physical Device, the IP ranges and so on as shown in Figure 20.
Figure 19: click on create to configure
Figure 20: Configure Virtual Network 3. Open Cloud Datastores
A datastore is a storage medium by which we store the images that we saw in the verification phase. OpenNebula supports three different datastore types.
● File and kernel: It store files that can be used for MicroVMs .
● Images: stores images repository.
● System: Holds running Virtual machines.
Figure 21 explains Image Datastores in OpenNebula:
Figure 21: Table to describe each datastore
Depending on hypervisors, datastores will be selected. Firecracker only uses File System. LXD only uses Filesystem and LXD[10][13].
VII. Advanced Features
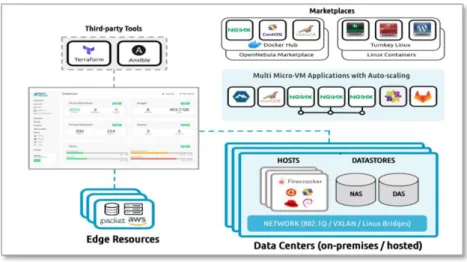
OpenNebula provides lots of functionalities that it offers as an IaaS platform. In addition to the above mentioned basic private cloud features it can manage user groups and multi-VM for workflow using “oneFlow” for services with auto-scaling capabilities. It provides Hybrid cloud -bursting and public cloud functionalities. These interfaces can be added to private clouds in case they desire to provide partners or external users access to user’s infrastructure or may be to sell user’s overcapacity. It is made possible with help of EC2 APIs. It also provides Edge Computing and hybrid computing capabilities[14].
Transition from centralised clouds to edge-like clouds is most sought out now-a -days with deployment of 5G services. Telefonica is using OpenNebula to provide support to IoT devices gaming, video streaming and many mobile applications that need real-time processing[12].
VIII. Findings & Conclusion
Developing a cloud infrastructure from scratch is very tiresome and level of difficulty depends on how well you know about the underlying operating systems on which cloud will be deployed and its complex technical terminology. This course helped us to unlock the world of Linux and Unix. We are not shy to admit that we used to have only basic knowledge of Linux flavours and its functionalities. Just like Thomas. A. Edison’s famous quote on failure, we also failed thousand times but learned more in each failure.
We strongly suggest that one who wants to implement OpenNebula private cloud (or Openshift, as we tried our luck there as well) to use high end processors with at least 16GB RAM and processor with virtualisation capabilities. For this we suggest that one should do a trial run using “miniONE '' as mentioned under test-drive. miniONE is not for production but for trial run that helps us in a few minutes to understand which hypervisor is compatible with our device and about Virtualisation support provided by it. This paper barely scratched the surface of OpenNebula cloud capabilities and is indeed a great platform and leading company in the IaaS cloud domain.
IX. References
[1] "OpenNebula 5.4 operation Guide", Accessed on: Feb 04, 2021.[Online]. Available:
http://docs.opennebula.io/pdf/5.4.13/opennebula_5.4_operation_guide.pdf
[2] X. Wen, G. Gu, Q. Li, Y. Gao and X. Zhang, "Comparison of open-source cloud management platforms: OpenStack and OpenNebula," 2012 9th International Conference on Fuzzy Systems and Knowledge Discovery, Sichuan, 2012, pp. 2457- 2461, doi: 10.1109/FSKD.2012.6234218.
[3] M. Fenn, M. Murphy, J. Martin and S. Goasguen, "An Evaluation of KVM for Use in Cloud Computing", Proc. 2nd International Conference on the Virtual Computing Initiative, 2008.
[4] Firecracker, Accessed on: Feb 04, 2021.[Online]. Available: https://firecracker- microvm.github.io
[5] KVM Installation, Accessed on: Feb 04, 2021. [Online]. Available on:
https://help.ubuntu.com/community/KVM/Installation
[6] Vivek Gite. Accessed on: Feb 04, 2021. [Online]. Available on:
https://www.cyberciti.biz/faq/install-lxd-on-ubuntu-20-04-lts-using-apt/
[7] Mr. Tech Jawan, Accessed on: Feb 03, 2021. [Online]. Available on:
https://barathadhithya29.blogspot.com/2019/07/how-to-install-opennebula- frontend-in.html
[8] Stephen J. Bigelow, Nick Martin. Accessed on: Feb 03, 2021. [Online]. Available on: https://searchitoperations.techtarget.com/definition/LXD-Linux-container- hypervisor
[9] Giovanni Toraldo, OpenNebula 3 Cloud Computing, 2012, ISBN: 9781849517478 [10] Installation guide, Retreived from OpenNebula Official website,
https://docs.opennebula.io/5.12/intro_release_notes/concepts_terminology/intro.ht ml#step-2-design-and-install-the-cloud
[11] IaaS, IBM cloud official Website, Accessed on Feb 04, 2021.
https://www.ibm.com/cloud/learn/iaas.
[12] Blog. (2017, JUNE 7), Retrieved from OpenNebula:
https://opennebula.io/telefonica-building-its-edge-computing-and-nfv-platform- with-opennebula/
[13] cloud Host setup. Retrieved from openNebula:
https://docs.opennebula.io/5.12/deployment/open_cloud_host_setup/index.html
[14] KeyFeatures, Retrieved from OpenNebula:
https://docs.opennebula.io/5.12/intro_release_notes/concepts_terminology/key_feat ures.html
[15] OpenNebula-Minione, Retrieved from OpenNebula Cloud Services:
https://docs.opennebula.io/minione/
[16] OpenNebula+Firecracker(2020,April 1), Retrived from: OpenNebula Announcements https://opennebula.io/opennebula-firecracker-building-the-future- of-on-premises-serverless-computing/
![Figure 1: OpenNebula Core Architecture [2]](https://thumb-eu.123doks.com/thumbv2/1library_info/4258272.1565035/4.892.184.709.169.475/figure-opennebula-core-architecture.webp)
![Figure 4: KVM System Architecture [9].](https://thumb-eu.123doks.com/thumbv2/1library_info/4258272.1565035/10.892.119.777.121.473/figure-kvm-system-architecture.webp)