iPhone 3D Programming
iPhone 3D Programming
Developing Graphical Applications with OpenGL ES
Philip Rideout
foreword by Serban Porumbescu
Beijing • Cambridge • Farnham • Köln • Sebastopol • Taipei • Tokyo
iPhone 3D Programming by Philip Rideout
Copyright © 2010 Philip Rideout. All rights reserved.
Printed in the United States of America.
Published by O’Reilly Media, Inc., 1005 Gravenstein Highway North, Sebastopol, CA 95472.
O’Reilly books may be purchased for educational, business, or sales promotional use. Online editions are also available for most titles (http://my.safaribooksonline.com). For more information, contact our corporate/institutional sales department: 800-998-9938 or corporate@oreilly.com.
Editor: Brian Jepson
Production Editor: Loranah Dimant
Copyeditor: Kim Wimpsett
Proofreader: Teresa Barensfeld
Production Services: Molly Sharp
Indexer: Ellen Troutman Zaig
Cover Designer: Karen Montgomery
Interior Designer: David Futato
Illustrator: Robert Romano
Printing History:
May 2010: First Edition.
Nutshell Handbook, the Nutshell Handbook logo, and the O’Reilly logo are registered trademarks of O’Reilly Media, Inc. iPhone 3D Programming, the image of a grasshopper, and related trade dress are trademarks of O’Reilly Media, Inc.
Many of the designations used by manufacturers and sellers to distinguish their products are claimed as trademarks. Where those designations appear in this book, and O’Reilly Media, Inc., was aware of a trademark claim, the designations have been printed in caps or initial caps.
While every precaution has been taken in the preparation of this book, the publisher and author assume no responsibility for errors or omissions, or for damages resulting from the use of the information con- tained herein.
TM
This book uses RepKover™, a durable and flexible lay-flat binding.
ISBN: 978-0-596-80482-4 [M]
Frank and Doris Rideout 1916–1998 and 1919–2007
Table of Contents
Foreword . . . xiii Preface . . . xv 1. Quick-Start Guide . . . 1
Transitioning to Apple Technology 3
Objective-C 3
A Brief History of OpenGL ES 4
Choosing the Appropriate Version of OpenGL ES 4
Getting Started 5
Installing the iPhone SDK 6
Building the OpenGL Template Application with Xcode 6
Deploying to Your Real iPhone 8
HelloArrow with Fixed Function 9
Layering Your 3D Application 9
Starting from Scratch 11
Linking in the OpenGL and Quartz Libraries 12
Subclassing UIView 13
Hooking Up the Application Delegate 19
Setting Up the Icons and Launch Image 21
Dealing with the Status Bar 22
Defining and Consuming the Rendering Engine Interface 22
Implementing the Rendering Engine 26
Handling Device Orientation 30
Animating the Rotation 31
HelloArrow with Shaders 34
Shaders 34
Frameworks 36
GLView 36
RenderingEngine Implementation 37
Wrapping Up 42
vii
2. Math and Metaphors . . . 43
The Assembly Line Metaphor 43
Assembling Primitives from Vertices 44
Associating Properties with Vertices 47
The Life of a Vertex 49
The Photography Metaphor 51
Setting the Model Matrix 55
Setting the View Transform 58
Setting the Projection Transform 59
Saving and Restoring Transforms with Matrix Stacks 62
Animation 64
Interpolation Techniques 64
Animating Rotation with Quaternions 65
Vector Beautification with C++ 66
HelloCone with Fixed Function 69
RenderingEngine Declaration 69
OpenGL Initialization and Cone Tessellation 71
Smooth Rotation in Three Dimensions 75
Render Method 77
HelloCone with Shaders 78
Wrapping Up 81
3. Vertices and Touch Points . . . 83
Reading the Touchscreen 83
Saving Memory with Vertex Indexing 89
Boosting Performance with Vertex Buffer Objects 94
Creating a Wireframe Viewer 98
Parametric Surfaces for Fun 100
Designing the Interfaces 104
Handling Trackball Rotation 106
Implementing the Rendering Engine 108
Poor Man’s Tab Bar 111
Animating the Transition 115
Wrapping Up 117
4. Adding Depth and Realism . . . 119
Examining the Depth Buffer 119
Beware the Scourge of Depth Artifacts 121
Creating and Using the Depth Buffer 123
Filling the Wireframe with Triangles 125
Surface Normals 128
Feeding OpenGL with Normals 128
The Math Behind Normals 129
Normal Transforms Aren’t Normal 131
Generating Normals from Parametric Surfaces 133
Lighting Up 135
Ho-Hum Ambiance 136
Matte Paint with Diffuse Lighting 136
Give It a Shine with Specular 138
Adding Light to ModelViewer 139
Using Light Properties 142
Shaders Demystified 144
Adding Shaders to ModelViewer 147
New Rendering Engine 149
Per-Pixel Lighting 152
Toon Shading 154
Better Wireframes Using Polygon Offset 155
Loading Geometry from OBJ Files 157
Managing Resource Files 159
Implementing ISurface 162
Wrapping Up 163
5. Textures and Image Capture . . . 165
Adding Textures to ModelViewer 165
Enhancing IResourceManager 167
Generating Texture Coordinates 169
Enabling Textures with ES1::RenderingEngine 172
Enabling Textures with ES2::RenderingEngine 175
Texture Coordinates Revisited 180
Fight Aliasing with Filtering 181
Boosting Quality and Performance with Mipmaps 184
Modifying ModelViewer to Support Mipmaps 186
Texture Formats and Types 187
Hands-On: Loading Various Formats 188
Texture Compression with PVRTC 191
The PowerVR SDK and Low-Precision Textures 198
Generating and Transforming OpenGL Textures with Quartz 201
Dealing with Size Constraints 204
Scaling to POT 206
Creating Textures with the Camera 208
CameraTexture: Rendering Engine Implementation 214
Wrapping Up 219
6. Blending and Augmented Reality . . . 221
Blending Recipe 222
Wrangle Premultiplied Alpha 224
Table of Contents | ix
Blending Caveats 226
Blending Extensions and Their Uses 227
Why Is Blending Configuration Useful? 228
Shifting Texture Color with Per-Vertex Color 229
Poor Man’s Reflection with the Stencil Buffer 230
Rendering the Disk to Stencil Only 232
Rendering the Reflected Object with Stencil Testing 235
Rendering the “Real” Object 236
Rendering the Disk with Front-to-Back Blending 236
Stencil Alternatives for Older iPhones 236
Anti-Aliasing Tricks with Offscreen FBOs 238
A Super Simple Sample App for Supersampling 239
Jittering 247
Other FBO Effects 252
Rendering Anti-Aliased Lines with Textures 252
Holodeck Sample 256
Application Skeleton 257
Rendering the Dome, Clouds, and Text 260
Handling the Heads-Up Display 264
Replacing Buttons with Orientation Sensors 269
Overlaying with a Live Camera Image 275
Wrapping Up 279
7. Sprites and Text . . . 281
Text Rendering 101: Drawing an FPS Counter 282
Generating a Glyphs Texture with Python 284
Rendering the FPS Text 288
Simplify with glDrawTexOES 293
Crisper Text with Distance Fields 295
Generating Distance Fields with Python 296
Use Distance Fields Under ES 1.1 with Alpha Testing 300
Adding Text Effects with Fragment Shaders 300
Smoothing and Derivatives 301
Implementing Outline, Glow, and Shadow Effects 304
Animation with Sprite Sheets 306
Image Composition and a Taste of Multitexturing 308
Mixing OpenGL ES and UIKit 310
Rendering Confetti, Fireworks, and More: Point Sprites 313
Chapter Finale: SpringyStars 314
Physics Diversion: Mass-Spring System 314
C++ Interfaces and GLView 318
ApplicationEngine Implementation 319
OpenGL ES 1.1 Rendering Engine and Additive Blending 322
Point Sprites with OpenGL ES 2.0 324
Wrapping Up 327
8. Advanced Lighting and Texturing . . . 329
Texture Environments under OpenGL ES 1.1 330
Texture Combiners 332
Bump Mapping and DOT3 Lighting 335
Another Foray into Linear Algebra 337
Generating Basis Vectors 338
Normal Mapping with OpenGL ES 2.0 340
Normal Mapping with OpenGL ES 1.1 343
Generating Object-Space Normal Maps 345
Reflections with Cube Maps 347
Render to Cube Map 351
Anisotropic Filtering: Textures on Steroids 352
Image-Processing Example: Bloom 354
Better Performance with a Hybrid Approach 358
Sample Code for Gaussian Bloom 358
Wrapping Up 364
9. Optimizing . . . 365
Instruments 365
Understand the CPU/GPU Split 366
Vertex Submission: Above and Beyond VBOs 367
Batch, Batch, Batch 367
Interleaved Vertex Attributes 369
Optimize Your Vertex Format 370
Use the Best Topology and Indexing 371
Lighting Optimizations 372
Object-Space Lighting 372
DOT3 Lighting Revisited 372
Baked Lighting 373
Texturing Optimizations 373
Culling and Clipping 374
Polygon Winding 374
User Clip Planes 375
CPU-Based Clipping 376
Shader Performance 376
Conditionals 376
Fragment Killing 377
Texture Lookups Can Hurt! 377
Optimizing Animation with Vertex Skinning 377
Skinning: Common Code 379
Table of Contents | xi
Skinning with OpenGL ES 2.0 381
Skinning with OpenGL ES 1.1 383
Generating Weights and Indices 386
Watch Out for Pinching 387
Further Reading 387
Appendix: C++ Vector Library . . . 389
Index . . . 403
Foreword
I’m sitting at my kitchen table writing this foreword on the eve of yet another momen- tous occasion for Apple. Today, February 23, 2010, marks the day the 10-billionth song was downloaded from the iTunes Music Store. Take a moment to really think about that number and keep in mind that the iTunes Music Store was launched just shy of seven years ago back in April 2003. That’s right. Ten billion songs downloaded in just under seven years.
The news gets even better. If you’re holding this book, you’re probably interested in iPhone application development, and the next number should really get you excited.
On January 5, 2010, Apple announced that 3 billion applications had been downloaded from its App Store in just under 18 months. Phenomenal!
Months before I was asked to review this book, I had started putting together an outline and researching material for my own iPhone graphics book. When I was asked whether I was interested in being a technical reviewer for a book that seemed so similar to what I was planning, I definitely hesitated. But I’ve always been a big fan of O’Reilly books and quickly changed my mind once I realized it was the publisher backing the book.
Philip has done a fantastic job of focusing on the content most crucial to getting you productive with OpenGL ES on the iPhone as quickly as possible. In the pages that follow you’ll learn the basics of using Xcode and Objective-C, move through the fixed function (OpenGL ES 1.1) and programmable (OpenGL ES 2.0) graphics pipelines, experiment with springs and dampeners, and learn advanced lighting techniques.
You’ll even learn about distance fields and pick up a bit of Python along the way. By the end of this book, you’ll find yourself resting very comfortably on a solid foundation of OpenGL ES knowledge. You’ll be well-versed in advanced graphics techniques that are applicable to the iPhone and beyond.
I knew from the moment I read the first partial manuscript that this was the book I wish I had written. Now that I’ve read the book in its entirety, I’m certain of it. I’m confident you’ll feel the same way.
— Serban Porumbescu, PhD Senior Gameplay Engineer Tapulous Inc.
xiii
Preface
How to Read This Book
“It makes programming fun again!” is a cliché among geeks; all too often it’s used to extol the virtues of some newfangled programming language or platform. But I honestly think there’s no better aphorism to describe iPhone graphics programming. Whether you’re a professional or a hobbyist, I hope this book can play a small role in helping you rediscover the joy of programming.
This book is not an OpenGL manual, but it does teach many basic OpenGL concepts as a means to an end, namely, 3D graphics programming on the iPhone and iPod touch.
Much of the book is written in a tutorial style, and I encourage you to download the sample code and play with it. Readers don’t need a graphics background, nor do they need any experience with the iPhone SDK. A sound understanding of C++ is required;
fluency in Objective-C is useful but not necessary. A smidgen of Python is used in Chapter 7, but don’t let it scare you off.
I tried to avoid making this book math-heavy, but, as with any 3D graphics book, you at least need a fearless attitude toward basic linear algebra. I’ll hold your hand and jog your memory along the way.
If you’re already familiar with 3D graphics but haven’t done much with the iPhone, you can still learn a thing or two from this book. There are certain sections that you can probably skip over. Much of Chapter 2 is an overview of general 3D graphics con- cepts; I won’t be offended if you just skim through it. Conversely, if you have iPhone experience but are new to 3D graphics, you can gloss over some of the Objective-C and Xcode overviews given in Chapter 1.
In any case, I hope you enjoy reading this book as much as I enjoyed writing it!
xv
Conventions Used in This Book
The following typographical conventions are used in this book:
Italic
Indicates new terms, URLs, email addresses, filenames, and file extensions. It also indicates the parts of the user interface, such as buttons, menus, and panes.
Constant width
Used for program listings, as well as within paragraphs to refer to program elements such as variable or function names, databases, data types, environment variables, statements, and keywords.
Constant width bold
Shows commands or other text that should be typed literally by the user.
Constant width italic
Shows text that should be replaced with user-supplied values or by values deter- mined by context.
This icon signifies a tip, suggestion, or general note.
This icon indicates a warning or caution.
Using Code Examples
This book is here to help you get your job done. In general, you may use the code in this book in your programs and documentation. You do not need to contact us for permission unless you’re reproducing a significant portion of the code. For example, writing a program that uses several chunks of code from this book does not require permission. Selling or distributing a CD-ROM of examples from O’Reilly books does require permission. Answering a question by citing this book and quoting example code does not require permission. Incorporating a significant amount of example code from this book into your product’s documentation does require permission.
We appreciate, but do not require, attribution. An attribution usually includes the title, author, publisher, and ISBN. For example: “iPhone 3D Programming by Philip Rideout.
Copyright 2010 Philip Rideout, 978-0-596-80482-4.”
If you feel your use of the code examples falls outside fair use or the permission given here, feel free to contact us at permissions@oreilly.com.
Safari® Books Online
Safari Books Online is an on-demand digital library that lets you easily search over 7,500 technology and creative reference books and videos to find the answers you need quickly.
With a subscription, you can read any page and watch any video from our library online.
Read books on your cell phone and mobile devices. Access new titles before they are available for print, and get exclusive access to manuscripts in development and post feedback for the authors. Copy and paste code samples, organize your favorites, down- load chapters, bookmark key sections, create notes, print out pages, and benefit from tons of other time-saving features.
O’Reilly Media has uploaded this book to the Safari Books Online service. To have full digital access to this book and others on similar topics from O’Reilly and other pub- lishers, sign up for free at http://my.safaribooksonline.com.
How to Contact Us
Please address comments and questions concerning this book to the publisher:
O’Reilly Media, Inc.
1005 Gravenstein Highway North Sebastopol, CA 95472
800-998-9938 (in the United States or Canada) 707-829-0515 (international or local)
707-829-0104 (fax)
We have a web page for this book, where we list errata, examples, and any additional information. You can access this page at:
http://oreilly.com/catalog/9780596804831
To comment or ask technical questions about this book, send email to:
bookquestions@oreilly.com
For more information about our books, conferences, Resource Centers, and the O’Reilly Network, see our website at:
http://www.oreilly.com
Acknowledgments
Harsha Kuntur planted the seed for this book by lighting up every dinner conversation with his rabid enthusiasm for the iPhone. Equally important are Stephen Holmes (who unintentionally made me into an Apple fanboy) and David Banks (who inspired me to get into graphics).
Preface | xvii
I’d also like to thank my editor and personal champion at O’Reilly, Brian Jepson. Much thanks to both John T. Kennedy and Jon C. Kennedy for their valuable suggestions (can’t the Irish be more creative with names?). I was joyous when Serban Porumbescu agreed to review my book—I needed his experience. I’m also supremely grateful to Alex MacPhee and David Schmitt of Medical Simulation Corporation, who have been accommodating and patient as I tried to juggle my time with this book. Thanks, Alex, for catching those last-minute bugs!
Finally, I’d like to thank Mona, who had 1-800-DIVORCE on speed dial while I was having an affair with this book, but she managed to resist the temptation. In fact, with- out her limitless support and encouragement, there’s absolutely no way I could’ve done this.
CHAPTER 1
Quick-Start Guide
Rumors of my assimilation are greatly exaggerated.
—Captain Picard, Star Trek: First Contact In this chapter, you’ll plunge in and develop your first application from scratch. The goal is to write a HelloArrow program that draws an arrow and rotates it in response to an orientation change.
You’ll be using the OpenGL ES API to render the arrow, but OpenGL is only one of many graphics technologies supported on the iPhone. At first, it can be confusing which of these technologies is most appropriate for your requirements. It’s also not always obvious which technologies are iPhone-specific and which cross over into general Mac OS X development.
Apple neatly organizes all of the iPhone’s public APIs into four layers: Cocoa Touch, Media Services, Core Services, and Core OS. Mac OS X is a bit more sprawling, but it too can be roughly organized into four layers, as shown in Figure 1-1.
At the very bottom layer, Mac OS X and the iPhone share their kernel architecture and core operating system; these shared components are collectively known as Darwin.
Despite the similarities between the two platforms, they diverge quite a bit in their handling of OpenGL. Figure 1-1 includes some OpenGL-related classes, shown in bold.
The NSOpenGLView class in Mac OS X does not exist on the iPhone, and the iPhone’s EAGLContext and CAEGLLayer classes are absent on Mac OS X. The OpenGL API itself is also quite different in the two platforms, because Mac OS X supports full-blown OpenGL while the iPhone relies on the more svelte OpenGL ES.
The iPhone graphics technologies include the following:
Quartz 2D rendering engine
Vector-based graphics library that supports alpha blending, layers, and anti- aliasing. This is also available on Mac OS X. Applications that leverage Quartz technology must reference a framework (Apple’s term for a bundle of resources and libraries) known as Quartz Core.
1
Core Graphics
Vanilla C interface to Quartz. This is also available on Mac OS X.
UIKit
Native windowing framework for iPhone. Among other things, UIKit wraps Quartz primitives into Objective-C classes. This has a Mac OS X counterpart called AppKit, which is a component of Cocoa.
Cocoa Touch
Conceptual layer in the iPhone programming stack that contains UIKit along with a few other frameworks.
Core Animation
Objective-C framework that facilitates complex animations.
OpenGL ES
Low-level hardware-accelerated C API for rendering 2D or 3D graphics.
EAGL
Tiny glue API between OpenGL ES and UIKit. Some EAGL classes (such as CAEGLLayer) are defined in Quartz Core framework, while others (such as EAGLCon text) are defined in the OpenGL ES framework.
This book chiefly deals with OpenGL ES, the only technology in the previous list that isn’t Apple-specific. The OpenGL ES specification is controlled by a consortium of companies called the Khronos Group. Different implementations of OpenGL ES all support the same core API, making it easy to write portable code. Vendors can pick Figure 1-1. Mac OS X and iPhone programming stacks
and choose from a formally defined set of extensions to the API, and the iPhone sup- ports a rich set of these extensions. We’ll cover many of these extensions throughout this book.
Transitioning to Apple Technology
Yes, you do need a Mac to develop applications for the iPhone App Store! Developers with a PC background should quell their fear; my own experience was that the PC-to- Apple transition was quite painless, aside from some initial frustration with a different keyboard.
Xcode serves as Apple’s preferred development environment for Mac OS X. If you are new to Xcode, it might initially strike you as resembling an email client more than an IDE. This layout is actually quite intuitive; after learning the keyboard shortcuts, I found Xcode to be a productive environment. It’s also fun to work with. For example, after typing in a closing delimiter such as ), the corresponding ( momentarily glows and seems to push itself out from the screen. This effect is pleasant and subtle; the only thing missing is a kitten-purr sound effect. Maybe Apple will add that to the next version of Xcode.
Objective-C
Now we come to the elephant in the room. At some point, you’ve probably heard that Objective-C is a requirement for iPhone development. You can actually use pure C or C++ for much of your application logic, if it does not make extensive use of UIKit. This is especially true for OpenGL development because it is a C API. Most of this book uses C++; Objective-C is used only for the bridge code between the iPhone operating system and OpenGL ES.
The origin of Apple’s usage of Objective-C lies with NeXT, which was another Steve Jobs company whose technology was ahead of its time in many ways—perhaps too far ahead. NeXT failed to survive on its own, and Apple purchased it in 1997. To this day, you can still find the NS prefix in many of Apple’s APIs, including those for the iPhone.
Some would say that Objective-C is not as complex or feature-rich as C++, which isn’t necessarily a bad thing. In many cases, Objective-C is the right tool for the right job.
It’s a fairly simple superset of C, making it quite easy to learn.
However, for 3D graphics, I find that certain C++ features are indispensable. Operator overloading makes it possible to perform vector math in a syntactically natural way.
Templates allow the reuse of vector and matrix types using a variety of underlying numerical representations. Most importantly, C++ is widely used on many platforms, and in many ways, it’s the lingua franca of game developers.
Transitioning to Apple Technology | 3
A Brief History of OpenGL ES
In 1982, a Stanford University professor named Jim Clark started one of the world’s first computer graphics companies: Silicon Graphics Computer Systems, later known as SGI. SGI engineers needed a standard way of specifying common 3D transformations and operations, so they designed a proprietary API called IrisGL. In the early 1990s, SGI reworked IrisGL and released it to the public as an industry standard, and OpenGL was born.
Over the years, graphics technology advanced even more rapidly than Moore’s law could have predicted.* OpenGL went through many revisions while largely preserving backward compatibility. Many developers believed that the API became bloated. When the mobile phone revolution took off, the need for a trimmed-down version of OpenGL became more apparent than ever. The Khronos Group announced OpenGL for Em- bedded Systems (OpenGL ES) at the annual SIGGRAPH conference in 2003.
OpenGL ES rapidly gained popularity and today is used on many platforms besides the iPhone, including Android, Symbian, and PlayStation 3.
All Apple devices support at least version 1.1 of the OpenGL ES API, which added several powerful features to the core specification, including vertex buffer objects and mandatory multitexture support, both of which you’ll learn about in this book.
In March 2007, the Khronos Group released the OpenGL ES 2.0 specification, which entailed a major break in backward compatibility by ripping out many of the fixed- function features and replacing them with a shading language. This new model for controlling graphics simplified the API and shifted greater control into the hands of developers. Many developers (including myself) find the ES 2.0 programming model to be more elegant than the ES 1.1 model. But in the end, the two APIs simply represent two different approaches to the same problem. With ES 2.0, an application developer needs to do much more work just to write a simple Hello World application. The 1.x flavor of OpenGL ES will probably continue to be used for some time, because of its low implementation burden.
Choosing the Appropriate Version of OpenGL ES
Apple’s newer handheld devices, such as the iPhone 3GS and iPad, have graphics hard- ware that supports both ES 1.1 and 2.0; these devices are said to have a programmable graphics pipeline because the graphics processor executes instructions rather than per- forming fixed mathematical operations. Older devices like the first-generation iPod touch, iPhone, and iPhone 3G are said to have a fixed-function graphics pipeline because they support only ES 1.1.
* Hart, John C. Ray Tracing in Graphics Hardware. SPEC Presentation at SIGGRAPH, 2003.
Before writing your first line of code, be sure to have a good handle on your graphics requirements. It’s tempting to use the latest and greatest API, but keep in mind that there are many 1.1 devices out there, so this could open up a much broader market for your application. It can also be less work to write an ES 1.1 application, if your graphical requirements are fairly modest.
Of course, many advanced effects are possible only in ES 2.0—and, as I mentioned, I believe it to be a more elegant programming model.
To summarize, you can choose from among four possibilities for your application:
• Use OpenGL ES 1.1 only.
• Use OpenGL ES 2.0 only.
• Determine capabilities at runtime; use ES 2.0 if it’s supported; otherwise, fall back to ES 1.1.
• Release two separate applications: one for ES 1.1, one for ES 2.0. (This could get messy.)
Choose wisely! We’ll be using the third choice for many of the samples in this book, including the HelloArrow sample presented in this chapter.
Getting Started
Assuming you already have a Mac, the first step is to head over to Apple’s iPhone developer site and download the SDK. With only the free SDK in hand, you have the tools at your disposal to develop complex applications and even test them on the iPhone Simulator.
The iPhone Simulator cannot emulate certain features such as the accelerometer, nor does it perfectly reflect the iPhone’s implementation of OpenGL ES. For example, a physical iPhone cannot render anti-aliased lines using OpenGL’s smooth lines feature, but the simulator can. Conversely, there may be extensions that a physical iPhone supports that the simulator does not. (Incidentally, we’ll discuss how to work around the anti-aliasing limitation later in this book.)
Having said all that, you do not need to own an iPhone to use this book. I’ve ensured that every code sample either runs against the simulator or at least fails gracefully in the rare case where it leverages a feature not supported on the simulator.
If you do own an iPhone and are willing to cough up a reasonable fee ($100 at the time of this writing), you can join Apple’s iPhone Developer Program to enable deployment to a physical iPhone. When I did this, it was not a painful process, and Apple granted me approval almost immediately. If the approval process takes longer in your case, I suggest forging ahead with the simulator while you wait. I actually use the simulator for most of my day-to-day development anyway, since it provides a much faster debug- build-run turnaround than deploying to my device.
Getting Started | 5
The remainder of this chapter is written in a tutorial style. Be aware that some of the steps may vary slightly from what’s written, depending on the versions of the tools that you’re using. These minor deviations most likely pertain to specific actions within the Xcode UI; for example, a menu might be renamed or shifted in future versions. How- ever, the actual sample code is relatively future-proof.
Installing the iPhone SDK
You can download the iPhone SDK from here:
http://developer.apple.com/iphone/
It’s packaged as a .dmg file, Apple’s standard disk image format. After you download it, it should automatically open in a Finder window—if it doesn’t, you can find its disk icon on the desktop and open it from there. The contents of the disk image usually consist of an “about” PDF, a Packages subfolder, and an installation package, whose icon resembles a cardboard box. Open the installer and follow the steps. When con- firming the subset of components to install, simply accept the defaults. When you’re done, you can “eject” the disk image to remove it from the desktop.
As an Apple developer, Xcode will become your home base. I recommend dragging it to your Dock at the bottom of the screen. You’ll find Xcode in /Developer/Applications/
Xcode.
If you’re coming from a PC background, Mac’s windowing system may seem difficult to organize at first. I highly recommend the Exposé and Spaces desktop managers that are built into Mac OS X. Exposé lets you switch between windows using an intuitive “spread-out” view. Spaces can be used to organize your windows into multiple virtual desktops.
I’ve used several virtual desktop managers on Windows, and in my opinion Spaces beats them all hands down.
Building the OpenGL Template Application with Xcode
When running Xcode for the first time, it presents you with a Welcome to Xcode dialog.
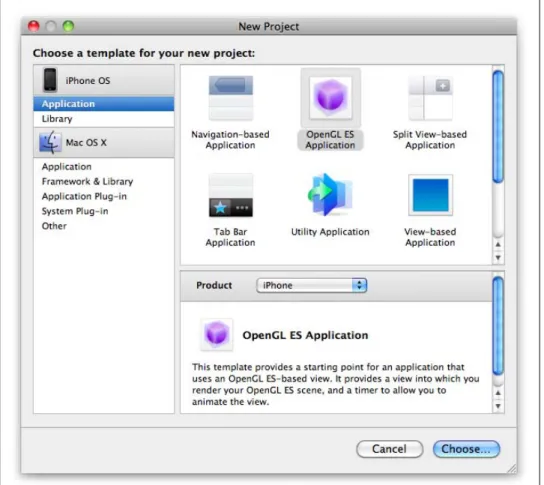
Click the Create a new Xcode project button. (If you have the welcome dialog turned off, go to File→New Project.) Now you’ll be presented with the dialog shown in Fig- ure 1-2, consisting of a collection of templates. The template we’re interested in is OpenGL ES Application, under the iPhone OS heading. It’s nothing fancy, but it is a fully functional OpenGL application and serves as a decent starting point.
Figure 1-2. New Project dialog
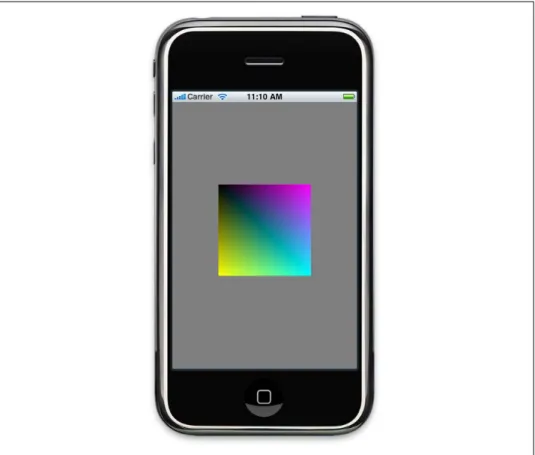
In the next dialog, choose a goofy name for your application, and then you’ll finally see Xcode’s main window. Build and run the application by selecting Build and Run from the Build menu or by pressing ⌘-Return. When the build finishes, you should see the iPhone Simulator pop up with a moving square in the middle, as in Figure 1-3.
When you’re done gawking at this amazing application, press ⌘-Q to quit.
Getting Started | 7
Figure 1-3. OpenGL ES Application template
Deploying to Your Real iPhone
This is not required for development, but if you want to deploy your application to a physical device, you should sign up for Apple’s iPhone Developer Program. This ena- bles you to provision your iPhone for developer builds, in addition to the usual software you get from the App Store. Provisioning is a somewhat laborious process, but thank- fully it needs to be done only once per device. Apple has now made it reasonably straightforward by providing a Provisioning Assistant applet that walks you through the process. You’ll find this applet after logging into the iPhone Dev Center and entering the iPhone Developer Program Portal.
When your iPhone has been provisioned properly, you should be able to see it in Xcode’s Organizer window (Control-⌘-O). Open up the Provisioning Profiles tree node in the left pane, and make sure your device is listed.
Now you can go back to Xcode’s main window, open the Overview combo box in the upper-left corner, and choose the latest SDK that has the Device prefix. The next time you build and run (⌘-Return), the moving square should appear on your iPhone.
HelloArrow with Fixed Function
In the previous section, you learned your way around the development environment with Apple’s boilerplate OpenGL application, but to get a good understanding of the fundamentals, you need to start from scratch. This section of the book builds a simple application from the ground up using OpenGL ES 1.1. The 1.x track of OpenGL ES is sometimes called fixed-function to distinguish it from the OpenGL ES 2.0 track, which relies on shaders. We’ll learn how to modify the sample to use shaders later in the chapter.
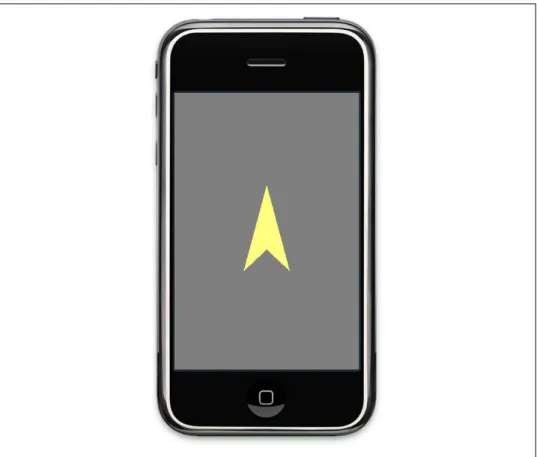
Let’s come up with a variation of the classic Hello World in a way that fits well with the theme of this book. As you’ll learn later, most of what gets rendered in OpenGL can be reduced to triangles. We can use two overlapping triangles to draw a simple arrow shape, as shown in Figure 1-4. Any resemblance to the Star Trek logo is purely coincidental.
Figure 1-4. Arrow shape composed from two triangles
To add an interesting twist, the program will make the arrow stay upright when the user changes the orientation of his iPhone.
Layering Your 3D Application
If you love Objective-C, then by all means, use it everywhere you can. This book sup- ports cross-platform code reuse, so we leverage Objective-C only when necessary.
HelloArrow with Fixed Function | 9
Figure 1-5 depicts a couple ways of organizing your application code such that the guts of the program are written in C++ (or vanilla C), while the iPhone-specific glue is written in Objective-C. The variation on the right separates the application engine (also known as game logic) from the rendering engine. Some of the more complex samples in this book take this approach.
Figure 1-5. Layered 3D iPhone applications
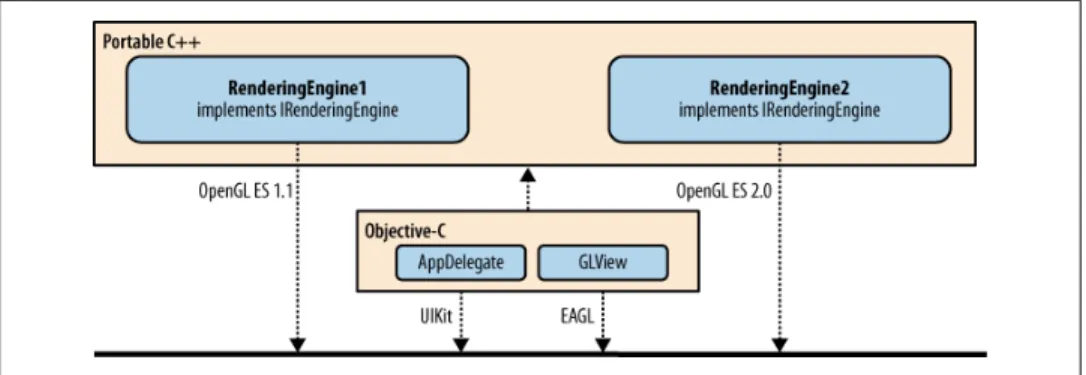
The key to either approach depicted in Figure 1-6 is designing a robust interface to the rendering engine and ensuring that any platform can use it. The sample code in this book uses the name IRenderingEngine for this interface, but you can call it what you want.
Figure 1-6. A cross-platform OpenGL ES application
The IRenderingEngine interface also allows you to build multiple rendering engines into your application, as shown in Figure 1-7. This facilitates the “Use ES 2.0 if supported, otherwise fall back” scenario mentioned in “Choosing the Appropriate Version of OpenGL ES” on page 4. We’ll take this approach for HelloArrow.
Figure 1-7. An iPhone application that supports ES 1.1 and 2.0
You’ll learn more about the pieces in Figure 1-7 as we walk through the code to HelloArrow. To summarize, you’ll be writing three classes:
RenderingEngine1 and RenderingEngine2 (portable C++)
These classes are where most of the work takes place; all calls to OpenGL ES are made from here. RenderingEngine1 uses ES 1.1, while RenderingEngine2 uses ES 2.0.
HelloArrowAppDelegate (Objective-C)
Small Objective-C class that derives from NSObject and adopts the UIApplication Delegate protocol. (“Adopting a protocol” in Objective-C is somewhat analogous to “implementing an interface” in languages such as Java or C#.) This does not use OpenGL or EAGL; it simply initializes the GLView object and releases memory when the application closes.
GLView (Objective-C)
Derives from the standard UIView class and uses EAGL to instance a valid rendering surface for OpenGL.
Starting from Scratch
Launch Xcode and start with the simplest project template by going to File→New Project and selecting Window-Based Application from the list of iPhone OS application templates. Name it HelloArrow.
Xcode comes bundled with an application called Interface Builder, which is Apple’s interactive designer for building interfaces with UIKit (and AppKit on Mac OS X). I don’t attempt to cover UIKit because most 3D applications do not make extensive use of it. For best performance, Apple advises against mixing UIKit with OpenGL.
HelloArrow with Fixed Function | 11
For simple 3D applications that aren’t too demanding, it probably won’t hurt you to add some UIKit controls to your OpenGL view. We cover this briefly in “Mixing OpenGL ES and UIKit” on page 310.
Optional: Creating a Clean Slate
The following steps remove some Interface Builder odds and ends from the project;
this is optional, but it’s something I like to do to start from a clean slate.
1. Interface Builder uses an XML file called a xib for defining an object graph of UI elements. Since you’re creating a pure OpenGL application, you don’t need this file in your project. In the Groups & Files pane on the left, find the folder that says Resources (or something similar such as Resources-iPhone). Delete the file ending in .xib. When prompted, move it to the trash.
2. The xib file normally compiles to a binary file called a nib, which is loaded at run- time to build up the UI. To instruct the OS not to load the nib file, you’ll need to remove an application property. In the Resources folder, find the HelloArrow- Info.plist file. Click it and then remove the property called Main nib file base name (toward the bottom of the Information Property List). You can remove a property by clicking to select it and then pressing the Delete key.
3. The template application normally extracts the name of the application delegate from the nib file during startup; since you’re not using a nib file, you need to pass in an explicit string. Under Other Sources, open main.m, and change the last ar- gument of the call to UIApplicationMain from nil to the name of your application delegate class (for example, @"HelloArrowAppDelegate"). The @ prefix means this is a proper Objective-C string rather than a C-style pointer to char.
4. The template includes a property in the application delegate that allows Interface Builder to hook in. This is no longer needed. To remove the property declaration, open HelloArrowAppDelegate.h (in the Classes folder), and remove the
@property line. To remove the implementation, open HelloArrowAppDelegate.m, and remove the @synthesize line.
Linking in the OpenGL and Quartz Libraries
In the world of Apple programming, you can think of a framework as being similar to a library, but technically it’s a bundle of resources. A bundle is a special type of folder that acts like a single file, and it’s quite common in Mac OS X. For example, applications are usually deployed as bundles—open the action menu on nearly any icon in your Applications folder, and you’ll see an option for Show Package Contents, which allows you to get past the façade.
You need to add some framework references to your Xcode project. Pull down the action menu for the Frameworks folder. This can be done by selecting the folder and
clicking the Action icon or by right-clicking or Control-clicking the folder. Next choose Add→Existing Frameworks. Select OpenGLES.Framework, and click the Add button.
You may see a dialog after this; if so, simply accept its defaults. Now, repeat this pro- cedure with QuartzCore.Framework.
Why do we need Quartz if we’re writing an OpenGL ES application?
The answer is that Quartz owns the layer object that gets presented to the screen, even though we’re rendering with OpenGL. The layer object is an instance of CAEGLLayer, which is a subclass of CALayer; these classes are defined in the Quartz Core framework.
Subclassing UIView
The abstract UIView class controls a rectangular area of the screen, handles user events, and sometimes serves as a container for child views. Almost all standard controls such as buttons, sliders, and text fields are descendants of UIView. We tend to avoid using these controls in this book; for most of the sample code, the UI requirements are so modest that OpenGL itself can be used to render simple buttons and various widgets.
For our HelloArrow sample, we do need to define a single UIView subclass, since all rendering on the iPhone must take place within a view. Select the Classes folder in Xcode, click the Action icon in the toolbar, and select Add→New file. Under the Cocoa Touch Class category, select the Objective-C class template, and choose UIView in the Subclass of menu. In the next dialog, name it GLView.mm, and leave the box checked to ensure that the corresponding header gets generated. The .mm extension indicates that this file can support C++ in addition to Objective-C. Open GLView.h. You should see something like this:
#import <UIKit/UIKit.h>
@interface GLView : UIView { }
@end
For C/C++ veterans, this syntax can be a little jarring—just wait until you see the syntax for methods! Fear not, it’s easy to become accustomed to.
#import is almost the same thing as #include but automatically ensures that the header file does not get expanded twice within the same source file. This is similar to the
#pragma once feature found in many C/C++ compilers.
Keywords specific to Objective-C stand out because of the @ prefix. The @interface keyword marks the beginning of a class declaration; the @end keyword marks the end of a class declaration. A single source file may contain several class declarations and therefore can have several @interface blocks.
HelloArrow with Fixed Function | 13
As you probably already guessed, the previous code snippet simply declares an empty class called GLView that derives from UIView. What’s less obvious is that data fields will go inside the curly braces, while method declarations will go between the ending curly brace and the @end, like this:
#import <UIKit/UIKit.h>
@interface GLView : UIView { // Protected fields go here...
}
// Public methods go here...
@end
By default, data fields have protected accessibility, but you can make them private using the @private keyword. Let’s march onward and fill in the pieces shown in bold in Example 1-1. We’re also adding some new #imports for OpenGL-related stuff.
Example 1-1. GLView class declaration
#import <UIKit/UIKit.h>
#import <OpenGLES/EAGL.h>
#import <QuartzCore/QuartzCore.h>
#import <OpenGLES/ES1/gl.h>
#import <OpenGLES/ES1/glext.h>
@interface GLView : UIView { EAGLContext* m_context;
}
- (void) drawView;
@end
The m_context field is a pointer to the EAGL object that manages our OpenGL context.
EAGL is a small Apple-specific API that links the iPhone operating system with OpenGL.
Every time you modify API state through an OpenGL function call, you do so within a context. For a given thread running on your system, only one context can be current at any time. With the iPhone, you’ll rarely need more than one context for your application. Because of the limited resources on mobile devices, I don’t recommend using multiple contexts.
If you have a C/C++ background, the drawView method declaration in Example 1-1 may look odd. It’s less jarring if you’re familiar with UML syntax, but UML uses - and + to denote private and public methods, respectively; with Objective-C, - and + denote
instance methods and class methods. (Class methods in Objective-C are somewhat similar to C++ static methods, but in Objective-C, the class itself is a proper object.) Take a look at the top of the GLView.mm file that Xcode generated. Everything between
@implementation and @end is the definition of the GLView class. Xcode created three methods for you: initWithFrame, drawRect (which may be commented out), and dealloc. Note that these methods do not have declarations in the header file that Xcode generated. In this respect, an Objective-C method is similar to a plain old function in C; it needs a forward declaration only if gets called before it’s defined. I usually declare all methods in the header file anyway to be consistent with C++ class declarations.
Take a closer look at the first method in the file:
- (id) initWithFrame: (CGRect) frame {
if (self = [super initWithFrame:frame]) { // Initialize code...
}
return self;
}
This is an Objective-C initializer method, which is somewhat analogous to a C++ con- structor. The return type and argument types are enclosed in parentheses, similar to C-style casting syntax. The conditional in the if statement accomplishes several things at once: it calls the base implementation of initWithFrame, assigns the object’s pointer to self, and checks the result for success.
In Objective-C parlance, you don’t call methods on objects; you send messages to ob- jects. The square bracket syntax denotes a message. Rather than a comma-separated list of values, arguments are denoted with a whitespace-separated list of name-value pairs. The idea is that messages can vaguely resemble English sentences. For example, consider this statement, which adds an element to an NSMutableDictionary:
[myDictionary setValue: 30 forKey: @"age"];
If you read the argument list aloud, you get an English sentence! Well, sort of.
That’s enough of an Objective-C lesson for now. Let’s get back to the HelloArrow application. In GLView.mm, provide the implementation to the layerClass method by adding the following snippet after the @implementation line:
+ (Class) layerClass {
return [CAEAGLLayer class];
}
This simply overrides the default implementation of layerClass to return an OpenGL- friendly layer type. The class method is similar to the typeof operator found in other languages; it returns an object that represents the type itself, rather than an instance of the type.
HelloArrow with Fixed Function | 15
The + prefix means that this is an override of a class method rather than an instance method. This type of override is a feature of Objective-C rarely found in other languages.
Now, go back to initWithFrame, and replace the contents of the if block with some EAGL initialization code, as shown in Example 1-2.
Example 1-2. EAGL initialization in GLView.mm - (id) initWithFrame: (CGRect) frame
{
if (self = [super initWithFrame:frame]) {
CAEAGLLayer* eaglLayer = (CAEAGLLayer*) super.layer;
eaglLayer.opaque = YES;
m_context = [[EAGLContext alloc] initWithAPI:kEAGLRenderingAPIOpenGLES1];
if (!m_context || ![EAGLContext setCurrentContext:m_context]) { [self release];
return nil;
}
// Initialize code...
}
return self;
}
Here’s what’s going on:
Retrieve the layer property from the base class (UIView), and downcast it from CALayer into a CAEAGLLayer. This is safe because of the override to the layerClass method.
Set the opaque property on the layer to indicate that you do not need Quartz to handle transparency. This is a performance benefit that Apple recommends in all OpenGL programs. Don’t worry, you can easily use OpenGL to handle alpha blending.
Create an EAGLContext object, and tell it which version of OpenGL you need, which is ES 1.1.
Tell the EAGLContext to make itself current, which means any subsequent OpenGL calls in this thread will be tied to it.
If context creation fails or if setCurrentContext fails, then poop out and return nil.
Memory Management in Objective-C
The alloc-init pattern that we used for instancing EAGLContext in Example 1-2 is very common in Objective-C. With Objective-C, constructing an object is always split into two phases: allocation and initialization. However, some of the classes you’ll encounter supply a class method to make this easier. For example, to convert a UTF-8 string into a NSString using the alloc-init pattern, you could do this:
NSString* destString = [[NSString alloc] initWithUTF8String:srcString];
But I prefer doing this:
NSString* destString = [NSString stringWithUTF8String:srcString];
Not only is this more terse, it also adds autorelease semantics to the object, so there’s no need to call release on it when you’re done.
Next, continue filling in the initialization code with some OpenGL setup. Replace the OpenGL Initialization comment with Example 1-3.
Example 1-3. OpenGL initialization in GLView.mm GLuint framebuffer, renderbuffer;
glGenFramebuffersOES(1, &framebuffer);
glGenRenderbuffersOES(1, &renderbuffer);
glBindFramebufferOES(GL_FRAMEBUFFER_OES, framebuffer);
glBindRenderbufferOES(GL_RENDERBUFFER_OES, renderbuffer);
[m_context
renderbufferStorage:GL_RENDERBUFFER_OES fromDrawable: eaglLayer];
glFramebufferRenderbufferOES(
GL_FRAMEBUFFER_OES, GL_COLOR_ATTACHMENT0_OES, GL_RENDERBUFFER_OES, renderbuffer);
glViewport(0, 0, CGRectGetWidth(frame), CGRectGetHeight(frame));
[self drawView];
Example 1-3 starts off by generating two OpenGL identifiers, one for a renderbuffer and one for a framebuffer. Briefly, a renderbuffer is a 2D surface filled with some type of data (in this case, color), and a framebuffer is a bundle of renderbuffers. You’ll learn more about framebuffer objects (FBOs) in later chapters.
HelloArrow with Fixed Function | 17
The use of FBOs is an advanced feature that is not part of the core OpenGL ES 1.1 API, but it is specified in an OpenGL extension that all iPhones support. In OpenGL ES 2.0, FBOs are included in the core API.
It may seem odd to use this advanced feature in the simple HelloArrow program, but all OpenGL iPhone applications need to leverage FBOs to draw anything to the screen.
The renderbuffer and framebuffer are both of type GLuint, which is the type that OpenGL uses to represent various objects that it manages. You could just as easily use unsigned int in lieu of GLuint, but I recommend using the GL-prefixed types for objects that get passed to the API. If nothing else, the GL-prefixed types make it easier for humans to identify which pieces of your code interact with OpenGL.
After generating identifiers for the framebuffer and renderbuffer, Example 1-3 then binds these objects to the pipeline. When an object is bound, it can be modified or consumed by subsequent OpenGL operations. After binding the renderbuffer, storage is allocated by sending the renderbufferStorage message to the EAGLContext object.
For an off-screen surface, you would use the OpenGL command glRenderbufferStorage to perform allocation, but in this case you’re as- sociating the renderbuffer with an EAGL layer. You’ll learn more about off-screen surfaces later in this book.
Next, the glFramebufferRenderbufferOES command is used to attach the renderbuffer object to the framebuffer object.
After this, the glViewport command is issued. You can think of this as setting up a coordinate system. In Chapter 2 you’ll learn more precisely what’s going on here.
The final call in Example 1-3 is to the drawView method. Go ahead and create the drawView implementation:
- (void) drawView {
glClearColor(0.5f, 0.5f, 0.5f, 1);
glClear(GL_COLOR_BUFFER_BIT);
[m_context presentRenderbuffer:GL_RENDERBUFFER_OES];
}
This uses OpenGL’s “clear” mechanism to fill the buffer with a solid color. First the color is set to gray using four values (red, green, blue, alpha). Then, the clear operation is issued. Finally, the EAGLContext object is told to present the renderbuffer to the screen.
Rather than drawing directly to the screen, most OpenGL programs render to a buffer that is then presented to the screen in an atomic operation, just like we’re doing here.
You can remove the drawRect stub that Xcode provided for you. The drawRect method is typically used for a “paint refresh” in more traditional UIKit-based applications; in 3D applications, you’ll want finer control over when rendering occurs.
At this point, you almost have a fully functioning OpenGL ES program, but there’s one more loose end to tie up. You need to clean up when the GLView object is destroyed.
Replace the definition of dealloc with the following:
- (void) dealloc {
if ([EAGLContext currentContext] == m_context) [EAGLContext setCurrentContext:nil];
[m_context release];
[super dealloc];
}
You can now build and run the program, but you won’t even see the gray background color just yet. This brings us to the next step: hooking up the application delegate.
Hooking Up the Application Delegate
The application delegate template (HelloArrowAppDelegate.h) that Xcode provided contains nothing more than an instance of UIWindow. Let’s add a pointer to an instance of the GLView class along with a couple method declarations (new/changed lines are shown in bold):
#import <UIKit/UIKit.h>
#import "GLView.h"
@interface HelloArrowAppDelegate : NSObject <UIApplicationDelegate> { UIWindow* m_window;
GLView* m_view;
}
@property (nonatomic, retain) IBOutlet UIWindow *m_window;
@end
If you performed the instructions in “Optional: Creating a Clean Slate” on page 12, you won’t see the @property line, which is fine. Interface Builder leverages Objective- C’s property mechanism to establish connections between objects, but we’re not using Interface Builder or properties in this book. In brief, the @property keyword declares a property; the @synthesize keyword defines accessor methods.
Note that the Xcode template already had a window member, but I renamed it to m_window. This is in keeping with the coding conventions that we use throughout this book.
HelloArrow with Fixed Function | 19
I recommend using Xcode’s Refactor feature to rename this variable because it will also rename the corresponding property (if it exists).
Simply right-click the window variable and choose Refactor. If you did not make the changes shown in “Optional: Creating a Clean Slate” on page 12, you must use Refactor so that the xib file knows the window is now represented by m_window.
Now open the corresponding HelloArrowAppDelegate.m file. Xcode already provided skeleton implementations for applicationDidFinishLaunching and dealloc as part of the Window-Based Application template that we selected to create our project.
Since you need this file to handle both Objective-C and C++, you must rename the extension to .mm. Right-click the file to bring up the action menu, and then select Rename.
Flesh out the file as shown in Example 1-4.
Example 1-4. HelloArrowAppDelegate.mm
#import "HelloArrowAppDelegate.h"
#import <UIKit/UIKit.h>
#import "GLView.h"
@implementation HelloArrowAppDelegate
- (BOOL) application: (UIApplication*) application
didFinishLaunchingWithOptions: (NSDictionary*) launchOptions {
CGRect screenBounds = [[UIScreen mainScreen] bounds];
m_window = [[UIWindow alloc] initWithFrame: screenBounds];
m_view = [[GLView alloc] initWithFrame: screenBounds];
[m_window addSubview: m_view];
[m_window makeKeyAndVisible];
return YES;
}
- (void) dealloc {
[m_view release];
[m_window release];
[super dealloc];
}
@end
Example 1-4 uses the alloc-init pattern to construct the window and view objects, passing in the bounding rectangle for the entire screen.
If you haven’t removed the Interface Builder bits as described in “Optional: Creating a Clean Slate” on page 12, you’ll need to make a couple changes to the previous code listing:
• Add a new line after @implementation:
@synthesize m_window;
As mentioned previously, the @synthesize keyword defines a set of property ac- cessors, and Interface Builder uses properties to hook things up.
• Remove the line that constructs m_window. Interface Builder has a special way of constructing the window behind the scenes. (Leave in the calls to makeKeyAndVisible and release.)
Compile and build, and you should now see a solid gray screen. Hooray!
Setting Up the Icons and Launch Image
To set a custom launch icon for your application, create a 57×57 PNG file (72×72 for the iPad), and add it to your Xcode project in the Resources folder. If you refer to a PNG file that is not in the same location as your project folder, Xcode will copy it for you;
be sure to check the box labeled “Copy items into destination group’s folder (if nee- ded)” before you click Add. Then, open the HelloArrow-Info.plist file (also in the Resources folder), find the Icon file property, and enter the name of your PNG file.
The iPhone will automatically give your icon rounded corners and a shiny overlay. If you want to turn this feature off, find the HelloArrow-Info.plist file in your Xcode project, select the last row, click the + button, and choose Icon already includes gloss and bevel effects from the menu. Don’t do this unless you’re really sure of yourself;
Apple wants users to have a consistent look in SpringBoard (the built-in program used to launch apps).
In addition to the 57×57 launch icon, Apple recommends that you also provide a 29×29 miniature icon for the Spotlight search and Settings screen. The procedure is similar except that the filename must be Icon-Small.png, and there’s no need to modify the .plist file.
For the splash screen, the procedure is similar to the small icon, except that the filename must be Default.png and there’s no need to modify the .plist file. The iPhone fills the entire screen with your image, so the ideal size is 320×480, unless you want to see an ugly stretchy effect. Apple’s guidelines say that this image isn’t a splash screen at all but a “launch image” whose purpose is to create a swift and seamless startup experi- ence. Rather than showing a creative logo, Apple wants your launch image to mimic the starting screen of your running application. Of course, many applications ignore this rule!
HelloArrow with Fixed Function | 21
Dealing with the Status Bar
Even though your application fills the renderbuffer with gray, the iPhone’s status bar still appears at the top of the screen. One way of dealing with this would be adding the following line to didFinishLaunchingWithOptions:
[application setStatusBarHidden: YES withAnimation: UIStatusBarAnimationNone];
The problem with this approach is that the status bar does not hide until after the splash screen animation. For HelloArrow, let’s remove the pesky status bar from the very beginning. Find the HelloArrowInfo.plist file in your Xcode project, and add a new property by selecting the last row, clicking the + button, choosing “Status bar is initially hidden” from the menu, and checking the box.
Of course, for some applications, you’ll want to keep the status bar visible—after all, the user might want to keep an eye on battery life and connectivity status! If your application has a black background, you can add a Status bar style property and select the black style. For nonblack backgrounds, the semitransparent style often works well.
Defining and Consuming the Rendering Engine Interface
At this point, you have a walking skeleton for HelloArrow, but you still don’t have the rendering layer depicted in Figure 1-7. Add a file to your Xcode project to define the C++ interface. Right-click the Classes folder, and choose Add→New file, select C and C++, and choose Header File. Call it IRenderingEngine.hpp. The .hpp extension signals that this is a pure C++ file; no Objective-C syntax is allowed.† Replace the contents of this file with Example 1-5.
Coding Convention
Example 1-5 defines an interface in C++ using some component-oriented conventions that we’ll follow throughout this book:
• All interface methods are pure virtual.
• Interfaces are of type struct because interface methods are always public. (Recall in C++, struct members default to public, and class members default to private.)
• Names of interfaces are prefixed with a capital I.
• Interfaces consist of methods only; no fields are permitted.
• The construction of implementation classes is achieved via factory methods. In this case, the factory method is CreateRenderer1.
• All interfaces should have a virtual destructor to enable proper cleanup.
† Xcode doesn’t care whether you use hpp or h for headers; we use this convention purely for the benefit of human readers.
Example 1-5. IRenderingEngine.hpp
// Physical orientation of a handheld device, equivalent to UIDeviceOrientation.
enum DeviceOrientation { DeviceOrientationUnknown, DeviceOrientationPortrait,
DeviceOrientationPortraitUpsideDown, DeviceOrientationLandscapeLeft, DeviceOrientationLandscapeRight, DeviceOrientationFaceUp, DeviceOrientationFaceDown, };
// Creates an instance of the renderer and sets up various OpenGL state.
struct IRenderingEngine* CreateRenderer1();
// Interface to the OpenGL ES renderer; consumed by GLView.
struct IRenderingEngine {
virtual void Initialize(int width, int height) = 0;
virtual void Render() const = 0;
virtual void UpdateAnimation(float timeStep) = 0;
virtual void OnRotate(DeviceOrientation newOrientation) = 0;
virtual ~IRenderingEngine() {}
};
It seems redundant to include an enumeration for device orientation when one already exists in an iPhone header (namely, UIDevice.h), but this makes the IRenderingEngine interface portable to other environments.
Since the view class consumes the rendering engine interface, you need to add an IRenderingEngine pointer to the GLView class declaration, along with some fields and methods to help with rotation and animation. Example 1-6 shows the complete class declaration. New fields and methods are shown in bold. Note that we removed the two OpenGL ES 1.1 #imports; these OpenGL calls are moving to the RenderingEngine1 class.
The EAGL header is not part of the OpenGL standard, but it’s required to create the OpenGL ES context.
Example 1-6. GLView.h
#import "IRenderingEngine.hpp"
#import <OpenGLES/EAGL.h>
#import <QuartzCore/QuartzCore.h>
@interface GLView : UIView {
@private
EAGLContext* m_context;
IRenderingEngine* m_renderingEngine;
float m_timestamp;
}
- (void) drawView: (CADisplayLink*) displayLink;
- (void) didRotate: (NSNotification*) notification;
@end
HelloArrow with Fixed Function | 23