Deploying and Scaling an App on Kubernetes with MinIO
Cloud Computing Project
Pagès, Louis César Atkinson, Lukas D’Aprea, Samuel Chen, Shuang
Winter Semester 2020/2021
Contents
1. Introduction 3
2. Architecture and Concepts of Kubernetes 4
2.1. Control Plane Components . . . . 4
2.2. Node Components . . . . 5
2.3. Addons . . . . 6
2.4. Service Discovery in Kubernetes . . . . 6
2.5. Kubernetes objects . . . . 6
3. Kubernetes setup 9 3.1. Install and set up kubectl . . . . 9
3.2. Installing Minikube . . . 10
3.3. Interacting with the cluster . . . 11
4. MinIO configuration 12 5. Target Application 17 5.1. REST API . . . 17
5.2. Implementation . . . 18
5.3. Dockerization . . . 18
5.4. Distribution via GitLab Container Registry . . . 19
6. Deploying an application on Kubernetes 21 6.1. Creating a Deployment . . . 21
6.2. Managing imagePullSecrets . . . 22
6.3. Defining a Service for the REST API . . . 23
6.4. Adding an Ingress . . . 23
6.5. Applying the configuration . . . 24
7. Scaling 26
8. Conclusion 27
References 28
A. Python source code for REST API 30
1. Introduction
Kubernetes is an open-source platform for automating deployment, scaling, and man- agement of containerized applications. It was open-sourced by Google in 2014 and is currently maintained by the Cloud Native Computing Foundation(CNCF). It provides users with a framework to run distributed systems resiliently and takes care of scaling and failover for the application. Kubernetes provides multiple practical functions, includ- ing service discovery and load balancing, storage orchestration, automated rollouts and rollbacks, automatic bin packing, self-healing and sensitive information management.
In this document, we are going to introduce some basic concepts of Kubernetes and provide a step-by-step guide of how to deploy a simple web application of Kubernetes.
Object storage for the application will be provided by MinIO, which will be deployed on
the same Kubernetes cluster.
2. Architecture and Concepts of Kubernetes
The basic structure of Kubernetes is called cluster, as depicted in Figure 2.1. A Ku- bernetes cluster consists of a set of nodes and a control plane. The nodes are worker machines running containerized applications. Each node hosts one or several pods, which are the smallest unit of the application workload. The control plane is responsible for managing the worker nodes and the pods in the cluster. In production environments, the control plane usually runs across multiple computers and a cluster usually runs multiple nodes, providing fault-tolerance and high availability.
In the following, we will provide an overview of control plane components, briefly touch upon node components and cluster addons, explain service discovery in the cluster, and present basic Kubernetes configuration objects.
Figure 2.1.: Kubernetes Cluster[12]
2.1. Control Plane Components
Control Plane Components in the Kubernetes cluster are in charge of making global
decisions about the cluster, and detecting and responding to cluster events. Control
plane components include API-server, persistent store, kube-scheduler, kube-controller- manager, and cloud-controller-manager [12].
The API server is the front end for the Kubernetes control plane, which is responsible for validating and configuring data for the api objects such as pods, services, replica- tioncontrollers and so on. The main implementation of a Kubernetes API server is kube-apiserver. It is designed to scale horizontally to deploy more instances. Users are allowed to run several instances of kube-apiserver to balance traffic.
Etcd is a consistent and highly-available key value store used for all cluster data. All Kubernetes objects are stored on etcd. In order to avoid losing master nodes and recover under disaster scenarios, it is important to periodically backup the etcd cluster data.
Kube-scheduler is the control plane component in charge of node scheduling. It monitors newly created Pods or nodes that are not assigned and will select a node for them to run on. In the process of scheduling, it usually takes a variety of factors into account, includ- ing resource requirements, hardware or software constraints, inter-workload interference, data locality, and deadlines.
Kube-controller-manager runs controller processes. The controller in Kubernetes include node controller, replication controller, endpoints controller, and service/token controllers.
In theory, each controller is a separate process. However, to reduce complexity, they are all compiled into a single binary and run in a single process.
Cloud-controller-manage is responsible for embedding cloud-specific control logic. It allows users to link their cluster into the cloud provider’s API, and separates out the components interacting with that cloud platform from components interacting with users’
own cluster.
2.2. Node Components
Node components, including kubelet, kube-proxy, and container runtime, are responsi- ble for maintaining running pods and providing the Kubernetes runtime environment.
Kubelet is an agent running on each node in the cluster. Its main function is to make
sure that containers are running in a Pod. Kube-proxy is a network proxy that imple-
ments part of the Kubernetes’ service concept. The container runtime is a software used
to run containers. Kubernetes supports several container runtimes, including Docker,
containerd, and any implementation of the Kubernetes Container Runtime Interface
(CRI).
2.3. Addons
Addons use Kubernetes resources (DaemonSet, Deployment, etc) to implement cluster features. Examples of Addons are dashboard, container resource monitoring, cluster- level logging and so on.
2.4. Service Discovery in Kubernetes
Within a Kubernetes cluster, service discovery can be performed via DNS.[4]
The name of a service corresponds directly to a hostname. For pods, a hostname is synthesized since there might be multiple pods within a deployment or stateful set. For a pod in a stateful set, an index is appended to the set name. E.g. the pods in the stateful set myset will be named myset-0, myset-1, and so on. Pod replicas in a deployment instead append a random hash to their hostname.
The fully qualified domain name (FQDN) of a pod or service consists of the cluster domain suffix (e.g. cluster.local), a type (e.g. svc), the namespace (e.g. default), the deployment name, and the hostname. So a container named foo in a stateful set bar would by default be accessible within the cluster as foo.bar.default.svc.cluster.local. Lookup is also possible without a FQDN (e.g. looking up a service with name some-service).
Pods can have different DNS policies (field dnsPolicy in a pod spec). The default setting ClusterFirst enables lookup of such FQDNs in Kubernetes’ DNS service. Alternative settings like Default inherit the node’s DNS setting, or select manual DNS configuration with None.
2.5. Kubernetes objects
Kubernetes objects are used to set up the Kubernetes environment. These objects rep- resent persistent entities which have a functionality and serve a role in the Kubernetes environment.
They can be created, updated, deleted by a so called configuration file, in a .yaml file.
Using such a file makes it possible to implement infrastructure as code. With kubectl apply, the cluster can be brought into the state specified by the configuration file. It is also possible to interact with the objects directly e.g. with kubectl set. This is discussed in detail in section 3.3 and section 6.
For each object, essential fields must be included in this configuration file in order to a
have meaningful configuration. Common fields include the apiVersion, kind, metadata,
and spec.
apiVersion This is the revision of the Kubernetes API specification for that object.
Different versions might be support different object properties. API objects are versioned independently from the Kubernetes controller.
kind The type of the object, e.g. Service or Pod.
metadata A description of the object itself (i.e. name, labels). This description is mostly useful for organizing configuration objects, but some fields can also serve as con- figuration parameters.
spec This sub-object describe the state of the object, its characteristics. For example, a Pod object might list the containers that shall run within the Pod.
In the following, we describe the most important types of Kubernetes configuration objects that are relevant for our project.
2.5.1. Pod
1This is the smallest that can be created in a Kubernetes environment. It hosts at least one container and serves as a logical platform for its functionality. The container must be specified, under the spec field using container. Then, container image of the app is declared with image. It is most of the time not instantiated individually but rather within the declaration of a workload manager object such as StatefulSet or Deployment.
2.5.2. Deployment
2Deployment allows us to describe the main characteristics of an application deployment like the number of pods, the container and image to use by the pods. The main idea is to make it easier to deploy the application and to apply updates. Most important characteristic of this object is the ability to scale our application by adjusting the number of pods according to the workload.
2.5.3. StatefulSet
3This object is similar to a deployment object. The difference is that pods created here can only have unique identity meaning they have persistent identifier, potentially persistent storage, and cannot be treated interchangeably. This configuration is used mostly if we need persistent storage for our application.
1https://kubernetes.io/docs/reference/kubernetes-api/workloads-resources/pod-v1/
2https://kubernetes.io/docs/reference/kubernetes-api/workloads-resources/deployment-v1/
2.5.4. Service
4A Service allows to export our application to the (internal) network. It handles the connections and therefore the workload going to our app by distributing requests to the pods. As pods are not persistent resources, Service is always aware of their state and knows how and when to send them requests.
A service is not directly represented by a physical resource such as a container. Instead, it makes the services provided by one or more containers discoverable via some hostname and port, as discussed in section 2.4.
The different types of services are NodePort, ClusterIP, and LoadBalancer depending on how the service can be accessed. Later, we will use the NodePort type which ex- poses a port on all cluster nodes on which a pod of the service runs. We also use the LoadBalancer type, which requires an external load balancer.
2.5.5. Ingress
5To expose a service to the outside, it is possible to use a Service of type NodePort, which will make the service accessible from the node’s public IP address. This does not permit for load balancing, except via DNS.
A more flexible approach is to use an ingress controller [9]. The controller can be configured via the Ingress API object. This makes it possible to provide a clear external entry point into the cluster, to forward traffic to services according to the configured rules, and to perform load balancing among the pods providing a service.
The ingress is generally provided by the cloud environment on which the cluster is running, e.g. the AWS load balancer, or a separately running HAproxy instance [10].
For the purpose of this project, Nginx is used as an ingress controller [17].
4https://kubernetes.io/docs/reference/kubernetes-api/services-resources/service-v1/
5https://kubernetes.io/docs/reference/kubernetes-api/services-resources/ingress-v1/
3. Kubernetes setup
To use Kubernetes, we first need a cluster which we will supply via Minikube. To interact with that cluster, we need the kubectl tool.
We present a Minikube-based test environment because it is easy to set up and integrates various convenience tools. For local testing, it is also possible to use the Kubernetes feature of Docker Desktop [2]. For setting up a production cluster without using managed Kubernetes cloud services, Kubernetes distributions such as K3S can be used [11].
3.1. Install and set up kubectl
Kubectl is a Kubernetes command-line tool, which allows users to run commands against Kubernetes clusters. Kubectl provides users with the functions including deploying applications, inspecting and managing cluster resources, and viewing logs.
The steps to install kubectl on Windows are as follows. First, download release v1.20.0 or use the following curl command (URL should be on one line, without spaces):
curl -LO https://storage.googleapis.com/kubernetes-release/release/
v1.20.0/bin/windows/amd64/kubectl.exe
↪
Next, add the binary to the PATH.
On Ubuntu, it can be installed instead with:
sudo snap install --classic kubectl
To test correct installation, we can display to Kubernetes version:
kubectl version --client
3.2. Installing Minikube
Minikube runs a local Kubernetes cluster using a virtual machine or using containers [13].
For Windows users, the steps of installing Minikube are as follows.
If the Windows Package Manager is installed, use the following command to install minikube:
winget install minikube
If the Chocolatey Package Manager is installed, use the following command:
choco install minikube
Otherwise, you should firstly download and run Windows installer.
For Linux users, there are three download options.
Binary download:
curl -LO
https://storage.googleapis.com/minikube/releases/latest/minikube-linux-amd64
↪
sudo install minikube-linux-amd64 /usr/local/bin/minikube
Debian package:
curl -LO
https://storage.googleapis.com/minikube/releases/latest/minikube_latest_amd64.deb
↪
sudo dpkg -i minikube_latest_amd64.deb
RPM package:
curl -LO
https://storage.googleapis.com/minikube/releases/latest/minikube-latest.x86_64.rpm
↪
sudo rpm -ivh minikube-latest.x86_64.rpm
After installation, from a terminal with administrator access (but not logged in as root), run the following command to start minikube:
minikube start
3.3. Interacting with the cluster
If you already have kubectl installed, you can now use it to access your new cluster:
kubectl get pods -A
Minikube bundles the Kubernetes Dashboard, which allows you to get easily acclimated to your new environment. The dashboard provides a graphical alternative to the kubectl command line tool. An example of this is shown in section 6.5. The following command will start the dashboard and open it in a browser.
minikube dashboard
We can now deploy a simple example. The following commands will create a new de- ployment that runs the specified image, then create a service that makes this container accessible on port 8080 of the Minikube virtual machine:
kubectl create deployment hello-minikube --image=k8s.gcr.io/echoserver:1.4 kubectl expose deployment hello-minikube --type=NodePort --port=8080
The deployment will show up when you run:
kubectl get services hello-minikube
The easiest way to access this service is to let minikube launch a web browser for you:
minikube service hello-minikube
Alternatively, use kubectl to forward the port:
kubectl port-forward service/hello-minikube 7080:8080
Now, the application will be available on http://localhost:7080/
4. MinIO configuration
MinIO [16] is a high-performance open-source object storage with an S3-compatible API. It can handle unstructured data such as photos, videos, log files, backups, and container images with currently the maximum supported object size of 5TB. In our demo application, we use MinIO to store the images undergoing processing. In the following, we show how MinIO can be deployed on Kubernetes.
The MinIO server has two modes, standalone and distributed. In standalone mode, there is a single server process that stores data in a single directory. In this mode, the server would be started as minio server /data. While standalone mode is useful for local testing, it does not provide interesting features such as replication and high-availability [15].
We therefore configure MinIO in its distributed mode [3], which provides additional features. In particular, data is replicated across multiple servers in order to tolerate partial failures, thus ensuring high availability. This is similar to a software RAID-5 configuration, except on a service level rather than on a disk controller level and with different availability guarantees. As a minimal high availability configuration, we will create a cluster of four MinIO servers with one disk each. For a production deployment all servers and disks should be on different hardware systems, but for testing all will be deployed on the same node. The MinIO server might be started in distributed mode like this, with a glob-like expression that is used to create a list of domain names for the other servers in the cluster:
minio server http://minio-{0...3}.example.com/data
As the first step to writing the Kubernetes configuration, we must add a Service. Here, we create a service called minio that exposes port 9000, and will include all apps labeled with app: minio:
---
apiVersion: v1 kind: Service metadata:
name: minio labels:
app: minio spec:
clusterIP: None
ports:
- port: 9000 name: minio selector:
app: minio
To create Pods with persistent storage, we will use a StatefulSet as explained in section 2.5.3. The configuration is similar to a Deployment, but will provide predictable names for the pods and allows us to add persistent storage with volumeClaimTemplates.
The general structure of the configuration is as follows:
---
apiVersion: apps/v1 kind: StatefulSet metadata:
name: minio spec:
selector: ... # which Pods should be part of the Set serviceName: minio # Service must exist previously replicas: 4
template:
metadata: ...
spec: ... # MinIO container configuration volumeClaimTemplates: ... # storage configuration
The volume claim templates define persistent storage that can be mounted in containers.
Here, this includes the ReadWriteOnce access mode, so that the volume can be mounted by a single container in read–write mode. We also apply a size limitation to 5GB. We use the following template called data:
volumeClaimTemplates:
- metadata:
name: data spec:
accessModes:
- ReadWriteOnce resources:
requests:
storage: 5Gi
For the pod spec template, we create a container that runs the MinIO server in distributed mode, exposes port 9000, and mounts a volume as defined above. For distributed mode, the running MinIO servers must be able to connect to each other.
Here, we have minio containers in a minio service using the default Kubernetes
namespace, so that the domain name of the first server in the StatefulSet will be
minio-0.minio.default.svc.cluster.local, as discussed for service discovery in sec- tion 2.4. In our configuration we also set environment variables with access credentials, although these could also be provided via the Kubernetes secrets mechanism.
template:
metadata:
labels:
app: minio spec:
containers:
- name: minio env:
- name: MINIO_ACCESS_KEY value: "minio"
- name: MINIO_SECRET_KEY value: "minio123"
image: minio/minio args:
- server
- http://minio-{0...3}.minio.default.svc.cluster.local/data ports:
- containerPort: 9000
# Each pod in the Set gets a volume mounted based on this field.
volumeMounts:
- name: data mountPath: /data
Together, and after adding labels/selectors in the necessary places, we obtain the follow- ing configuration:
---
apiVersion: v1 kind: Service metadata:
name: minio labels:
app: minio spec:
clusterIP: None ports:
- port: 9000 name: minio selector:
app: minio
---
apiVersion: apps/v1
kind: StatefulSet
metadata:
name: minio spec:
selector:
matchLabels:
app: minio serviceName: minio replicas: 4
template:
metadata:
labels:
app: minio spec:
containers:
- name: minio env:
- name: MINIO_ACCESS_KEY value: "minio"
- name: MINIO_SECRET_KEY value: "minio123"
image: minio/minio args:
- server
- http://minio-{0...3}.minio.default.svc.cluster.local/data ports:
- containerPort: 9000 volumeMounts:
- name: data mountPath: /data volumeClaimTemplates:
- metadata:
name: data spec:
accessModes:
- ReadWriteOnce resources:
requests:
storage: 5Gi
When this configuration is written to a YAML file, it can be deployed with one com- mand:
kubectl create -f minio-deployment.yaml
Whereas the kubectl create command will attempt to create new resources which will
only succeed once, the configuration could also be deployed with kubectl apply which
is an idempotent operation.
We can inspect the current state of our MinIO storage by accessing our MinIO service in the Kubernetes cluster. For that, we need to port-forward the MinIO service using the following command:
kubectl port-forward service/minio-service 8080:9000
With 8080 being the port we will access on localhost and 9000 the port of the MinIO service.
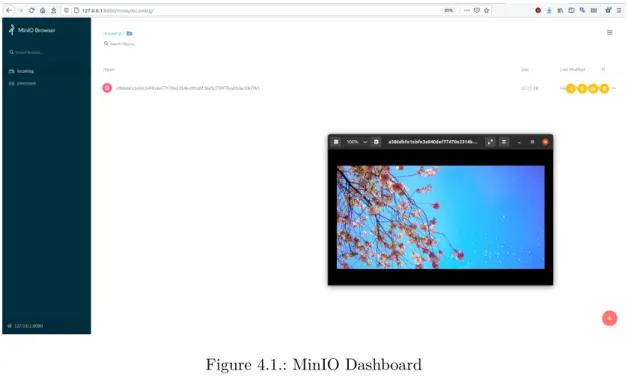
In Fig. 4.1, the MinIO user interface is shown. In the left part, the available storage buckets are listed. In the right part, the files in one bucket are listed. Here, the incoming bucket contains one picture that was just downloaded.
Figure 4.1.: MinIO Dashboard
5. Target Application
In this section, we describe the container-based application to be deployed on Kuber- netes.
Security Warning: The application was developed for demonstration purposes on virtual machine, and does not contain any authentication. It must not be deployed on publicly accessible systems.
5.1. REST API
The application is a simple REST API that provides an image processing service: it can download images from the internet, and then convert them into greyscale.
Specifically, the app will provide the following routes:
GET /
Returns a JSON document with a list of routes.
POST /incoming
Instructs the application to download an image into persistent storage. The request body must be a JSON document providing an url:
{"url": "https://example.com/image.png"}
The response will be a JSON document that contains the name of the stored image, which will be needed for the conversion step. For example:
{"path":
"/incoming/56df5bf60b0500d5e9a6e85193ca4b52b21024b8dc5ce6f8c4882bfaacea24b1"}
↪
GET /incoming/<name>
Retrieves a previously downloaded image. This can directly use the path from the
previous step.
POST /processed
Instructs the application to convert an image to greyscale. The request body must be a JSON document providing the path to an incoming image, as from the previous steps.
The response will contain a similar object with a path, this time naming a processed file:
{"path":
"/processed/011e8ba0a6ace928861845837e84578efbf75382d8c1595bb1aa66e33b621e4f"}
↪
GET /processed/<name>
Retrieves a previously processed image. This can directly use the path from the previous step.
Note: the API accepts requests with a JSON payload only when the content type is set correspondingly. With cURL, the request for processing an image would look like:
curl -H 'Content-Type: application/json' http://example.com/processed --data
'{"path":"/incoming/56df5bf60b0500d5e9a6e85193ca4b52b21024b8dc5ce6f8c4882bfaacea24b1"}'
↪
5.2. Implementation
The REST API was implemented in Python using the Flask web framework [6]. The conversion is carried out by the ImageMagick convert tool [1], which is invoked as a separate process. To interface with MinIO storage, the MinIO Python SDK is used [14].
While the idea of this application and early versions of the code were substantially based on the OpenFAAS demo by Ellis [5], the code was substantially restructured and extended. This involved conversion to a simpler REST API, having the API configure MinIO storage buckets itself, as well as substantial restructuring and modernization of the Python code.
The full source code for the Python application is shown in appendix A.
5.3. Dockerization
To deploy the application on Kubernetes, it must be first packaged as a container image.
To this end, the following Dockerfile was used:
FROM ubuntu:20.04 WORKDIR /app
RUN apt-get update \
&& DEBIAN_FRONTEND=noninteractive apt-get install -y --no-install-recommends
\
↪
python3 python3-pip imagemagick libmagic1 COPY ./image_app/requirements.txt ./
RUN python3.8 -m pip install -r requirements.txt
# copy project
COPY ./image_app ./image_app EXPOSE 5000
CMD ["python3.8", "./image_app/__main__.py"]
First, this Dockerfile installs required system prerequisites such as Python, ImageMag- ick, and libmagic for determining the MIME type of the images. To keep the im- age small, the --no-install-recommends flag excludes optional dependencies. The DEBIAN_FRONTEND=noninteractive environment variable prevents the package installa- tion process from expecting human interaction.
Next, the requirements.txt list with Python dependencies is copied into the container and installed. This includes Flask, the MinIO client SDK, as well as requests for making external HTTP requests, and python-magic for interacting with libmagic.
Finally, the entire application source code is copied into the container and configured as the default command when executing the container.
5.4. Distribution via GitLab Container Registry
For using our container image in a Kubernetes cluster, it is necessary to store the image in a container registry. Instead of creating a public image on Docker Hub, we opted for using the Container Registry feature of a self-hosted GitLab instance [7]. This has advantages such as being independent from rate limits during testing, and being able to automatically build the image in a CI pipeline.
In our case, we used the following .gitlab-ci.yml pipeline to automatically rebuild the image whenever new code was pushed:
stages:
- build
docker-build:
image: docker:latest stage: build
services:
- docker:dind before_script:
- echo $CI_BUILD_TOKEN | docker login -u "$CI_REGISTRY_USER"
--password-stdin $CI_REGISTRY
↪
script:
- docker build --pull -t "$CI_REGISTRY_IMAGE" . - docker push "$CI_REGISTRY_IMAGE"
There are no special tricks involved here. The CI job (which has the application
source code already checked out) logs into our private registry using a temporary token,
builds the image, then pushes it into the registry. The $CI_REGISTRY_IMAGE
variable contains an image name that is automatically derived from the Git
repository name. In the following, we will assume that the image name is
pkg.example.com/kube-image-processing.
6. Deploying an application on Kubernetes
In this section, we deploy the container image from section 5 on our Minikube Kubernetes environment. This will involve creating a deployment with multiple pods running this container, managing secrets to access the private container registry, exposing the API as a service, and adding an ingress to make the service accessible from outside Kubernetes.
6.1. Creating a Deployment
Our deployment looks as follows.
---
apiVersion: apps/v1 kind: Deployment metadata:
name: web-deployment labels:
app: web.app spec:
replicas: 2 selector:
matchLabels:
app: web.app template:
metadata:
labels:
app: web.app spec:
containers:
- name: web-container
# note the private registry – need imagePullSecret image: pkg.example.com/kube-image-processing ports:
- containerPort: 5000 env:
- name: minio_hostname value: minio:9000 - name: minio_access_key
value: minio
value: minio123 imagePullSecrets:
- name: kube-image-processing-regcred
In this YAML file, a deployment named web-deployment is created, indicated by the .metadata.name field. The Deployment creates two replicated Pods, indicated by the .spec.replicas field. The .spec.selector field defines how the Deployment finds which Pods to manage. Here, we select a label that is defined in the Pod template (app:
web.app).
The template field contains several sub-fields. The Pods are labeled app:
web.app using the .metadata.labels field. The .template.spec field indi- cates that the Pods run one container: web-container, which runs the image pkg.example.com/kube-image-processing.
In Kubernetes, a Service is an abstraction which defines a logical set of Pods and a policy by which to access them. The Service abstraction enables the frontends to be able to decouple from the backends. A Service in Kubernetes is a REST object, similar to a Pod. Like all of the REST objects, you can POST a Service definition to the API server to create a new instance. The name of a Service object must be a valid DNS label name[18].
6.2. Managing imagePullSecrets
One important aspect of this deployment is the imagePullSecrets field. This would require authentification for Kubernetes to pull a private container image with a particular namespace[19]. Our project being developed in a self-hosted GitLab and for private purposes, we pull the container image created by the CI pipeline of GitLab. We need to specify the name of the corresponding secret we create in our Kubernetes environment with the following command:
kubectl create secret docker-registry kube-image-processing-regcred --docker-server=pkg.example.com/kube-image-processing
--docker-username=USERNAME --docker-password=TOKEN
↪
↪
![Figure 2.1.: Kubernetes Cluster[12]](https://thumb-eu.123doks.com/thumbv2/1library_info/4258265.1565029/4.892.139.745.555.834/figure-kubernetes-cluster.webp)