For your convenience Apress has placed some of the front matter material after the index. Please use the Bookmarks
and Contents at a Glance links to access them.
v
Contents at a Glance
About the Author ����������������������������������������������������������������������������������������������������������������� xi About the Technical Reviewer �������������������������������������������������������������������������������������������xiii Acknowledgments �������������������������������������������������������������������������������������������������������������� xv Preface ����������������������������������������������������������������������������������������������������������������������������� xvii
Chapter 1: Benefits of the New API
■ �����������������������������������������������������������������������������������1 Chapter 2: Implementation Prerequisites
■ ������������������������������������������������������������������������29
Chapter 3: ES 2�0 Fundamentals
■ �������������������������������������������������������������������������������������55 Chapter 4: 3D Modeling
■ ���������������������������������������������������������������������������������������������������93 Chapter 5: Texturing and Shading
■ ���������������������������������������������������������������������������������141 Chapter 6: Taking the Development Ahead
■ ��������������������������������������������������������������������169
Index ���������������������������������������������������������������������������������������������������������������������������������195
1
Chapter 1
Benefits of the New API
In this chapter I introduce you to OpenGL ES 2.0, and account for its increasing popularity compared to older graphic rendering APIs for embedded devices. I describe OpenGL ES 2.0’s support from computer-graphics communities and leading embedded and mobile device vendors, which helps to ensure its increasing popularity. Finally, I show how easy it is to get started with ES 2.0 on Android devices, when we take our first step towards game development, by creating a blank OpenGL surface view.
This chapter assumes you have some experience of setting up Android Software Development Kit (SDK) for Eclipse and installing SDK Platform for various API levels from SDK Manager.
Modern Graphic-rendering API
OpenGL ES (Open Graphics Library for Embedded Systems) is an API (Application Programming Interface) for rendering 3D graphics on embedded devices, such as mobiles, tablets, and gaming consoles.
The OpenGL ES 1.0 and ES 1.1 APIs (referred to jointly as OpenGL ES 1.x) were released by the non-profit Khronos Group as a fixed-function graphic-rendering API. OpenGL ES 1.x API does not provide graphics application developers full access to underlying hardware, because most rendering functions in this API are hard-coded, leading to popular names—“fixed-function graphic rendering API” or “fixed-function pipeline.”
Unlike OpenGL ES 1.x API, OpenGL ES 2.0 API was released as a programmable graphic-rendering API (programmable pipeline), giving developers full access to the underlying hardware through shaders (discussed in Chapter 3).
Graphics rendered through a fixed-function pipeline involve device-provided algorithms for most rendering effects. These algorithms (and the rendering functions based on them) cannot be modified.
They are fixed because they were made for special purpose graphics cards, for a specific data-flow.
Because of the fixed functionality of OpenGL ES 1.x API, graphics hardware could be optimized for faster rendering.
In contrast, a programmable graphic-rendering API is a more flexible API and requires a general purpose graphics card, enabling graphic developers to unleash the huge potential of modern GPUs.
Technically, the programmable pipeline is slower than the fixed function pipeline; however, graphics rendered using the programmable pipeline can be greatly enhanced because of flexibility offered by new general purpose graphics cards. OpenGL ES 2.0 combines GLSL (OpenGL Shading Language) with a modified subset of OpenGL ES 1.1 that has removed any fixed functionality. Chapter 3 discusses OpenGL Shading Language.
Figure 1-1. ADS (Ambient Diffuse Specular) shading in OpenGL ES 2.0
Note GLSL is the OpenGL Shading Language for programming vertex and fragment shaders. Shaders are programs in programmable pipelines that help users work on two separate aspects of object rendering: vertex marking and color filling.
With OpenGL ES 2.0, enhancements in various effects, such as lighting/shading effects (as shown in Figure 1-1—a basic shading example), no longer have any restrictions, compared to ES 1.x. What is required is transformation of creative ideas for any such effects into algorithms, then into custom functions executed on the graphics card, which would be impossible in ES 1.x.
OpenGL ES 2.0 is derived from the larger OpenGL 2.0 API, the programmable pipeline for rendering 3D graphics on desktops. ES 2.0 is a suitable subset of OpenGL, optimized for resource constrained display devices, such as mobiles, tablets, and gaming consoles. ES 2.0 contains only the most useful methods from OpenGL 2.0 API, with redundant techniques removed. This allows OpenGL ES 2.0 on handheld devices to deliver rich game content like its parent API.
Devices Love It
As of October 1, 2012, more than 90% of all Android devices were running version 2.0 of OpenGL ES. Devices running version 2.0 are also capable of emulating version 1.1. However, an activity in Android cannot use both versions together, stemming from the fact that OpenGL ES 2.0 API is not backwards compatible with ES 1.x. Note that, although an activity cannot use both versions together, an application can still use them together. (Information about OpenGL ES version distribution across Android devices is available at http://developer.android.com/about/dashboards/index.html, and Figure 1–2 shows a chart representing that distribution.)
Figure 1-2. OpenGL ES version distribution
Note To demonstrate the use of both ES 1.x and ES 2.0 APIs in an application, the GLES ACTIVITY application is provided in the source code for this chapter. This application contains activities Main and Second. The Main activity uses ES 1.x, whereas the Second activity uses ES 2.0. To load this application into your Eclipse workspace, under “File Menu,” select “Import,” and then import the archive file glesactivity.
zip from the Chapter1 folder.
OpenGL ES 2.0 constitutes such a huge share of distribution (Figure 1-2), because of widespread support from leading CPU and GPU manufacturing industries. (A complete list of companies with their conformant ES 1.x/2.0 products can be found at http://www.khronos.org/conformance/
adopters/conformant-products#opengles.) The following vendors have actively participated in consolidating support for OpenGL ES 2.0 on Android since 2010:
(Leading GPU manufacturers) NVIDIA
AMD
Imagination Technologies
(Leading CPU manufacturers)
ARM
Texas Instruments
STMicroelectronics
Implementer companies make use of the Khronos developed technologies at no cost in license fees. However, they do not claim that a product is “compliant,” unless the technologies enter and pass conformance testing. The following are the implementers of OpenGL ES 2.0 for various embedded devices:
Intel
Marvell
NVIDIA
Creative Technology Ltd.
QUALCOMM
MediaTek Inc.
Apple, Inc.
NOKIA OYJ
Digital Media Professionals
Panasonic
Note Although most embedded platforms are up and running with OpenGL ES 2.0, the Khronos Group announced on August 6th, 2012, the release of the OpenGL ES 3.0 specification, bringing significant functionality and portability enhancements to OpenGL ES API. OpenGL ES 3.0 is backwards compatible with OpenGL ES 2.0, enabling applications to incrementally add new visual features to applications. The full specification and reference materials are available for immediate download at http://www.khronos.org/registry/gles/.
Easy App Development: Let’s Create an OpenGL Surface View
ES 2.0 applications can be easily developed for Android devices using the Android SDK. The best part about creating such applications using this SDK is that there is no need for any external library (something that can be quite burdensome for new ES 2.0 application developers on iPhone).
There is another way to create Android ES 2.0 applications—using the Android Native Development Kit (NDK). In some cases, NDK can make ES 2.0 applications faster than those made using SDK.
NDK lets users code in native languages, such as C and C++. This makes it possible to use popular libraries written using C/C++, but only at the cost of increased complexity. Beginner ES 2.0 application
developers may find this difficult to deal with, which can ultimately make NDK counter-productive.
NDK is typically a tool for advanced Android developers, but be assured the performance gap between most ES 2.0 applications created using SDK and NDK is becoming negligible.
Note Do not use NDK simply because you like coding your applications in C/C++; use it only for cases in which performance is critical to your application. Also, remember that Dalvik VM is becoming faster, reducing the performance gap between SDK and NDK.
Determining OpenGL ES Version
To demonstrate the ease of developing ES 2.0 applications for Android devices, a quick example is given here for creating an OpenGL surface view. This view is different from the XML view (UI layout) you have generally created for most Android applications. (Chapter 3 contains a detailed account of OpenGL surface view.)
Before I discuss this example, you need to determine the version of OpenGL ES on your Android device. To do so, let’s create a blank Activity:
1. In the Eclipse toolbar, click the icon to open wizard to create a new Android project.
2. Uncheck the “Create custom launcher icon” option, and click “Next,” as shown in Figure 1-3.
Note You might be accustomed to an older version of the SDK. The older version lacked some tools present in the newer version. Make sure you have these tools installed using your SDK Manager. If you prefer working offline, always allow time to update the SDK.
Figure 1-3. Creating a new Android application
3. For “Create Activity,” select BlankActivity and click “Next.” Select MasterDetailFlow (Figure 1-4) only if you are experienced in developing applications for tablets. This book only addresses BlankActivity, because we are not developing for tablets.
4. Set the “Activity Name” and “Layout Name” as “Main” and “main,”
respectively (Figure 1-5). In cases in which the Android application has only one activity, most coders name the Java file Main.java.
Figure 1-4. Selecting the type of Activity
5. Click “Finish” if you have already installed the “Android Support Library.”
If you haven’t installed it, then click “Install/Update,” wait until it is installed, and then click “Finish” (please note that you might not get the option to install “Android Support Library” if using an older version of the ADT plugin).
Figure 1-5. Creating a new blank Activity
1. In the Problems view, click the small plus-sign (+) button near “Warnings” and the list of warnings will be displayed.
2. Double click any warning. SDK will move the edit cursor to the line containing the warning.
3. Now, press Ctrl and 1 on the keyboard. SDK will then suggest ways to remove the warning(s).
4. Select the “Organize imports” (Figure 1-7) option, and the warnings will be removed.
Figure 1-6. Project warnings
After the blank Activity (Main.java) is created, SDK will show warnings for unused imports, as shown in Figure 1-6. To remove these warnings:
5. If warnings persist, clean the project by selecting the “Clean” option under
“Project Menu” in Eclipse, as shown in Figure 1-8. Remember this step, because Eclipse might not update the project binaries after modification(s).
Cleaning will update/refresh them.
Figure 1-7. Organizing imports
After warnings have been removed, replace the entire (XML) UI layout in your project’s res/layout/
main.xml with the contents of Listing 1-1. Notice the main difference between Listing 1-1 and the default UI layout (of the blank Activity template) is the root tag RelativeLayout.
Note Although it is not necessary to remove all the warnings from your application (because the application can still work with these warnings), get into the habit of clearing them, especially in cases in which unused imports or other redundant code can cause your application to be larger than necessary.
The few lines that cause warnings may look insignificant now; however, later in the book, we will be dealing with examples in which those lines might add up to bloat the performance of your application. The Android lint tool always highlights such warnings and, in some cases, can optimize the binaries by itself. This does not happen always, however, so remember to clear those warnings.
Figure 1-8. Cleaning our project
Listing 1-1. GLES VERSION/res/layout/main.xml
<LinearLayout xmlns:android="http://schemas.android.com/apk/res/android"
xmlns:tools="http://schemas.android.com/tools"
android:layout_width="match_parent"
android:layout_height="match_parent" >
<TextView
android:id="@+id/textview1"
android:layout_width="fill_parent"
android:layout_height="wrap_content"
android:padding="@dimen/padding_medium"
android:text="@string/hello_world"
tools:context=".Main" />
</LinearLayout>
Listing 1-1 places a TextView on the screen. This TextView is as wide as the screen in any orientation and has an id of “textview1.” Additionally, its padding-dimensions and text are defined in the
dimens.xml and strings.xml files, respectively, inside this project’s res/values folder.
Now, replace the onCreate method of the blank Activity (Main.java) with the onCreate method from Listing 1-2.
Listing 1-2. GLES VERSION/src/com/apress/android/glesversion/Main.java
@Override
public void onCreate(Bundle savedInstanceState) { super.onCreate(savedInstanceState);
setContentView(R.layout.main);
final ActivityManager activityManager = (ActivityManager) getSystemService(Context.ACTIVITY_SERVICE);
final ConfigurationInfo configurationInfo = activityManager.getDeviceConfigurationInfo();
final boolean supportsEs2 = configurationInfo.reqGlEsVersion >= 0x20000;
TextView tv = (TextView) findViewById(R.id.textview1);
if (supportsEs2) {
tv.setText("es2 is supported");
} else {
tv.setText("es2 is not supported");
} }
In the onCreate method (Listing 1-2), we obtain the device configuration attributes and use them to detect the version of OpenGL ES running on the device. Next, we find the TextView in the UI layout of our application by its id (“textview1”) and use it to display the result using its setText method.
Now the application is ready for use. However, before running this application on a real device, we will test it on the Android Emulator. If you haven’t created a virtual device yet, start the AVD Manager and complete the following steps:
1. Click “New” to open the window to create a new virtual device.
2. Name this virtual device “IceCreamSandwich”. We are targeting (at least) the Ice Cream Sandwich emulator, so we will name it IceCreamSandwich. You may also modify this name to indicate the resolution of virtual device.
3. Under target, select API level 15, as shown in Figure 1-9.
Figure 1-9. Using AVD Manager
4. Enter the size for the SD card.
5. Enable “Snapshot” to avoid going through the Android bootup sequence every time you start the virtual device.
6. To create this virtual device at a specific resolution, select a built-in skin.
7. Click “Create AVD” to create the virtual device.
AVD Manager will take some time to prepare the virtual device. After the device is successfully created, it will be listed in the AVD Manager with a green tick at the beginning. Select the created virtual device and click “Start.”
Let the device boot. With Snapshot enabled, the device will start from where it left off the next time. When the Home screen is visible in the virtual device (Figure 1-10), return to Eclipse and run the application.
Figure 1-10. IceCreamSandwich on Android Emulator
As of January 2013, Android Emulator supported ES 1.x only (some hosts allow Emulators to access their GPU for ES 2.0, but, for most, Android Emulator supports ES 1.x only—Figure 1-11).
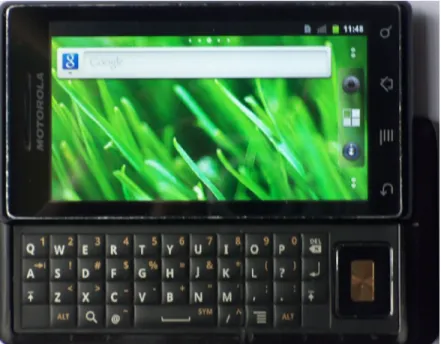
Now, test this application on a real device. (Here, we use a Motorola Milestone—Figure 1-12—running Gingerbread, Android version 2.3.3). Close the Emulator and connect your Android handheld using USB. Return to Eclipse, and run the application again.
Figure 1-11. Emulator does not support ES 2.0
Figure 1-12. Gingerbread on Motorola Milestone
If your device shows “es2 is not supported,” then try this application on another device you know supports ES 2.0; if your device supports ES 2.0 as shown in Figure 1-13, you can now create an OpenGL surface view. To do so, first you need to create a new Android application.
Figure 1-13. Motorola Milestone supports ES 2.0
Creating the OpenGL Surface
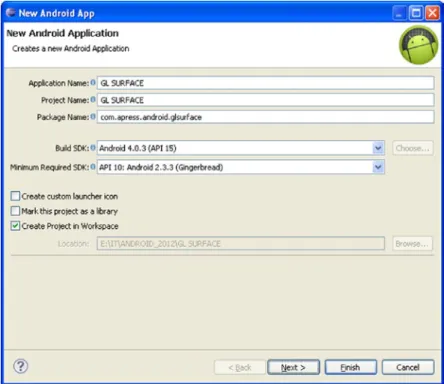
Once you create a new Android application (Figure 1-14), open the Main.java file. Replace the contents of this file with the code given in Listing 1-3. Table 1-1 gives the description of lines in this code.
Figure 1-14. Creating new Android application for OpenGL surface view application
Listing 1-3. GL SURFACE/src/com/apress/android/glsurface/Main.java public class Main extends Activity {
private GLSurfaceView _surfaceView;
@Override
public void onCreate(Bundle savedInstanceState) { super.onCreate(savedInstanceState);
_surfaceView = new GLSurfaceView(this);
_surfaceView.setEGLContextClientVersion(2);
_surfaceView.setRenderer(new GLES20Renderer());
setContentView(_surfaceView);
} }
Table 1-1. onCreate method, lines description
Line Description
1. Calls onCreate method of the super class Activity, which takes Bundle as argument 2. Requests an OpenGL surface view by calling the view constructor GLSurfaceView,
which takes Context as argument
3. Sets the version of OpenGL ES (in this case, ES 2.0) that will be used by the current context’s surface view
4. Starts a separate renderer thread that will cause the rendering (drawing) to begin 5. setContentView method sets _surfaceView object as the content view
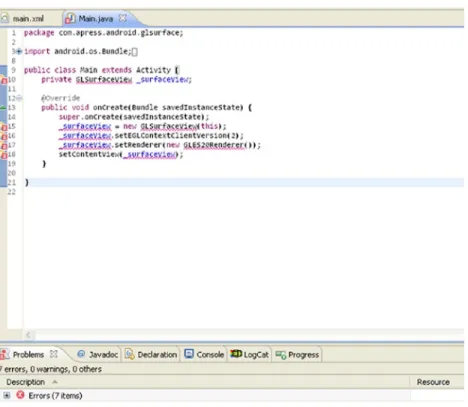
Because the GLSurfaceView class is not yet imported (Figure 1-15), press Ctrl and 1 for quick fixing errors as shown in Figure 1-16. (“Quick fix” is a commonly used problem correction tool in Eclipse.) SDK will import the class, and you will then see only 1 error.
Figure 1-15. Errors after modifying the template code of class Main
Figure 1-16. “Quick fix errors” using Ctrl and 1
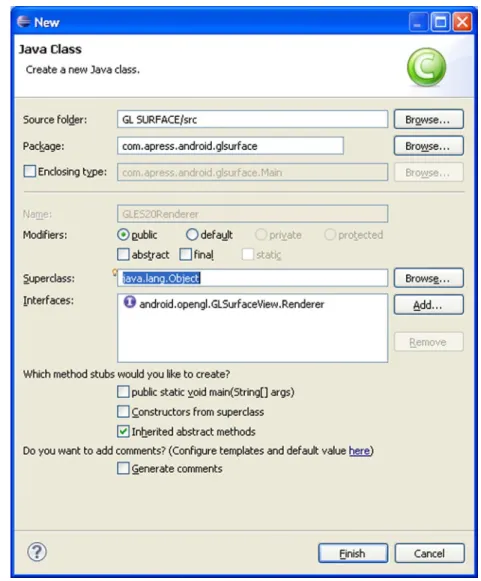
To fix the last error, we have to create the GLES20Renderer class. Amazingly, SDK automates even this step, so you can “quick fix” it. Select the first option (Figure 1-17), to create the class GLES20Renderer, which implements an interface GLSurfaceView.Renderer.
Figure 1-17. Android automating class creation
After Android has created our Renderer class (Figure 1-19), you might observe warnings in the Problems view, depending on the ADT version you are using. These include:
The import
android.support.v4.app.NavUtils is never used.
The import
android.view.Menu is never used.
The import
android.view.MenuItem is never used.
Figure 1-18. GLES20Renderer class implementing interface GLSurfaceView.Renderer
These warnings are indicated for unused imports in Main.java file. Quick fix these warnings if you are on Eclipse. Finally, replace the class GLES20Renderer with the code given in Listing 1-4. You will see an error after replacing the code—“GLES20 cannot be resolved to a variable.” This error is caused because the class android.opengl.GLES20 is not imported yet. So, import it.
Listing 1-4. GL SURFACE/src/com/apress/android/glsurface/GLES20Renderer.java public class GLES20Renderer implements Renderer {
public void onSurfaceCreated(GL10 gl, EGLConfig config) { GLES20.glClearColor(0.0f, 0.0f, 1.0f, 1);
}
public void onSurfaceChanged(GL10 gl, int width, int height) { GLES20.glViewport(0, 0, width, height);
}
public void onDrawFrame(GL10 gl) {
GLES20.glClear(GLES20.GL_COLOR_BUFFER_BIT | GLES20.GL_DEPTH_BUFFER_BIT);
} }
Figure 1-19. Auto-generated methods for GLES20Renderer class
Figure 1-20. Blank OpenGL surface view
Take a closer look at this application’s code listings (Listings 1-3 and 1-4). Understanding the structure of such projects and the flow of control will speed up your learning process. Chapters 2 and 3 describe the details of this application, the classes used, the interface Renderer, and the ES 2.0 functions used.
ES 2.0 Is for the Ambitious
As I mentioned earlier, OpenGL ES 2.0 is derived from OpenGL 2.0 API, the programmable pipeline for rendering graphics on desktop hardware. If you are able to understand the concepts behind the programmable pipeline for ES 2.0, you will easily understand OpenGL 2.0 API. It is worth reiterating that OpenGL API is meant only for desktops, not for embedded devices. There are various programming languages you can use to create 3D graphics applications based on OpenGL API, such as Python, C, and C++. Similar to the OpenGL API, there are other programmable graphic rendering APIs (for various platforms), and understanding the OpenGL ES 2.0 API makes understanding the others easy:
Note In Listing 1-4, you will see that the sequence of auto-generated methods for GLES20Renderer class is modified. This shows the actual sequence in which these methods are called. If you closely observe these methods, you might wonder what the purpose of GL10 type for argument gl is. GL10 is a public interface that implements GL. GLES20Renderer class must implement the inherited abstract methods of GLSurfaceView.Renderer interface, and the methods of this interface use GL10 type for arguments.
After removing all errors and warnings, run the application. A blank, blue colored OpenGL surface view, similar to Figure 1-20, will appear.
Direct3D (the 3D graphics API within Microsoft’s DirectX SDK) is also based on programmable pipeline; however, it uses the .NET Framework, not Java, for coding. If you understand the .NET Framework and can code applications in C#, check out Microsoft XNA for Windows and Xbox. XNA is a collection of tools that facilitate video game development. XNA Framework is based on the .NET Framework and is the most popular framework for creating 2D/3D games based on the programmable pipeline.
Stage3D and its subset Starling are ActionScript 3 3D/2D frameworks used for game development. Stage3D is available on desktop through Flash Player 11 and AIR 3. Stage3D and Starling use low-level GPU APIs running on OpenGL, DirectX on desktop, and OpenGL ES 2.0 on mobiles. If you know how to code in ActionScript 3, you have already mastered one of the prerequisites for Adobe programmable pipeline game development.
Web Graphics Library (
WebGL) is a JavaScript API for rendering interactive 2D/3D graphics in web browsers without plug-ins; it can be mixed with HTML.
There are many JavaScript libraries for working with WebGL. One is three.js, a cross-browser JavaScript library used with HTML5 Canvas. WebGL is based on OpenGL ES 2.0, and, like OpenGL/OpenGL ES, WebGL is designed and maintained by Khronos. Google Maps is one of the most popular WebGL applications. In addition to this, Chrome Experiments (Figure 1-21) contains a showcase of various applications powered by WebGL.
Figure 1-21. Chrome Experiments
Chrome Experiments is a showcase for creative web experiments, the vast majority of which are built with the latest open technologies, including HTML5, Canvas, SVG, and WebGL. These were made and submitted by talented artists and programmers from around the world.1
The experiments are meant for Chrome browsers, but Mozilla Firefox and Safari are also able to run most of these.
Where Are the Developers?
Most Android devices (more than 90%) have sufficient capabilities to run version 2.0 of OpenGL ES;
however, most game developers have not fully exploited such capabilities, because game vendors (i.e., desktop, console, and handheld) develop their own frameworks/engines for creating games and none are completely based on ES 2.0. These frameworks are not designed for multi-paradigm game programming.
Instead, they are object-oriented with complete designs for integrating all aspects of the game, mainly:
1. Screen: splash screen, options screen, and game screen
2. Input: keyboard input, touch input, UI input from buttons, and input from motion sensors like Accelerometer and position sensors like Magnetometer, which are common on most Android devices
3. Audio: audio for splash screen and background scores, audio for player/
enemy movements and attacks, and audio for options screen and other sounds in the game
It takes time to build and test these game frameworks. The longer it takes to build one, the more variety is offered in terms of types of games. Much literature is available for creating complete game frameworks for Android. The most recent book is Beginning Android Games, Second Edition by Mario Zechner and Robert Green (Apress, 2012). Beginning Android Games provides a complete idea of how to build an Android game framework; however, all the rendering classes in this book are based on ES 1.0, meaning, once understand ES 2.0, you can translate the fixed functions of ES 1.x into your custom (ES 2.0) functions.
For game developers who have used any open-source or proprietary game development
frameworks/engines for handheld devices, based on the fixed-function pipeline, ES 2.0 poses a big problem. However, game developers can take advantage of this situation. They can learn ES 2.0 for developing games, or they can become game framework developers for ES 2.0. Because there are few ES 2.0 game developers and even fewer game frameworks, most game developers are also game framework developers.
Here are some popular games on Android based on OpenGL ES 2.0:
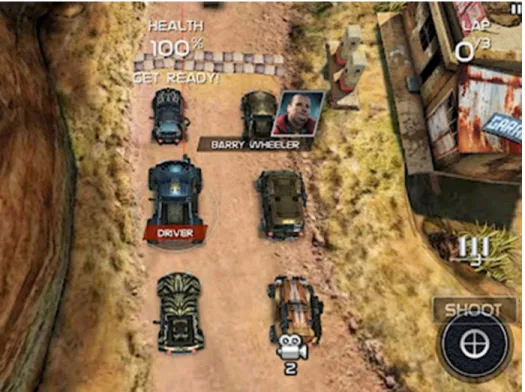
Death Rally (seen in Figure
1-22) is “an action packed combat racer with cars, guns, and explosive fun. Death Rally has been played more than 60 million times by more than 11 million gamers worldwide!”2 (More on Remedy Entertainment can be found at http://remedygames.com).
1http://www.chromeexperiments.com/about/
2http://remedygames.com
“Unlike existing mobile benchmarking applications available for Android enthusiasts,
the Electopia OpenGL ES 2.0 benchmark is written by game development experts in a manner representative of advanced, real world mobile games. Electopia provides accurate graphics performance measurements, along with unique features like the ability to isolate GPU performance from other system factors, such as LCD resolution.”3 (More information about Electopia (seen in Figure 1-23) and Tactel can be found at http://electopia1.android.informer.com/).
Figure 1-22. Death Rally by Remedy Entertainment
3http://electopia1.android.informer.com/
Figure 1-23. Electopia by Tactel AB
“Raging Thunder is a gut-churning, tire burning racer, giving you control of the most
extreme muscle cars in the world! Race against time, CPU controlled opponents, or up to three other speed addicts in this fast-paced, exhilarating, coin-op style racing game.”4 More about Raging Thunder (seen in Figure 1-24) can be found at
https://play.google.com/store/apps/details?id=com.polarbit.ragingthunder.
Figure 1-24. Raging Thunder by polarbit
4https://play.google.com/store/apps/details?id=com.polarbit.ragingthunder
Summary
This chapter discussed the basic differences between ES 1.x and 2.0 APIs, and how those
differences are likely to persist because of the great support for programmable pipeline from leading CPU/GPU hardware manufacturers.
Since learning any new software technology can be difficult, the chapter also features an
introductory tour of the vast scope of programmable graphic rendering APIs on various platforms, including modern browsers. It shows you how to create a simple app that makes use of ES 2.0, illustrating how painless it is to use this API on Android using the Android SDK.
In Chapter 2 you can read about some useful techniques for using OpenGL ES with UIs, such as buttons and motion/position sensors, before diving into the ES 2.0 environment for rendering 3D graphics.
29
Chapter 2
Implementation Prerequisites
This chapter does not jump straight into ES 2.0 fundamentals, because there are some prerequisites, such as knowledge of device inputs, for implementing OpenGL ES on Android devices. Most coders are prone to errors when working with device inputs, which play a crucial role in making ES 2.0 applications interactive, unless they have a sound understanding of the inputs and the associated classes at work behind the scenes.
Before diving into the basic concepts of the programmable pipeline, I shall explain the efficient usage of user interface (UI) on handhelds. You will learn to use buttons to update the rendering on an OpenGL surface and then we will look into using screen and sensors to obtain inputs, which can be used to move and animate game objects.
Selecting a Development Device: Why Upgrade to Gingerbread?
For an interactive graphics application, such as a game, leaving a good impression on users requires fulfilling certain conditions. The most crucial of these is lag time (latency). We often observe delays or lags when interacting with graphics applications, especially during gameplays. This is completely unacceptable, because a few milliseconds can spoil the entire user experience. If developers do not take steps to prevent this, users simply switch to other similar applications that are lag-free.
Although this is not true of earlier Android versions, graphics applications developed on Gingerbread do not suffer from delays or lags. (Reasons for this can be found at
http://www.badlogicgames.com/wordpress/?p=1315). Additionally, Google IO 2011: Memory management for Android Apps, a conference session held by Google (the video for this session is available on YouTube), explains that pre-Gingerbread garbage collectors are the primary cause for a laggy response from applications, although sometimes the application itself could be flawed or buggy.
At the time of writing, less than 6% of all Android devices have Donut, Eclair, or Froyo versions. It is common for owners to upgrade to Gingerbread. As a result, Gingerbread accounts for more than 40% of the Android OS version distribution (Figure 2-1).
Debuggable versions of heavy applications are slower than the optimized exported apk versions, and, if you are developing on pre-Gingerbread versions of Android, the garbage collector makes your application even slower (both debuggable and exported apk). There is no way to tackle this, since faster (concurrent) garbage collectors have only been available since Gingerbread. So, when beginning development of interactive graphics applications (based on ES 1.x or ES 2.0), be sure to do so on Gingerbread.
Choosing Inputs That Your Game Needs
Gameplay requires the use of inputs (or controls), through which the game logic comes to life. On handhelds, these inputs range from the basic UI (button-views, seekbars, touch, etc.) to motion and position sensors and peripherals. Although the gaming experience is enhanced by innovations, such as peripheral controls from controller manufacturers like Zeemote, game developers should attempt to minimize any need for external inputs (Figure 2-2 shows the Zeemote controller, which is coupled with the Android device via Bluetooth). Developers should even minimize (and optimize) the use of any UI that is natively available on Android handhelds, such as button-views and motion and position sensors. After all, a game for mobile devices becomes popular largely because it can be played anywhere and requires simply touching buttons on the screen, dragging a finger across the screen, or using sensors.
Figure 2-1. Android OS: version distribution
Note The Android OS version distribution is available at http://developer.android.com/about/
dashboards/index.html, and Figure 2-1 provides a chart representing this.
Casual, Tower-Defense, and Puzzle games are the most popular genres of games on handhelds.
In most of these games, the innovation and simplicity of the UI design (layout and use of visual elements, as well as the use of sensors) makes them widely accepted across all devices, by all groups of people, whether the game uses buttons to make a character jump or touch to position a basket and collect fruit (Figure 2-3).
Figure 2-2. Zeemote JS1 game controller
Figure 2-3. Catchy Basket by MetaDesign Solutions Pvt Ltd
Simple UI designs in such games do not reflect limitations in the underlying hardware, since most Android devices offer powerful and feature-rich UIs. We just want the UI design to be as simple as it can be, in order to make the gameplay easy.
Although we have not yet discussed how to render graphics using ES 2.0, to develop an
understanding of UI design (for gameplay inputs) I shall introduce a feature of 3D graphic rendering APIs called 3D-Transformation. 3D-Transformation is the process of changing sizes, orientations, or positions of objects by mathematical operations, such as Matrix Multiplication. There are three types of 3D-Transformation:
Geometric or Modeling transformation
Coordinate or Viewing transformation
Perspective or Projection transformation
At this stage, Geometric transformation (Modeling transformation) should be sufficient to better understand the game UI. Geometric transformation has three types:
Translation: shifting an object to a new position
Scaling: changing the dimensions of an object
Rotation: rotating an object about a center
In Geometric transformation, an object is transformed to a new position (translation), a new size (scaling), or a new configuration (rotation). This transformation is achieved using matrices for various types of geometric transformation. Therefore, translation is achieved by using a translate matrix, scaling is achieved by using a scale matrix, and rotation is achieved by using a rotate matrix.
Note It is possible to combine various transformations in a single matrix. For now, I do not want to expose you to advanced concepts. Chapter 3 demonstrates combining transformations, using Android’s matrix math utilities.
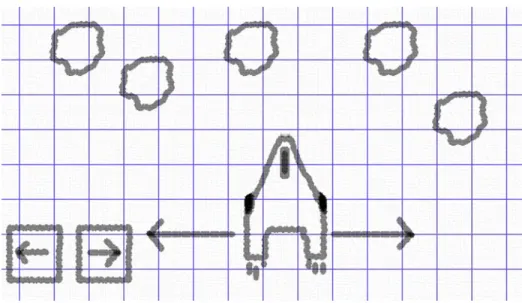
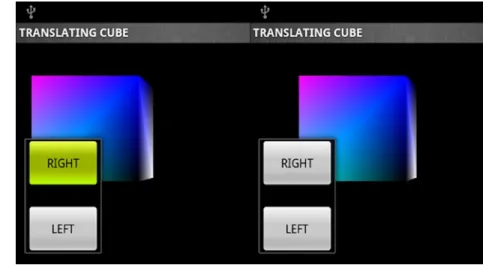
Figure 2-4 shows a spacecraft trying to dodge incoming rocks. Assuming the image is a 3D scene in a game within which the motion of spacecraft is confined along the x and y axes, the only possible way to successfully dodge the rocks is by translating along the x-axis (in the directions in which the longer arrows are pointing). In graphic rendering APIs, this can only be achieved by translation transformation.
Figure 2-4. Translation using UI: Buttons
Note Throughout this book, we work in landscape mode, especially when working with game layout, so we can stay focused on one approach, instead of choosing between landscape and portrait modes. Moreover, landscape mode provides a wider view so UI elements, such as button-views and seekbars, can be widely laid out for a spacious look to the game.
Graphic rendering APIs allow us to associate matrices with objects to animate them, and, for such a movement along the x-axis, APIs allow constant updating to the translate matrix associated with the object. For translation along the x-axis, we only need a measure of the (number of) moves along the x-axis. Hence, it should only require a UI design consisting of buttons for moves along the positive x-axis and the negative x-axis. Two buttons, one for left move and one for right move, are enough to dodge the incoming rocks in this case.
Unlike gaming consoles, handhelds do not have controllers. Most games on handhelds use the screen to place the visual elements used as inputs for gameplay. Unlike the spacious screen of a tablet, space on a mobile screen is very limited. This is why we focus on the UI design on mobiles, rather than on tablets. Therefore, after designing the game UI, we need to reduce the area occupied by visual elements, such as button-views, to avoid cluttering UI and GPU rendered 3D graphics. You may wonder about the relationship between the rendering of game UI (visual elements like button- views and seekbars) and OpenGL’s GPU rendering. Chapter 3 provides in-depth insight regarding that relationship. The examples in the following section, however, should help you understand the practical difference between game UI and OpenGL rendering.
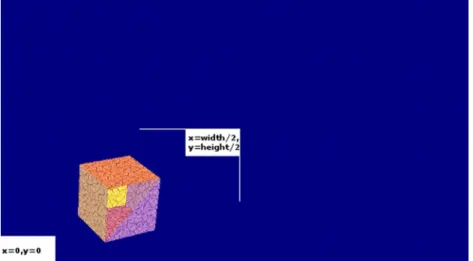
In Figure 2-4, two buttons were used to translate objects separately along the positive x-axis and the negative x-axis. These buttons can easily be eliminated, by logically dividing the screen (or the widget layout occupying the entire width of the screen if not the entire height) into two equal parts (as shown in Figure 2-5). We can get the x-coordinate of the touch using MotionEvent.getX(). If this value is less than the x-coordinate of the mid-point of the screen, it imitates a left button touch for translating the object to the left, and a right button touch in the other case. This imitation is under our control, because the conditional block for half screen touches can now handle the matrix update code. Such innovations help make efficient use of space on a mobile screen.
Figure 2-5. Translation using UI: Screen
Note Every visual element (that inherits from View) in an Android application can be assigned a touch listener using the setOnTouchListener method. This method registers a listener for the callback method onTouch, which is invoked when a touch event is sent to this visual element. The onTouch method takes two arguments (of type View and MotionEvent). The View argument is for the view (visual element) that the touch event has been dispatched to, whereas the MotionEvent argument contains full information about the event (for example, the x and y coordinates of touch, which are accessed using the getX() and getY() methods of the MotionEvent class).
After translation, rotation is the most commonly used geometric transformation in games. Graphic rendering APIs allow us to associate rotation matrices with objects, just like the translation matrices.
Like translation, rotation is implemented in a variety of ways. We can logically divide the screen for clockwise-anticlockwise spins, use buttons for spins, or use motion and position sensors to detect tilt (left-right) for different types of spins. In some cases, translation can be made automatic (a clever design principle becoming very common in popular modern games) so the screen can be used for rotation. This way, a lot of screen space can be left for a spacious look to the game.
Tank Fence
Having explained the necessary relationship between inputs for gameplay and object transformation (using graphic rendering APIs), it’s time to introduce the game we will be working with.
This game is Tank Fence, a simple 3D shooting game in which the player gets to control a tank to guard a region against invaders. The UI for this game (Figure 2-6) consists of buttons for forward- backward movement of the tank, another button for firing weapons at the invaders, and touch (or optional use of motion and position sensors) to rotate the tank. The buttons intended for forward- backward movement will actually update the translate matrix we associate with the tank, and the touch (or optionally motion & position sensors) will update the rotate matrix used in combination with the translate matrix.
Figure 2-6. Tank Fence
We will start working on this game after discussing ES 2.0 fundamentals (Buffers, GLSL, State Management and 3D-Transformation) in Chapter 3, and we will design the objects for the game (tank and invaders) using Blender in Chapter 4. But before that, let’s see how to create menus for the game.
Creating Menus for the Game
Most games initialize with a main menu for options or settings, and the main menu displays after a splash screen, which is where the logo of the game is displayed. We won’t use a splash screen, but I will explain the basic features and functioning of the GAME MENU application from the source code to help you get started with menus for the game.
Under “File Menu” in Eclipse, select “Import” and then select “Existing Projects into Workspace.”
Import the archive file gamemenu.zip from the Chapter2 folder. This will load the GAME MENU application into your workspace.
Notice that the structure of the GAME MENU application is similar to the GL SURFACE application we created in Chapter 1. Unlike that application, however, we have a modified entry point; class Main in the Main.java file now extends the ListActivity class for hosting a ListView (with id @android:id/list) to display the menu options. The options are inside the options.xml file (Listing 2-1) inside the res/values folder.
Listing 2-1. GAME MENU/res/values/options.xml
<resources>
<string-array name="options">
<item name="game">New Game</item>
<item name="score">High Score</item>
<item name="player">Edit Player</item>
<item name="sound">Toggle Sound</item>
<item name="data">Clear Data</item>
</string-array>
</resources>
In the onCreate method of class Main (GAME MENU/src/com/apress/android/gamemenu/Main.java), setListAdapter is called to set the default formatting for the ListView items, as well as to collect the options (string-array) for display from the options.xml file (using the getStringArray method).
To initiate a response by clicking the items in the ListView, class Main implements the interface OnItemClickListener.
The real action happens inside the inherited method onItemClick. This is a callback method that is invoked when we click an item in the ListView. This method provides a lot of information about the clicked item. At this stage, we need to know the position of the clicked item in the ListView. This information is stored inside the third argument of the onItemClick method (int arg2). Keeping in mind that the first item in the list is at position 0, Listing 2-2 shows how to handle the clicks.
Listing 2-2. GAME MENU/src/com/apress/android/gamemenu/Main.java
public void onItemClick(AdapterView<?> arg0, View arg1, int arg2, long arg3) { if (arg2 == 0) {
startActivity(new Intent(Main.this, Game.class));
}
else if (arg2 == 1) {
Dialog d = new Dialog(this);
d.setContentView(R.layout.highscore);
d.setTitle("High Score");
d.show();
}
Note The GAME MENU application consists of default responses for handling most of the clicked items in the ListView. If you are an advanced Android developer, you can extend these responses later, but right now they are sufficient.
Since the list is displayed in the same order as the items inside the options.xml file (string-array in Listing 2-1 contains this list), it becomes easy to create if blocks to handle each clicked item according to its position in the list.
Inside the if block for “High Score” and “Edit Player” items (Listing 2-2), there are lines of code to invoke a dialog, which has some styling applied to it, which is defined in the res/layout folder. The dimens.xml and strings.xml files inside the res/values folder contain the padding-dimensions and the text (respectively) for the dialogs. Figures 2-7 and 2-8 show these dialogs.
Figure 2-7. Game menu: high score else if (arg2 == 2) {
Dialog d = new Dialog(this);
d.setContentView(R.layout.editplayer);
d.setTitle("Edit Player");
d.show();
} }
When clicked, the “New Game” item starts a new activity to display an OpenGL surface view on the screen (Figure 2-9). The Java class for this new activity is identical to class Main from the GL SURFACE application; it has simply been renamed to Game. (The associated Renderer class for this activity is also identical to the GLES20Renderer class from the GL SURFACE application).
Figure 2-8. Game menu: edit player
Figure 2-9. Game menu: new game
To make sure the GAME MENU application takes over the entire screen and is oriented in landscape mode, all the activity elements in the AndroidManifest.xml file must include the attributes and values shown in Listing 2-3. Table 2-1 provides the line descriptions for Listing 2-3.
Listing 2-3. GAME MENU/AndroidManifest.xml
android:configChanges="keyboard|keyboardHidden|orientation"
android:screenOrientation="landscape"
android:theme="@android:style/Theme.NoTitleBar.Fullscreen"
Table 2-1. Listing 2-3, lines description Line Description
1. Hint Android to avoid performing the default reset of activity when the specified configurations change 2. Set landscape orientation
3. Make the activity full-screen
Now, we move on to an important topic to discuss using OpenGL views along with XML-based layouts and views.
Setting Views Using setContentView and addContentView
Activity content can be set to an explicit view using the setContentView method, which is a public method of the android.app.Activity class. Using this method, a View is placed directly into the activity’s view hierarchy. This View can be as simple as a button-view (Listing 2-4, Figure 2-10) or it can itself be a complex view hierarchy, consisting of various layouts and views within it.
Listing 2-4. SETCONTENTVIEW/src/com/apress/android/setcontentview/Main.java
@Override
public void onCreate(Bundle savedInstanceState) { super.onCreate(savedInstanceState);
Button button = new Button(this);
button.setText("SETCONTENTVIEW");
setContentView(button);
}
Note Layout widgets, such as LinearLayout,as well as the widgets with visual representation, such as Button, (Listing 2-4) are all subclasses of the android.view.View class.
We saw in Chapter 1 that the setContentView method can set an OpenGL surface as the activity’s content view. This is possible because GLSurfaceView (android.opengl.GLSurfaceView) is a subclass of View.
On Android, all OpenGL rendering is hosted by GLSurfaceView. To modify this rendering using visual elements like button-views, we must separate them from GLSurfaceView. Android provides a convenient way to do so, using the addContentView method (addContentView(View view, LayoutParams params)).
The addContentView method is also a public method of the android.app.Activity class. Unlike the setContentView method, the addContentView method requires an extra argument to obtain the view’s layout information.
Figure 2-10. setContentView with button-view
Using the addContentView method, we add an additional content view to the activity. In an activity, if the argument passed to the setContentView method is an OpenGL surface and the first argument passed to the addContentView method is a layout widget, the OpenGL surface is laid out below the layout widget (Figure 2-11). To get a better understanding, let’s create a new application:
1. Click the wizard to create a new Android project.
2. Set the application and project name as “ADDCONTENTVIEW.”
3. Uncheck the “Create custom launcher icon” option and click “Next.”
4. For “Create Activity,” select BlankActivity and click “Next.”
5. Set the “Activity Name” and “Layout Name” as “Main” and “main,”
respectively.
6. Click “Finish.”
7. Copy the files GLES20Renderer.java and Main.java from GL SURFACE application into the package for ADDCONTENTVIEW application (confirm overwriting of Main.java).
setContentView(_surfaceView); in Main.java (ADDCONTENTVIEW application) sets an OpenGL surface as the activity’s content view. Now, we add a layout widget (with button-views) as an additional content view (Listing 2-5).
Listing 2-5. ADDCONTENTVIEW/src/com/apress/android/addcontentview/Main.java LinearLayout layout = new LinearLayout(this);
layout.setOrientation(LinearLayout.VERTICAL);
layout.setPadding(0, 200, 0, 0);
1. After line 16 (the line with the call to the setContentView method) in Main.
java, add the lines of code from Listing 2-5 to create a LinearLayout layout with vertical orientation and top-padding of 200 pixels (if you are on Eclipse, you can quick fix errors to import the class android.widget.LinearLayout).
2. Create two buttons for this layout and name them “Up” and “Down,”
respectively.
3. After setting width and height for the buttons using setWidth and setHeight, set their layout parameters (Listing 2-6).
Listing 2-6. ADDCONTENTVIEW/src/com/apress/android/addcontentview/Main.java Button buttonUp = new Button(this);
buttonUp.setText("Up");
buttonUp.setWidth(110);
buttonUp.setHeight(85);
LinearLayout.LayoutParams layoutParamsButtonUp = new LinearLayout.LayoutParams(
LinearLayout.LayoutParams.WRAP_CONTENT, LinearLayout.LayoutParams.WRAP_CONTENT);
layoutParamsButtonUp.setMargins(0, 0, 0, 20);
Button buttonDown = new Button(this);
buttonDown.setText("Down");
buttonDown.setWidth(110);
buttonDown.setHeight(85);
LinearLayout.LayoutParams layoutParamsButtonDown = new LinearLayout.LayoutParams(
LinearLayout.LayoutParams.WRAP_CONTENT, LinearLayout.LayoutParams.WRAP_CONTENT);
layoutParamsButtonDown.setMargins(0, 20, 0, 0);
Figure 2-11. OpenGL with XML/UI view
Note If using Eclipse, do not forget to quick fix the errors.
4. Finally, add these buttons to the layout and add the layout widget as an additional content view using the addContentView method (Listing 2-7).
Listing 2-7. ADDCONTENTVIEW/src/com/apress/android/addcontentview/Main.java layout.addView(buttonUp, layoutParamsButtonUp);
layout.addView(buttonDown, layoutParamsButtonDown);
layout.setGravity(Gravity.CENTER | Gravity.RIGHT);
addContentView(layout, new LayoutParams(LayoutParams.MATCH_PARENT, LayoutParams.MATCH_PARENT));
Using the addContentView method, visual elements like button-views are easily separated from the OpenGL rendering (Figure 2-11). This allows us to use OpenGL views along with XML-based layouts and views to conveniently control the 3D rendering on OpenGL surfaces using the UI.
Sleek Design of XML Views
Now, we make some changes to the ADDCONTENTVIEW application to give a sleek design to the XML-based views, which we also use in the Tank Fence game:
1. In Main.java, clear all lines of code from the onCreate method after setContentView(_surfaceView);
so the method body is reduced to:
super.onCreate(savedInstanceState);
surfaceView = new GLSurfaceView(this);
surfaceView.setEGLContextClientVersion(2);
surfaceView.setRenderer(new GLES20Renderer());
setContentView(_surfaceView);
2. Add the lines of code from Listing 2-8 after the setContentView method to create a LinearLayout with LayoutParams layoutParamsUpDown and gravity bottom-left to keep the LinearLayout away from the back button while in landscape mode (we set screenOrientation to landscape later in this section). Quick fix errors (if any) to import the required classes.
Figure 2-12. ADDCONTENTVIEW INFLATER application
Note Instead of writing Java code to create layout widgets with button-views, you can use
LayoutInflater to inflate XML-based layouts and views. The ADDCONTENTVIEW INFLATER application (output seen in Figure 2-12) from the source code helps you get started with layout inflaters.
Listing 2-8. SLEEK UI/src/com/apress/android/sleekui/Main.java LinearLayout layout = new LinearLayout(this);
LinearLayout.LayoutParams layoutParamsUpDown = new LinearLayout.LayoutParams(
LinearLayout.LayoutParams.MATCH_PARENT, LinearLayout.LayoutParams.MATCH_PARENT);
layout.setGravity(Gravity.BOTTOM | Gravity.LEFT);
3. To inflate XML-based views from a layout file, get access to the inflater service by calling: getSystemService(Context.LAYOUT_INFLATER_SERVICE);
4. Create a View object to reference the inflated view returned by the inflater.inflate method (as shown in Listing 2-9).
Listing 2-9. SLEEK UI/src/com/apress/android/sleekui/Main.java
LayoutInflater inflater = (LayoutInflater) getSystemService(Context.LAYOUT_INFLATER_SERVICE);
View linearLayoutView = inflater
.inflate(R.layout.updown, layout, false);
5. After quick fixing the errors for unimported classes, rename the file main.xml (inside res/layout folder) as updown.xml.
6. Add the following string resources (Listing 2-10) to the strings.xml file (inside res/values folder):
Listing 2-10. SLEEK UI/res/values/strings.xml
<string name="up">UP</string>
<string name="down">DOWN</string>
7. Remove all lines from the updown.xml file and add the layout shown in Listing 2-11.
Listing 2-11. SLEEK UI/res/layout/updown.xml
<?xml version="1.0" encoding="utf-8"?>
<LinearLayout xmlns:android="http://schemas.android.com/apk/res/android"
android:layout_width="wrap_content"
android:layout_height="wrap_content"
android:layout_marginBottom="5dp"
android:layout_marginLeft="5dp"
android:background="@android:drawable/alert_dark_frame"
android:orientation="vertical"
android:paddingBottom="11dp" >
<Button
android:layout_width="90dp"
android:layout_height="wrap_content"
android:layout_marginBottom="25dp"
android:contentDescription="@string/app_name"
android:text="@string/up" />
<Button
android:layout_width="90dp"
android:layout_height="wrap_content"
android:contentDescription="@string/app_name"
android:text="@string/down" />
</LinearLayout>
8. Add the inflated view (from 4) to the LinearLayout layout by calling layout.
addView(linearLayoutView), then, add the layout as an additional content view by calling: addContentView(layout, layoutParamsUpDown);
The purpose of using the layout from Listing 2-11 is to ensure:
Wide buttons are used: Buttons should have layout_width of 90dp (density independent pixels). Buttons should be at least that wide, because graphics applications, such as games, require users to interact continuously with UI elements, such as buttons, and, they are easy to click if wide enough.
LinearLayout does not get hidden: Make sure the LinearLayout maintains a gap from the left corner of the screen and it has layout_marginLeft and layout_
marginBottom of 5dp.
Buttons have color contrast with other views: By setting a dark background for LinearLayout using android:background="@android:drawable/alert_dark_
frame", it becomes easy to spot light-colored buttons, which helps quick interaction during gameplays. Use of layouts with border or background is a great way to debug your designs.
Be sure this activity takes the entire screen in landscape mode (as shown in Figure 2-13). Add the lines of code from Listing 2-3 to the activity element inside the manifest file for this application.
Figure 2-13. Landscape mode with UI
Working with Buttons and the Counter Class
Here, we finally discuss the functioning of an application that updates the rendering on an OpenGL surface using a layout (that we just created). To load that application into your workspace, import the archive file updowncounter.zip from the Chapter2 folder.
Inside the UPDOWN COUNTER application (Figures 2-14 and 2-15), if you browse the layout folder, you will see the files updown.xml and counter.xml. The updown.xml file contains the layout from the previous topic. However, now the buttons contain ids “up” and “down” defined in the id.xml file (inside res/values folder), which also contains another id “counter,” corresponding to the TextView inside the counter.xml file. The TextView (Figures 2-14 and 2-15) has some basic styling applied to it.
Buttons are assigned ids so they can be referenced from the Activity defined in Main.java file. This application contains the Renderer class from the previous application with slight modifications.
This application uses an important class Counter (this class will also be used in the Tank Fence game) to track the number of clicks on the up and down buttons. (The reasons for using
synchronized blocks in this class are discussed in Chapter 3.) Let’s see how this application works using the class Counter and GLES20Renderer:
Each time a button is clicked, the static field
_upDown (of class Counter) is
modified by a call to getUpDownNextValue or getUpDownPreviousValue (called inside the click listeners for buttonUp and buttonDown).
The glClearColor method (inside the GLES20Renderer class) takes float type arguments (in rgba format, in the 0 to 1 range) for coloring the entire OpenGL surface; hence, calling glClearColor(0.0f, 0.0f, 0.0f, 1); makes the entire screen black, as shown in Figure 2-14.
The clearScreenWithColor method defined in the GLES20Renderer class takes an int type argument to modify the blue color component inside the glClearColor method.
When the
onDrawFrame method gets called (on refresh of the OpenGL surface), it invokes the clearScreenWithColor method by passing it the current value of the _upDown field (which is controlled by the buttons). This leads to a new color of the OpenGL surface each time the button is clicked (this will only happen if the blue color component is supplied a value in the 0 to 1 range).
Figure 2-14. Synchronized counter application
Figure 2-15. Using buttons to affect the rendering
This example gives you the basic idea of controlling the rendering on OpenGL surface by the use of UI like button-views (Figure 2-15).
Similar to the technique used here, the following topics use touch and sensors in place of buttons to control graphic rendering on the OpenGL surface.
Take a closer look at the Counter class (UPDOWN COUNTER/src/com/apress/android/updowncounter/
Counter.java) and the way it has been used with UI and Renderer. Understanding its usage is necessary to understand the concepts for using UI with OpenGL rendering.
Using Touch for Rotation
For the Tank Fence game, we implement rotation using the screen (or optionally using sensors). We won’t use buttons for rotation. In this topic, you learn to use the screen using screen touch to update the rotate matrix associated with an object.
The rotate matrix associated with an object requires the desired angle of rotation (in degrees) to rotate the object by that angle about a particular axis.
If you want to use the screen to rotate an object about the axis perpendicular to it (the screen) so that the angle of rotation is proportional to the horizontal distance moved by a finger across the screen, take the ratio of the total horizontal distance moved to the width of the screen. For example, we can create a class that implements the interface OnTouchListener, and, inside the implemented method onTouch, we can use the code shown in Listing 2-12 to find the horizontal distance moved.
Listing 2-12. TOUCH ROTATION/src/com/apress/android/touchrotation/Main.java if (event.getAction() == MotionEvent.ACTION_DOWN) {
_touchedX = event.getX();
} else if (event.getAction() == MotionEvent.ACTION_MOVE) { float touchedX = event.getX();
float dx = Math.abs(_touchedX - touchedX);
We get the device width by accessing the display metrics members, and we obtain the ratio of dx to the device width. We then convert this ratio into degrees, which can be used by the rotate matrix to rotate the object. This concept is utilized by the TOUCH ROTATION application (Figure 2-16), in the source code for this chapter. This application (via class Main) also takes into account the direction (left or right) in which the finger moves across the screen so as to handle clockwise and anticlockwise rotations separately.
To create such an application, we need two classes:
Renderer class: to render an object as well as expose the rotate matrix (or related attributes like rotation angle) associated with this object
Main class: to calculate the angle of rotation and update the rotate matrix using it
Load the TOUCH ROTATION application into your workspace. It contains both classes as described.
You do not need to worry about the class GLES20Renderer at this stage; all that it does is:
Renders a 3D object, which has a
rotate matrix (_RMatrix) associated with it
Exposes access to the field
_zAngle, which stores the angle of rotation to update the rotate matrix
The Main class implements a touch listener for calculating the ratio of the total horizontal distance moved to the width of the screen (inside its onTouch method). Because of the default sensitivity settings, if this ratio is 1/2, the object performs a complete rotation about the axis perpendicular to the screen. This class also contains if blocks to compare consecutive finger moves across the screen for clockwise and anticlockwise rotations (please note that the finger has to be lifted before the next swipe across the screen). The _TOUCH_SENSITIVITY and _filterSensitivity fields are used to make the rotations smooth. You can modify these fields to adjust the sensitivity of touch.
Rotation Using Android Sensors
Now we discuss the use of Android sensors as UI to update the 3D rendering on an OpenGL surface (Figures 2-17 to 2-21). Because of the varying support for sensors across various Android devices, we restrict the use of sensors to:
Accelerometer (Motion sensor)
Gravity sensor (Motion sensor)
Magnetometer (Position sensor)
We access the sensors available on an Android device using the Android sensor API. This API helps us perform important sensor-related tasks on an Android handheld, such as determining the availability of a sensor, requesting raw sensor data, and registering sensor event listeners.
To get started with this API, create an instance of the sensor service, as shown in Listing 2-13.
Listing 2-13. SENSOR ROTATION/src/com/apress/android/sensorrotation/Main.java
SensorManager sm = (SensorManager) getSystemService(Context.SENSOR_SERVICE);
Figure 2-16. Rotating arrow with touch
