Supervised by: Prof. Dr. Christian Baun
Using Terraform and Ansible
INFRASTRUCTURE AS CODE
By (Group 9):
Faiz Usmani 1323197 Parag Tambalkar 1322596
Pranay Raman 1321759
Shubham Girdhar 1323003
By (Group 9) :
Faiz Usmani 1323197
Parag Tambalkar 1322596
Pranay Raman 1321759 Shubham Girdhar 1323003
By (Group 9) :
Faiz Usmani 1323197
Parag Tambalkar 1322596 Pranay Raman
Cloud Computing Project
Cloud Computing Project Cloud Computing Project
Cloud Computing Project
Cloud Computing Project
Cloud Computing Project
Cloud Computing Project
Cloud Computing Project
Contents
1. Introduction ... 3
1.1 Terraform – The Maestro Provisioner ... 4
1.2 Ansible – The Configuration Expert ... 5
1.3 Azure and Cloud Shell – Cloud and Command Line Specialists ... 6
1.4 Visual Studio 2019 – The Pro IDE ... 6
2. Deployment Plan ... 7
3. Provisioning Infrastructure with Terraform ... 8
3.1 Understanding Terraform Workflow ... 8
3.2 Prerequisites ... 9
3.3 Understanding the Terraform code ... 10
3.4 Bringing up the Infrastructure with Terraform ... 18
4. Running IIS using Ansible ... 20
4.1 Understanding the Ansible Code ... 20
4.2 Invoking Ansible Playbook ... 23
5. Deploying the Web Application ... 26
6. Conclusion and Final Remarks ... 31
7. References ... 32
1. Introduction
Before the concept of DevOps, the deployment of applications into various environments was a daunting task requiring time, effort, and skills. A separate Operations team with extensive knowledge and experience of various servers, Virtual Machines (VMs), and host Operating System’s (OS) used to manually access the servers and configure them according to the requirements of the application. In the case of small organizations usually, developers of the application were in charge of doing this (well, not a good sight to imagine).
Now, thanks to the advancements in the field of cloud and DevOps in recent years, these tasks are becoming less complex. The virtual servers on cloud and onsite physical servers can be provisioned and configured easily in minutes just by executing a script written in a user-friendly language (mostly YAML). This is possible by a concept known as Infrastructure as Code (IaC) which allows us to deal with servers, networks, security groups, databases, etc. as if they are a part of the software. The leading solutions in the market nowadays for IaC are provided by Terraform, Ansible, Chef, Puppet, etc. [1].
Let us look at some of the advantages offered by Infrastructure as Code:
1. Code Once, Iterate Multiple times: As the configuration files are coded initially for creating and configuring the environment for an application. These files can be used to spin up multiple environments (for example testing, production, staging, etc.) and can also be used to deploy similar environments for applications with the same OS and package requirements. They can also be tweaked a little bit if the configurations change and Voila! We have a new environment setup and ready to go.
2. Immune to Human error: As before, the infrastructures were configured manually and by different people, there used to be errors known as infrastructure deviations. These were minor differences in the configuration of environments due to the manual process of deployment by different people on multiple servers. Now, because of using scripts for provisioning and configurations, this process is standardized.
3. Scaling, a piece of cake!: When there is high incoming traffic in your application at a particular time of the day or year, you can create new environments with just a few clicks and commands and deploy multiple instances of your application. Similarly, you can bring down environments when there is less traffic leading to cost efficiency. Scaling environments up and down is as easy as it gets.
Now, let us have some basic understanding of the tools we will be using in this project.
1.1 Terraform – The Maestro Provisioner
Think of Terraform as a Master Civil Engineer/Builder, you will provide him with what you need, and he will go ahead and build it for you in a matter of minutes. Also, before building the actual thing he will inform and take your consent about the plan he is going to implement.
In the language of Software development – “Terraform is a tool for building, changing, and versioning infrastructures safely and efficiently. Terraform can manage existing and popular service providers as well as custom in-house solutions” [2].
There are three main parts in Terraform project:
1. main.tf – In the case of simple projects this is the file that has all the code to build up infrastructure, it contains all the modules and data sources that are needed. If the project is bigger and complex, the files are logically split based on the functionalities.
2. variables.tf – It stores the declarations for the variables which are referenced in main.tf.
3. terraform.tfvars – It is used to define the default values of the variables.
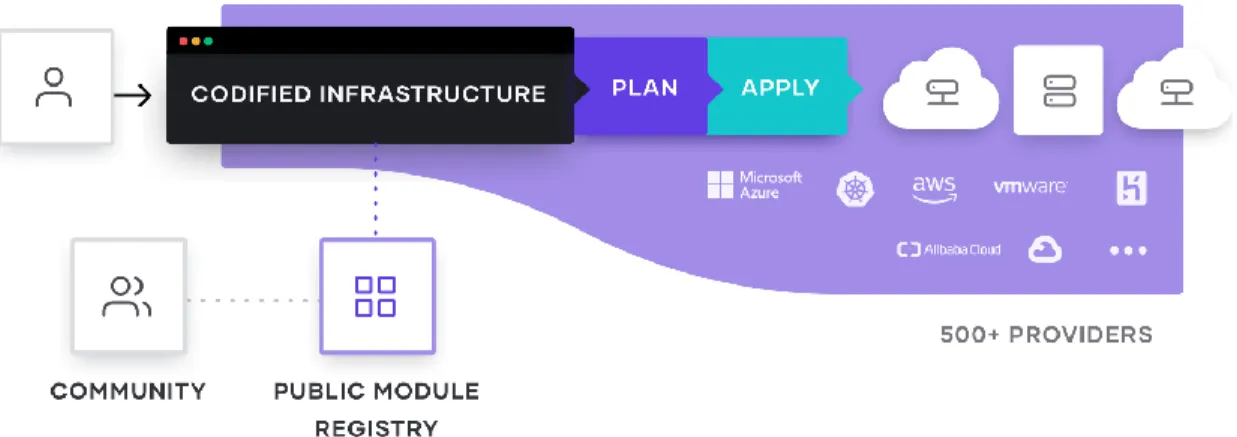
The configuration files written in HashiCorp Configuration Language (HCL) describe the resources and components which are required to run your application. Terraform will then go ahead and produce an execution plan describing the steps to reach the desired state, and then goes ahead and executes it [3]. If there are changes that are applied to the configuration files, terraform sees what is changed and based on it creates incremental execution plans.
Terraform is supported by multiple cloud providers and the infrastructure that can be provisioned by it includes application instances, networking resources, databases, SaaS features, DNS items, etc.
Also, the main difference between Terraform and the other IaC tools is that it does not re-provision resources that are successfully provisioned if it encounters them in some future execution of the configuration script. Instead, it focuses on the new additions and the failed resources from the previous executions. Working of terraform is shown in Figure 1.
Figure 1: https://www.terraform.io/_next/static/images/how-terraform-works-33c33a9c82bf5aef0bf9f75eb5f5f9b2.svg
1.2 Ansible – The Configuration Expert
Now, after having the basic infrastructure, you find out that it requires some modifications and touchups.
For this Ansible is your go-to-guy. Think of it as an experienced craftsman.
Although Ansible is a tool that can do a lot more than configuring existing infrastructures. It is primarily known for the configuration tasks as it is very easy to do it using Ansible. A whole network of computers can be configured using Ansible at once.
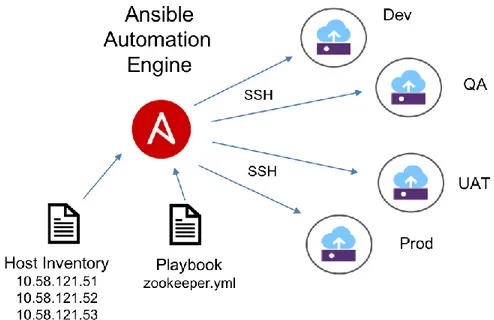
The primary architecture of Ansible is shown in Figure 2 which consists of two kinds of nodes – Control and Managed nodes. A Control node is the main system that has Ansible installed on it, while the managed nodes are the clients that are connected to the Control node using SSH (secure shell) or any other authentication techniques. The Control node has a host inventory file containing the addresses of the Managed nodes.
The Control node sends configuration programs which are known as modules to the Managed nodes.
These programs are saved as Ansible playbooks (name of the Ansible specific configuration files written in YAML) on the Control node. These modules compare the states of various Managed nodes to what is mentioned in the modules, finds the mismatch, and then updates the state of the managed nodes [4].
Figure 2: Ansible_ov.png (904×602) (s81c.com)
1.3 Azure and Cloud Shell – Cloud and Command Line Specialists
Azure is a cloud computing service provider by Microsoft. It offers a multitude of services including Software as a Service, Infrastructure as a Service, Platform as a Service, etc. In the context of our project, it will provide space and resources for our infrastructure to be built in it. The Virtual Machines which will be built by Terraform and configured by Ansible will be hosted on Azure Cloud.
Alas! Like most of the things in the world, it is not free to use but comes with a flexible charging plan.
If you have a student email ID it will provide you with a credit of 100 dollars for a period of 1 year and for a general email ID it gives credit of 200 dollars for 1 month. On a side note, do not forget to clean up the resources after successfully executing and testing your project, because keeping them on Azure for a long period of time may turn out to be a costly affair.
Here is the link to get you started:
Azure for Students – Free Account Credit | Microsoft Azure
Azure Cloud Shell is a browser integrated shell that is used to manage resources on Azure. You can use PowerShell, Bash, or Azure CLI (a cross-platform command-line tool that can be used to run commands on the resources present in Azure Cloud) on it. Head over to the Azure portal and click on the command line icon at the top near the search bar to get going.
1.4 Visual Studio 2019 – The Pro IDE
A powerful Integrated Development Environment that can be used to develop software and programs for windows, web apps, services, etc. The reason for choosing it was because of the ease by which the ASP.NET web apps can be published on Azure VMs through its interactive User Interface.
Just make sure while installing Visual Studio 2019, these workloads are also installed – “ASP.NET and web development”, “Azure development”, “.NET Core cross-platform development”. If Visual Studio 2019 is already installed, make sure these workloads are present by opening the “Visual Studio Installer”
through windows search and then clicking on the “Modify” button and checking the workloads.
Note – The email id used to sign-in into Visual Studio and Azure portal must be the same as the email id used for signing in for Windows. Otherwise, during publishing the apps into VMs, some errors may occur due to permissions issues. If the email ids are different, the id which is used in the Azure portal should be added into the appropriate permissions of the folder where the ASP.NET app is present.
2. Deployment Plan
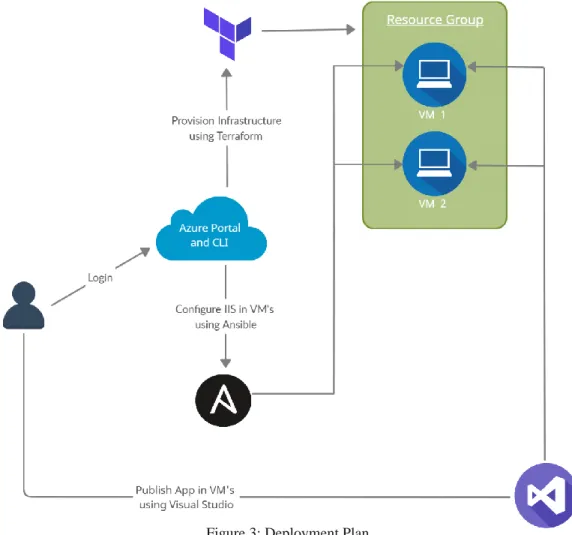
Now, after having some basic understanding of the tools and technologies used in this project. Let us have a look at the design of the project depicted in Figure 3 which we are going to implement [5].
1. The user will login into the Azure portal and use Azure Cloud Shell to run Terraform and Ansible scripts.
2. Terraform scripts are run and a resource group with two Windows VMs having proper network configurations are created.
3. After the successful creation of VMs, IIS (Internet Information Services – a web server software package specifically designed for windows) and some other modules are configured on both VMs using their IP’s. They are required to run an ASP.NET web app on a Windows server.
4. A self-created web app or app cloned from the provided GitHub link is published on both VMs using Visual Studio 2019 and accessed through the public IP of the load balancer.
Figure 3: Deployment Plan
3. Provisioning Infrastructure with Terraform
This section provides information of Terraform workflow, configuration code and how to spin up the Infrastructure using Terraform.
3.1 Understanding Terraform Workflow
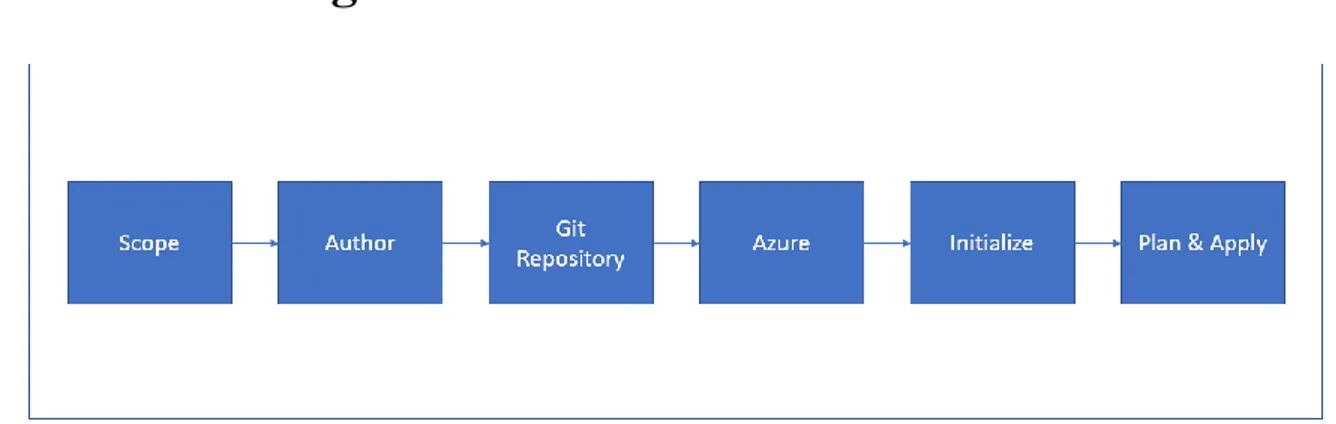
Workflow of Terraform to build the cloud infrastructure will follow the steps shown in the block diagram shown in Figure 4. The description of each step in the workflow is provided below [6],
1. Scope: In this step, we identify the resources required for the project. In this particular project we require resources such as Virtual Machines, resource groups, network security groups, load balancer, etc.
2. Author: In this step, we need to create a configuration of identified resources using HCL. A detailed overview of this process is provided in the ‘Bringing up the Infrastructure with Terraform’ sub- section of this report.
3. Git Repository: After creating terraform configuration for the given project we need to add these files in the Git repository of our project.
4. Azure: We need to link the project repository at GitHub with the Azure account using which we are deploying our project. Detailed information about this process is mentioned in the ‘Deploying the Web Application’ section of the report.
5. Initialize: To download the appropriate provider plug-ins for the project and initialize the working directory with Terraform configuration files, we need to run terraform init command in the project directory containing terraform configuration files.
6. Plan & Apply: Execution of terraform plan command creates execution plan to verify infrastructure creation process. Also, terraform performs a refresh in order to determine the necessary actions to be performed to achieve the expected state of the infrastructure. This command helps us to know in advance that the infrastructure being created is matching with the expected infrastructure. After successful verification of the execution plan, we need to run terraform apply command to build real infrastructure with specified resources. It also creates a state file that stores the existing state of infrastructure and compares configuration modification files with existing configuration of deployment environment.
Figure 4: Terraform Workflow
3.2 Prerequisites
1. Azure Subscription
We need a valid Azure subscription to deploy the project on cloud. In this project we are using Azure for Students subscription.
In this project we will be using Azure CloudShell pre-built in Azure portal. If you want to run the scripts using local machine the next steps are necessary.
2. Install the Azure Command Line Interface (CLI) tool
We need to install Azure CLI tool to create and manage Azure resources from PowerShell. In order to install Azure CLI tool, we need to open PowerShell prompt as an administrator and run the command:
Invoke-WebRequest -Uri https://aka.ms/installazurecliwindows -OutFile .\AzureCLI.msi; Start-Process msiexec.exe -Wait -ArgumentList '/I AzureCLI.msi /quiet'; rm .\AzureCLI.msi [7]
3. Install Terraform
In order to use Terraform, we need to install Terraform as a binary package (version 0.14.5) from the official website of Terraform.
4. Authenticate using the Azure CLI
After successful installation of Azure CLI tool, the next step is to link and authenticate Azure CLI tool with our Azure account. Terraform requires authentication from Azure to create infrastructure. For this we need to log into Azure account locally from the terminal using Azure CLI tool by running the command:
az login
This will open your browser window and ask you to enter your Azure login credentials. After successful authentication, your terminal will display your subscription information [8].
3.3 Understanding the Terraform code
To run our project in Azure, we need to create the required infrastructure for the web application using Terraform. We have written configuration for all the identified resources in main.tf file and defined some repeatedly used parameters of the variables in terraform.tfvars file [14]. The following steps are needed to create the infrastructure,
1. We need to define the service provider as azurem and its version that is 2.0 as shown in Figure 5. To create infrastructure, a resource group is required to hold all project-related resources. We defined an Availability set which is the logical grouping for isolating VM resources from each other after deployment.
[9] Figure 5: Terraform Configuration Service Provider Resource Group and Availability Set
2. We need to create Network Security Group (NSG) to filter the traffic to and from resources in Azure.
Below image (Figure 6) shows NSG configuration,
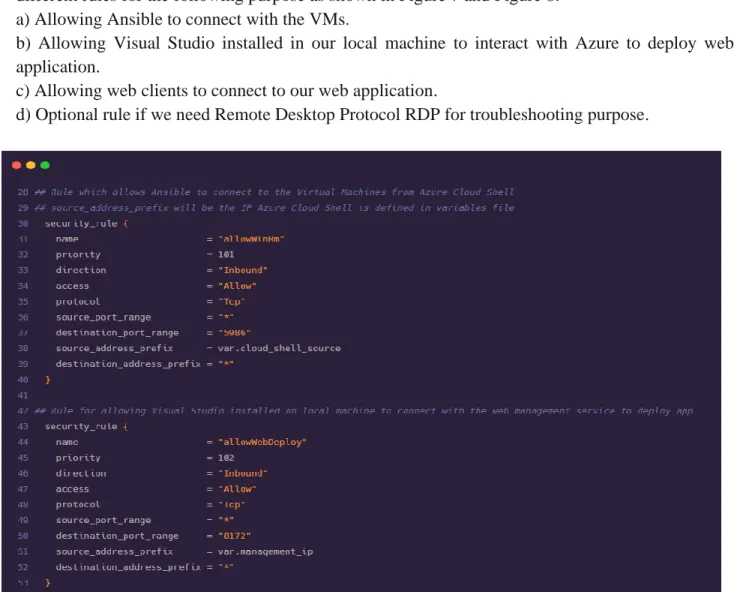
3. It is very important to define the rules to filter the traffic. For our project, we have created four different rules for the following purpose as shown in Figure 7 and Figure 8:
a) Allowing Ansible to connect with the VMs.
b) Allowing Visual Studio installed in our local machine to interact with Azure to deploy web application.
c) Allowing web clients to connect to our web application.
d) Optional rule if we need Remote Desktop Protocol RDP for troubleshooting purpose.
Figure 6: Terraform Configuration
Figure 7: Terraform Configuration Security Rules Part 1
4. Now we need to define the infrastructure for Virtual Network which is the representation of our network in the cloud. We also defined subnets under the Virtual Network shown in below Figure 9.
Figure 8: Terraform Configuration Security Rules Part 2
Figure 9: Terraform Configuration Virtual Network
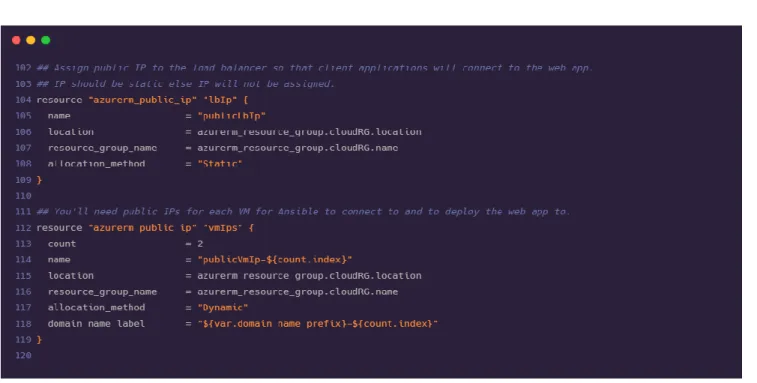
5. We need to assign a static IP address to the load balancer in advance. Also, need to assign public IP address for each VM that we are deploying as shown in below image (Figure 10). We require two VMs for this project.
6. It is important for every VM to connect to the network. For this, we created a virtual Network Interface Card (vNIC) for each VM as shown in Figure 11. vNIC severs as a gateway between network and VMs. It is required to provide IP configuration to each of the Network Interface Card.
Before creating vNIC it is mandatory to ensure that our subnet is up and running.
Figure 10: Terraform Configuration Assign IP
Figure 11: Terraform Configuration NIC
7. We need to apply the NSG rules that were created in second and third steps to the VMs and NICs in our network. Configuration for applying NSG is shown in below Figure 12.
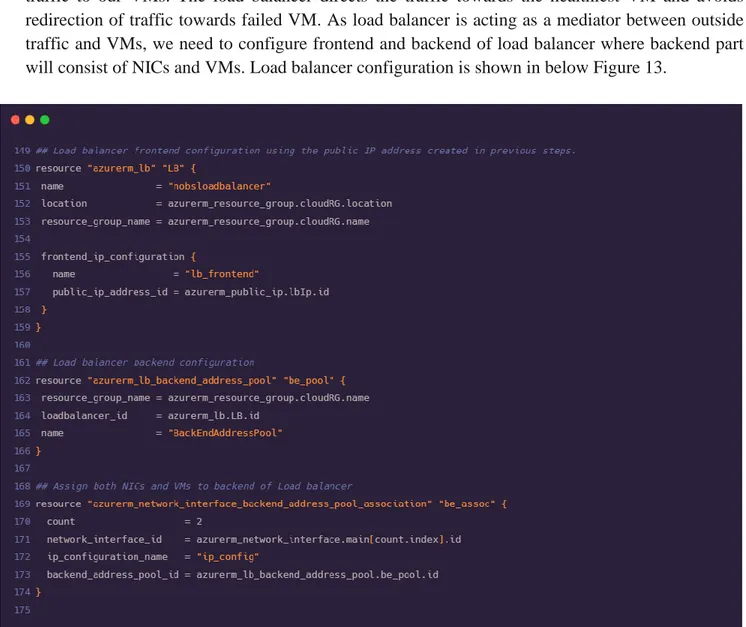
8. Now we are ready with the declaration for creating the VMs. We need a load balancer to rout the traffic to our VMs. The load balancer directs the traffic towards the healthiest VM and avoids redirection of traffic towards failed VM. As load balancer is acting as a mediator between outside traffic and VMs, we need to configure frontend and backend of load balancer where backend part will consist of NICs and VMs. Load balancer configuration is shown in below Figure 13.
Figure 12: Terraform Configuration NSG to VNet and NIC
Figure 13: Terraform Configuration Load Balancer
9. As described in the previous step, load balancer directs the traffic to the healthiest VM in the network.
For this we configured the health probe for VMs as shown in Figure 14. This will periodically check on both VMs for an open port 80.
10. Using the health probe defined in the step above, we need to create a rule to direct the incoming traffic on port 80 to the healthiest VM available in the backend as shown in below Figure 15.
11. As an important step we need to create VMs and associate it with vNICs created in earlier steps.
Association configuration is coded as shown in Figure 16 and Figure 17.
Figure 14: Terraform Configuration health probe
Figure 15: Terraform Configuration Load Balancer Traffic
Figure 16: Terraform Configuration Associate VMs and vNIC Part 1.
12. We need to install a custom script VM extension on each virtual machine using the code shown in Figure 18. This will download the ConfigureRemotingForAnsible.ps1 script from GitHub. Execution of this script will open the Windows Remote Management (WinRM). Using WinRM Ansible connects with Azure Cloud Shell.
Figure 17: Terraform Configuration Associate VMs and vNIC Part 2
Figure 18: Terraform Configuration Extensions for VMs
13. After declaring all the required resources in main.tf file, we are now ready with our Terraform code for the deployment of our infrastructure. Before proceeding to understand Ansible configuration and deployment steps, we need to look at terraform.tfvars (Figure 19) and variables.tf (Figure 20) file where we have stored values for frequently used variables in order to maintain consistency. The values of variables in these files can be modified without affecting the main configuration.
Figure 19: Terraform Configuration terraform.tfvars
Figure 20: Terraform Configuration variables.tf
3.4 Bringing up the Infrastructure with Terraform
1. Open Azure portal and click on the Azure cloud CLI icon adjacent to the search bar and select PowerShell as shell type.
2. Create a new directory. In this directory we will save all the necessary files that are required for building the Infrastructure. Use the below command:
md terraform
3. Now we need to move to the newly created directory. Use the following command to move to the created directory:
cd terraform
4. Once we are in the terraform directory, we need to get the main.tf, terraform.tfvars, variables.tf files from the git repository.
foreach ($file in @('main.tf','terraform.tfvars','variables.tf')) {
$uri = "https://raw.githubusercontent.com/Shubham-Girdhar/Infrastructure- As-Code/main/terraform/$file"
Invoke-WebRequest -Uri $uri -OutFile $file }
The syntax above will download all the files from the git repository to the terraform directory which was created in step 2.
5. Now, we have all the required files, and we will initialize Terraform using the command:
terraform init
6. After the initialization of Terraform we will bring up the plan using the command:
terraform plan
7. We require the IP address (public) of Azure session. We need to pass this IP in Terraform apply command (In step 9).
curl http://ifconfig.me
8. Find the IP address (public) of your machine. We need this because, a port is created and opened in NSG by Terraform and it is used to deploy the ASP.NET application later. Run the following command in PowerShell to know the IP address.
curl http://ifconfig.me or we can directly type ‘amazon whats my ip’ in web browser.
9. Run the terraform apply command to spin up the infrastructure.
terraform apply -var="location=<Enter the location>" -
var="resource_group=cloudRG" -var="cloud_shell_source=<cloud shell IP>" - var="domain_name_prefix=<application name>" -var="management_ip=<local ip>"
Be sure to fill in the appropriate variable values in the above syntax.
• location: This will be selected automatically depending on the location of Azure (It can be eastus, westeurope or any other location chosen by the user).
• resource_group: The name of resource group which we have mentioned in main.tf file. This variable is automatically selected to CloudRG as we have mentioned the resource group name as CloudRG in main.tf file.
• cloud_shell_source: Pass the IP address which is obtained in step 7.
• domain_name_prefix: The Domain Name that will be applied (The name for the application to be accessed from the browser).
• management_ip: The public IP address of the local machine which is obtained in step 8.
.
10. When terraform apply is executed it will return the IP addresses of load balancer and the VMs. In the backend the necessary resources are produced.
11. The below image (Figure 21) shows all the resources that are created along with the IP addresses of load balancer and the VMs.
Figure 21: Resources and IPs
12. By the end of step 11, the Infrastructure is successfully built.
4. Running IIS using Ansible
In this section, we will use an Ansible playbook to configure our Windows VMs. After configuration, we will be able to publish .NET CORE web applications to Azure VMs directly using Visual Studio.
WebDeploy (a client server tool) is used by the VMs to deploy the ASP.NET web applications [10].
4.1 Understanding the Ansible Code
There are two important parts of the Ansible architecture required for configuration management.
1. Ansible playbook: This is the main script with the set of instructions that need to be implemented on multiple hosts.
2. Inventory: This is the part that maintains the structure of the network environment. We create different nodes and pass these nodes to the playbook, so that it knows which action needs to be implemented on which resource.
The various parts of the Ansible playbook (iis.yml) for our deployment are explained below:
1. Specify the hosts as azurevms (Figure 22). This node consists of the list of IP address of our VMs.
Figure 22: hosts
2. Install the basic windows features of IIS (Figure 23) [11].
a) win_feature: installs or uninstalls features or roles on windows server.
b) include_management_tools: adds corresponding management tools to specified features
Figure 23: Install Features
3. Regedit (registry) values are entered for remotely managing the Web-Mgmt service (Figure 24).
a) win_regedit: add, modify or remove registry keys and values.
Figure 24: Regedit values
4. The Windows package of Web Deploy is downloaded and installed (Figure 25).
a) win_package: installs or uninstalls software packages for Windows.
Figure 25: Install Web Deploy
5. We are changing the configurations from manual to auto and starting the below service (Figure 26):
a) win_service: manage and query Windows services.
Figure 26: Start service
6. Install .net core IIS hosting module with no frameworks (Figure 27) [12].
a) win_chocolatey: manage packages using chocolatey. If chocolatey is missing, the module will install it.
Figure 27: Install .net hosting module
7. Create logging directory (Figure 28).
a) win_file: create or remove files or directories.
Figure 28: Create Directory
8. Restart IIS after installing .net core IIS hosting with the help of handlers (Figure 29) [12].
Figure 29: Restart IIS
The inventory (hosts) for our ansible includes the following (Figure 30):
1. [azurevms]: This is a node that contains the list of Windows VMs on Azure that we want to configure.
2. [azurevms:vars]: These are the variables that are needed to make the WinRM connection to work.
a) ansible_user= Select a username to connect to the VM b) ansible_password= Select a password
c) ansible_connection=winrm (this connection is set to SSH by default, so to make the connection to Windows VM to work, this needs to be set as winrm)
d) ansible_winrm_transport=basic
e) ansible_winrm_server_cert_validation=ignore (set to ignore as the certificates are generated locally to virtual machines are self-signed)
f) ansible_port=5986 (ansible port)
Figure 30: Inventory
4.2 Invoking Ansible Playbook
1. Open Azure portal and click on the Azure cloud CLI icon adjacent to the search bar and select PowerShell as shell type.
2. Make a new directory for Ansible files and change to this directory using the following commands:
mkdir ansibleConfigs cd ansibleConfigs
3. Get the hosts (inventory) and iis.yml (playbook) files from the git repo using the following command:
foreach ($file in @('hosts','iis.yml')) {
$uri = " https://raw.githubusercontent.com/Shubham-Girdhar/Infrastructure- As-Code/main/ansibleConfigs/$file"
Invoke-WebRequest -Uri $uri -OutFile $file }
4. Now, we update the hosts inventory and add the IP address of the VMs created using Terraform. This is done so that the inventory points the playbook to the correct VMs.
5. To Edit the inventory, type code . This will open VS Code editor. Now update the IP addresses (Figure 31) under the [azurevms] node and add the IPs of the two VMs we got as the output of the terraform apply step (Figure 32).
Figure 31: Replace IP
5. Use Ctrl + s to save and Ctrl + q to exit the editor.
Figure 32: Update IP
7. Finally, it is time to execute the Ansible playbook. This is done using the ansible-playbook command which takes the following two parameters:
a) name of the playbook (iis.yml) b) - i name of host (- i hosts)
8. So, the final command looks like:
ansible-playbook iis.yml -i hosts
9. This should configure the VMs by installing IIS features, enabling IIS remote management, installing WebDeploy, starting and setting management service to auto, installing .net core iis hosting module and creating a logging directory. The output of this steps looks like the below (Figure 33):
Figure 33: Configure VMs
5. Deploying the Web Application
By this point of time, we have the Infrastructure provisioned by Terraform and configured by Ansible.
Now it is time to develop and deploy the web application on the VMs. In order to deploy the web application, follow the below steps:
1. Download Visual-Studio Community Edition 2019.
2. Login to the Visual Studio using university email id (or with the same email id that is used for logging to Azure portal).
3. In order to deploy the application using Visual Studio we need the following three workloads .Net Core cross-platform development, ASP.NET and web development, Azure development. We need to download these three workloads (Figure 34) while installing Visual Studio.
Figure 34: Required Workloads
4. Once the required workloads are downloaded, we are ready to deploy an application to the cloud.
5. Create a simple app or clone a sample application in a folder on the local machine. Use the command below to clone the application [13]:
git clone https://github.com/Shubham-Girdhar/Infrastructure-As-Code.git 6. Open Visual Studio and open an existing project as shown below (Figure 35).
Figure 35: Open project
7. Navigate to the folder where the application is cloned. Open the web application1 folder and select .sln file (It is a file created by Visual Studio which ties up all the assemblies required by the ASP .Net project).
Once the project is opened in Visual Studio, right-click on the project and select Publish option as shown below (Figure 36).
Figure 36: Publish
8. This will open the publish window (Figure 37). Click on Azure and then on Specific target select Azure Virtual Machine.
Figure 37: Publish Window
9. Once we select Azure Virtual Machine it will automatically fetch the details from our Azure account (Figure 38) such as subscription type, resource group and the available VMs.
Figure 38: Azure account
10. Select the first VM (i.e., cloudvm-0), if everything goes well, there will be no error messages (i.e., we can see the Finish option enabled). Click on Finish.
Note: As we have cloned a project from GitHub and trying to deploy it, we might face an error in the above step. The error says, “Web deploy cannot be succeeded”. This might be because of permission issues. This error occurs if we have used different accounts for Visual Studio and the local machine. For example, if the local machine is logged in with the account xyz@gmail.com and Visual Studio is logged in with xyz@stud.fra-uas.de then this error might occur. In order to overcome this error, we need to enable permissions for that folder on the local machine.
a) Select the folder which contains the application and right-click on it. Click on properties. Move to the security tab. Click on the Edit option, this will open the permissions of that folder. Click on Add, under Enter the object names to select type “Everyone” and select Check Names. Then click on OK and Apply (Figure 39). By performing the above process, we will enable the permissions to everyone, and the error will be fixed.
Figure 39: Enable Permissions
11. Now, the next step is to connect to the VM. In order to do that we should provide the credentials and authenticate the self-signed certificate. To make these changes select the Edit option. Refer the below Figure 40.
Figure 40: Credentials and Validation
12. After providing the Password make sure to save it, so that the password will be saved for future deployments. Now, we need to Validate the Connection (Figure 40). By performing the validation, the certificate will be placed in the VMs. If we did not perform the validation, we will not be able to connect.
14. After Validating the Connection, an error will pop up (Figure 41) regarding the certificate. This is an expected outcome. Check the Save Certificate checkbox and select Accept.
Figure 41: Certificate Error
14. We must repeat the steps from 6 to 13 for the second VM (i.e., for cloudvm-1). Select the web application2 folder and run it on VM 2. Both the VMs have different web application deployed i.e., the structure of the application is same, but the welcome message is different in each of the VMs. This is to know that which VM is picked by the load balancer in case of traffic.
15. Select both the VMs (cloudvm-0 and cloudvm-1) and Publish them. By publishing, WebDeploy will transfer the files from local machine to both the VMs.
16. Once the Publish button is clicked, a web browser will be opened with the deployed application.
17. Below Figures 42,43 are the images of the deployed web application in first and second VM, respectively. For the same load balancer IP, we can see that same application is running in different VMs.
Figure 42: Web Application on VM1
Figure 43: Web Application on VM2
6. Conclusion and Final Remarks
First things first. After deploying and playing around with the application, remember to remove all the resources that you have created during this project. Otherwise, some fees might be charged to your Azure account. To remove all the resources created using Terraform, navigate to the terraform folder:
cd ../terraform
Then use the following command to destroy all the resources:
terraform destroy
Infrastructure as Code tries to solve three different needs, which are:
1. Create/destroy infrastructure resources like network resources, virtual machines, load balancers etc.
2. Manage configurations for the created resources.
3. Deploy applications to the infrastructure.
After successful implementation of this project, we were able to achieve the above-mentioned points in the following manner:
1. Automating the infrastructure provisioning process through a reusable Terraform script.
2. Automating the configuration of the VMs using an Ansible playbook.
3. Publishing a .NET CORE web application to configured machines directly through Visual Studio using Web Deploy.
The next steps from here could be automating this process further by configuring these steps into a CI/CD (Continuous Integration/Continuous Deployment) pipeline. This would even automate the process of manually executing the Terraform and Ansible scripts and replace it with just triggering build and release pipelines. While the process of configuring these steps into pipelines could be a little tricky, once achieved, this could make the life of the DevOps or cloud engineer much easier. This would mean that new environments could now be spun in a matter of minutes and that too without the worry of infrastructure deviations or configuration drifts.
7. References
[1]https://medium.com/cloudnativeinfra/when-to-use-which-infrastructure-as-code-tool-665af289fbde [2]https://medium.com/@singhbhupesh261201
[3]https://github.com/ayyappa1/Terraform/blob/master/README.md [4] End-to-End Application Provisioning with Ansible and Terraform | IBM [5] For creating deployment diagram - Creately
[6] https://learn.hashicorp.com/collections/terraform/azure-get-started [7] Step 1 - PowerShell | Distech Wiki (distech-controls.com)
[8] https://learn.hashicorp.com/tutorials/terraform/azure-build
[9] For generating code screenshots - Carbon | Create and share beautiful images of your source code [10] https://docs.ansible.com/ansible/latest/collections/ansible/windows
[11] https://docs.microsoft.com/en-us/aspnet/core/host-and-deploy/iis/?view=aspnetcore-3.1#install-the- net-core-hosting-bundle
[12] https://cloudskills.io/blog/configure-ansible-windows
[13] https://dotnet.microsoft.com/learn/aspnet/hello-world-tutorial/intro
[14] https://github.com/NoBSDevOps/BookResources/blob/master/Part-II-Project/Virtual- Machines/Terraform-VMs/VMs/main.tf