Sketching with Hardware: A Course for Teaching Interactive Hardware Prototyping to Computer
Science Students
Andreas Schmid Andreas.Schmid@ur.de University of Regensburg
Regensburg, Germany
Raphael Wimmer Raphael.Wimmer@ur.de University of Regensburg Regensburg, Germany ABSTRACT
Sketching with Hardware is an undergraduate university course with the goal to teach students how to build pro- totypes for tangible user interfaces. Goals of this course are to create awareness for tangible interaction among students and prepare them to realize advanced projects like bachelor’s and master’s theses in this field. In this paper, authors share their experience teaching the concepts of tangible interaction, electronics and prototyping to computer science students in a two week course. The course’s content, structure and goals are explained, and needed material and infrastructure are described. The long-term effect of the course has been eval- uated by conducting a survey among former participants.
KEYWORDS
tangible interaction, teaching, prototyping 1 INTRODUCTION
Ever since Hiroshi Ishii introduced the idea of tangible inter- action to the computer science community [2] it has become an important field of research in human computer interaction.
However, the process of building tangible user interfaces requires skills in electronics, low-level programming and crafting, which are usually not part of an applied computer science curriculum. To convey these skills and therefore em- power students to build tangible user interfaces, we offer the elective course Sketching with Hardware in the media informatics curriculum of the University of Regensburg.
Sketching with Hardware is inspired by Tom Igoe’s physical computing course [1] at New York University Tisch School of the Arts. While similar course concepts have been discussed in earlier publications, these focus on designing products [8]
Permission to make digital or hard copies of part or all of this work for personal or classroom use is granted without fee provided that copies are not made or distributed for profit or commercial advantage and that copies bear this notice and the full citation on the first page. Copyrights for third- party components of this work must be honored. For all other uses, contact the owner/author(s).
MuC’19 Workshops, Hamburg, Deutschland
© 2019 Copyright held by the owner/author(s).
https://doi.org/10.18420/muc2019-ws-563
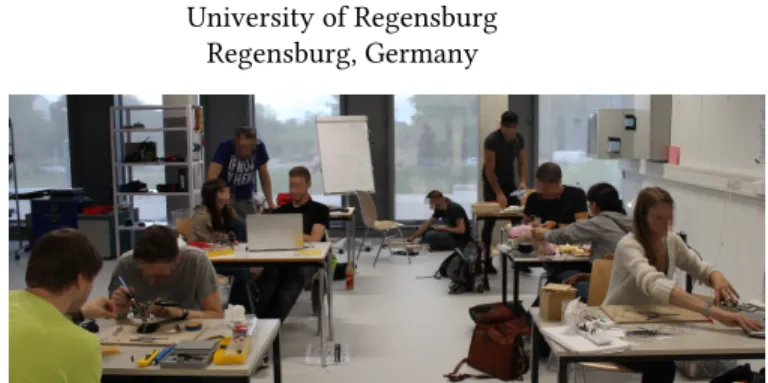
Figure 1: Course participants of Sketching with Hardware working on their prototypes
or artistic exhibits [3], while our course has a main emphasis on creating artifacts and interfaces for tangible interaction.
Our course is targeted at media informatics students who already have some programming experience and a basic un- derstanding of HCI (Human Computer Interaction) concepts.
The course concept for Sketching with Hardware was de- veloped by Alexander Wiethoff and Raphael Wimmer who combined a course concept targeted at interaction designers with one targeted at computer science students at LMU Mu- nich [9] in 2009, where the course has been taught ever since.
Wimmer started teaching the course from 2012 onwards to- gether with Florian Echtler at University of Regensburg with Andreas Schmid joining in 2015. Therefore, compared to re- lated work presenting the results of experimental courses that have been conducted only once, we can share the ex- perience from a total of twelve iterations of Sketching with Hardware.
In this paper, we describe the goals and overall structure of the course, as well as the needed personnel, materials and infrastructure in order to provide tips and inspiration to others planning to start such a course.
2 COURSE GOALS AND STRUCTURE
Sketching with Hardware is a university course with the goal
to teach media informatics students basic concepts of elec-
tronics, microcontrollers and interaction design. Because
of the practical nature of those topics, we emphasize on
hands-on excercises and learning by doing instead of theo- retical lectures. After acquiring these skills, course partici- pants create prototypes for tangible user interfaces. In con- trast to other courses in applied computer science, Sketching with Hardware encourages students to approach problems from a physical and hardware-centered point of view. Even though we provide an introduction to electronics, a thorough overview of the field can not be provided within the scope of this course. Furthermore, basic programming knowledge is a prerequisite to participate in Sketching with Hardware.
Course Goals
Main goal of this course is to introduce the field of tangible interaction to students and teach them skills required to cre- ate tangible user interfaces. Course graduates are thereby enabled to work on further projects in electronics, proto- typing, and tangible interaction, including bachelor’s and master’s theses with hardware-related topics.
The hardware interactive prototypes created in this course can be used as exhibits at public events to create awareness for tangible interaction and the lab among a broader audi- ence.
Course Structure
The course is organized as a full-time block of two weeks.
During the first week, basic concepts of electronics, micro- controller programming, prototyping and interaction design are taught through lectures and practical excercises.
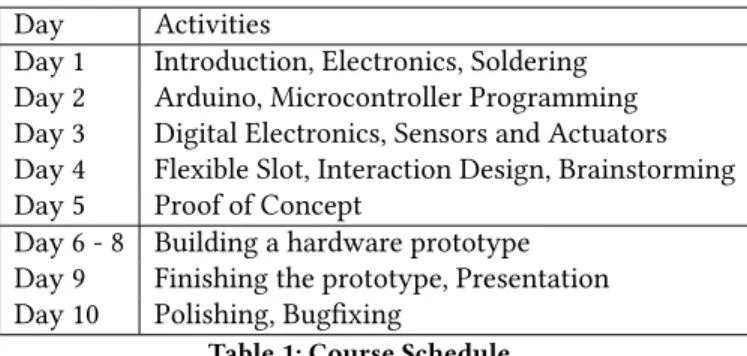
Day Activities
Day 1 Introduction, Electronics, Soldering Day 2 Arduino, Microcontroller Programming Day 3 Digital Electronics, Sensors and Actuators Day 4 Flexible Slot, Interaction Design, Brainstorming Day 5 Proof of Concept
Day 6 - 8 Building a hardware prototype Day 9 Finishing the prototype, Presentation Day 10 Polishing, Bugfixing
Table 1: Course Schedule
On the first day of the course, basic concepts and impor- tant milestones of tangible interaction are introduced to the students. The course’s content is previewed, material needed for the course (Figure 3) is given to the students, and orga- nizational topics are addressed. Thereafter, basic concepts of electronic circuits, Ohm’s Law, and important compo- nents are introduced. This theoretical block is followed by an exercise where students test their knowledge of these concepts. After a lunch break, students are taught soldering and practice this technique. This is followed by another the- oretical block about electronics covering Kirchhoff’s circuit
laws, transistors, and integrated circuits. The first day of the course is concluded after a hands-on task using the 555 timer IC to build a monostable multivibrator circuit. Main purpose of this exercise is to teach students how to read data sheets.
The second day of the course is focused on microcontroller programming. After a short introduction to the Arduino Mi- cro, students have to solve a few simple programming tasks to get used to the platform. This is followed by a prototyping exercise where participants build a custom input device for a simple video game of their choice based on the Arduino.
After a lunch break, the main differences in programming between the Arduino and Java (the programming language taught in our induction courses) are explained. The final exercise of the second day is to build a binary clock using the Arduino Micro, a shift register and several LEDs.
The third day of the course starts with an introduction of important libraries for Arduino and an exercise with Adafruit NeoPixel
1LED strips. Thereafter, communication with sen- sors and actuators over SPI, I2C and UART protocols is taught in a short lecture followed by a practical task. For this exer- cise, each group gets a pair of components (one sensor and one actuator) which they have to connect in a adequate way to the Arduino. Depending on the complexity of selected components, this task can take rather long and students are likely to need individual support. The third day is concluded with an overview on existing sensors and actuators as well as existing projects using those components.
The fourth day of the course begins with a flexible slot which can be used to teach specific skills needed for the final project. After a lunch break, concepts and workflows of interaction design based on the ideas of Bill Moggridge [4], Kevin Silver [7] and Donald Norman [5] are taught and affordances of tangible artifacts in comparison to GUIs are explained. With this hard break from the technical point of view of the former content, students are motivated to change to a mindset more focused on design. Then, the theme for the final project is revealed. We recommend selecting an abstract theme with room for creativity, as too specific themes will limit the students’ possibilities while too general themes can leave them overwhelmed with the number of possibilites.
As an example, a selection of past topics of our course are
“Spooky Interactions at a Distance“ (prototypes communi- cation with each other), “Harry Potter“ (tangible artifacts inspired by the Harry Potter [6] universe), and “Tangible Games“. Following the revelation of the theme, participants form groups of two for their final project. To find a concrete topic for the project, each group sketches three ideas on a poster and presents those to the other students who pro- vide feedback. After this brainstorming round, each group
1
NeoPixel LED strips (based on WS2812 ) on their distributor’s official website:
https://www.adafruit.com/category/168
Figure 2: Selection of prototypes developed during the course (environment-aware lamp, ghost detector game, uni- corn tamagochi, interactive ouija board, story-telling teddy bear, interactive voodoo doll)
selects one of their ideas as their topic. The rest of the fourth day and the entire fifth day are used for proof of concept experiments, testing and creating low-fidelity prototypes.
Over the weekend, each group is tasked with creating a concept video for their prototype. This video has to demon- strate the interaction with the planned prototype and should not exceed one minute.
During the second week of the course, students work independently on their prototype for the final project and instructors are only present to help them solve individual problems. In case there is a need for special components, they should be ordered as soon as possible to prevent bottlenecks caused by missing material.
Presentations of the soon to be finished prototypes are scheduled for the afternoon of the penultimate day of the course. The projects have to be finished on the last day of the course and should then be in a functional and high-fidelity state. We suggest not to provide additional time to finish the projects as this has proven to have little impact on the final prototype’s quality.
In addition to the hardware artifact, participants have to hand in a written documentation of the project and a high-fidelity video demonstrating interaction with the fin- ished prototype. Those are due one week after the end of the course.
3 ORGANISATION AND INFRASTRUCTURE As the students have to apply newly acquired skills, intensive support has to be provided by the course’s supervisors. In addition, available space and access to tools can be a bottle- neck. For this reason, we limit the number of participants to a maximum of twelve students who are selected based on a short essay in which they substantiate their motivation to join the course and specify their previous knowledge in HCI, electronics and tangible interaction.
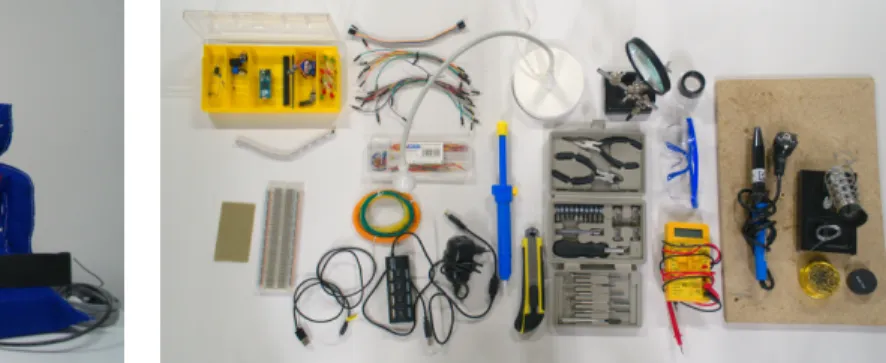
Figure 3: Tools and components for each group (see Appen- dix B for detailed list)
Each group is provided with a box containing a set of tools and electrical components (Figure 3, Appendix B) required to work on the excercises during the first week. For their final project, each group gets a budget of 30€ to spend on addi- tional components. Additionally, we recommend providing a range of often needed materials like wood, plastic boxes, screws and paint, as well as a selection of tools (Appendix B). Due to the practical activities during the course, an appro- priate room with enough space is needed. Ideally, the room is reserved for the complete duration of the course and can be locked so that tools, material, and prototypes can be left there over night. Access to tools should be uncomplicated.
A student assistant with sufficient knowledge in electron- ics, programming and crafting supports the instructor by helping the participants to solve problems during practical phases of the course and answer individual questions.
Sketching with Hardware has a high financial cost per stu- dent compared to other courses in computer science, as tools and material are needed and supervision is intensive. Aside from gear for shared use by all participants, each group gets a box containig tools and material which cost about 150€
altogether. In addition to this one time investment in the pro- curement of material that can be reused in future iterations of the course, there are recurrent costs for consumables like electrical components, building materials and the budget for each group’s project (about 250€ total per course), as well as the salary of instructor and student assistant, and the replacement of broken gear.
Design Decisions
Based on our experience teaching the course, we have made
several decisions to foster participants’ creativity and ensure
a smooth procedure. We strongly recommend using the Ar-
duino Micro as a microcontroller platform because it is small
enough to be included inside hardware prototypes and it can
easily be plugged into a breadboard for testing. We have also
tried using more advanced platforms like the LOLIN D32
2but they turned out to be too complex for novice users.
As the course participants are likely to have experience in programming GUI applications, we try to get them out of their comfort zone by prohibiting the use of displays in their hardware prototype. By providing only one shared set of tools to each group of two, we encourage collaboration and planning ahead.
Exercises during the course are in form of extensive tu- torial sheets. This way, each group can work in their own tempo while instructors can provide individual assistance.
4 EVALUATION
To evaluate the long-term results of Sketching with Hardware, we conducted a survey among graduates of the last five instances of the course (Winter 2015/16 onwards). Students participating earlier iterations have been excluded from the survey as they all have already finished studying and were hard to reach. Out of 52 eligible subjects, 38 could be reached and 22 have participated in the survey.
We asked for the participant’s main motivation to join the course, the impact of the skills and knowledge contained during the course on their daily lives, the effect of the course on their interest for electronics and tangible interaction, the attitude towards writing a theses related to tangible inter- action, and feedback on the course’s content (Appendix A, Table 5). To determine statistical significance of the survey’s results, we conducted a two-tailed paired sample t-test.
Both interest in electronics (average before the course:
3.14; present: 3.91; p=0.005) and the interest for tangible interaction (average before the course: 2.79; present: 3.55;
p=0.001) have increased significantly among former course participants and knowledge obtained during the course has been “rather relevant“ (average 4.81 out of 7) for them.
Half of the course’s graduates can imagine writing a thesis with a topic from the field of tangible interaction (Table 2).
Answer Count
Yes, I have already/Yes, am I doing currently 2
Yes, I am planning to 0
Yes, I can imagine doing so 9
I do not know 3
No, only if I have to 2
Certainly not 1
No, I do not have to write a thesis 5 Table 2: Answers to the question “Can you imagine writing a thesis with a topic from the field of tangible interaction?“
(multiple choice)
2