Exercise 5 – Simple Webserver, EBS volume, Cluster
Alexander Steinbrecher asteinbr@stud.fh-frankfurt.de
November 20, 2013
1 Exercise - Create a simple Web Server
1. After initializing successfully a EC2 instance with linux you need to install nginx webserver with sudo apt-get install nginx
2. Under the directory/usr/share/nginx/html/you find the fileindex.htmlwhich is the standard webpage of nginx
Hint: nginx is able to manage different websites, they are defined in /etc/nginx/nginx.conf.
The default pages are located in /etc/nginx/sites-available/default.
3. Start nginx with sudo nginx.
(After a system restart nginx should be started automatically with/etc/init.d/nginx start).
4. Now its time to try a test. Try to access the webserver with putting the ip-address of your EC2 instance in your webbrowser.
Figure 1: Output of the webbrowser while connecting to nginx webserver.
Please consider that the last line of the output is modified by me.
2 Exercise - Persistent Storage
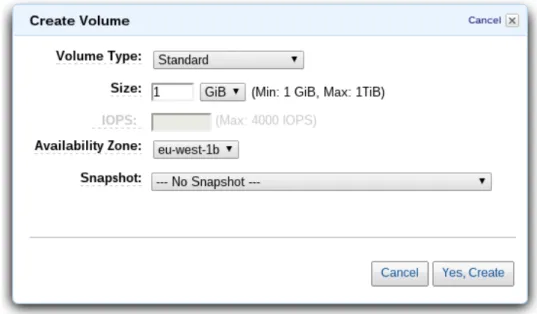
1. To create a additional storage for a EC2 instance click under EC2 Console on the right view on Volumes below of Elastic Block Storage and then Create a Volume.
It is important that the EBS volume has the same availability zone as the desired EC2 instance, otherwise the volume can’t be attached to the instance.
Figure 2: It is important to choose the same availability zone as the desired EC2 instance.
The created volume appear as availablein the Volumes overview.
2. After creating a new volume it is necessary to attach it to a EC2 instance. With a right click on the created volume can click onAttach Volumeto attach it.
3. After the volume is attached you can see the difference via lsblk:
Before:
ubuntu@ip-172-31-19-105:~$ lsblk
NAME MAJ:MIN RM SIZE RO TYPE MOUNTPOINT xvda1 202:1 0 8G 0 disk /
After:
ubuntu@ip-172-31-19-105:~$ lsblk
NAME MAJ:MIN RM SIZE RO TYPE MOUNTPOINT xvdf 202:80 0 1G 0 disk
xvda1 202:1 0 8G 0 disk /
As result you see that a new device with 1G size is being attached.
4. Now its time to create a partition table and filesystem on the volume that we can use it within the instance.
sudo fdisk /dev/xvdf opens fdisk utility to create the partition table. You have to create a new partition table with o, then a new partition with n as a primary partition p, number one 1, beginning cylinder 2048 with just pressing <ENTER> and even for the last cylinder just press
<ENTER>, the partiton type is 83, i.e. tand83. Finally it’s mandatory to write the changes to the volume viaw.
The result is:
ubuntu@ip-172-31-19-105:~$ sudo fdisk /dev/xvdf Command (m for help): p
Disk /dev/xvdf: 1073 MB, 1073741824 bytes
139 heads, 8 sectors/track, 1885 cylinders, total 2097152 sectors Units = sectors of 1 * 512 = 512 bytes
Sector size (logical/physical): 512 bytes / 512 bytes I/O size (minimum/optimal): 512 bytes / 512 bytes Disk identifier: 0xc0a2c0ef
Device Boot Start End Blocks Id System
/dev/xvdf1 2048 2097151 1047552 83 Linux
5. After the partition is created a filesystem is needed. This can be done withmkfs.ext3:
ubuntu@ip-172-31-19-105:~$ sudo mkfs.ext3 /dev/xvdf1 mke2fs 1.42.8 (20-Jun-2013)
Filesystem label=
OS type: Linux
Block size=4096 (log=2) Fragment size=4096 (log=2)
Stride=0 blocks, Stripe width=0 blocks 65536 inodes, 261888 blocks
13094 blocks (5.00%) reserved for the super user First data block=0
Maximum filesystem blocks=268435456 8 block groups
32768 blocks per group, 32768 fragments per group 8192 inodes per group
Superblock backups stored on blocks:
32768, 98304, 163840, 229376 Allocating group tables: done Writing inode tables: done
Creating journal (4096 blocks): done
Writing superblocks and filesystem accounting information: done lsblk is telling:
ubuntu@ip-172-31-19-105:~$ lsblk
NAME MAJ:MIN RM SIZE RO TYPE MOUNTPOINT xvdf 202:80 0 1G 0 disk
--xvdf1 202:81 0 1023M 0 part xvda1 202:1 0 8G 0 disk /
6. The filesystem is ready but still not mounted into the instance:
• Create a mount point for the volume (in this casenginxStore):
ubuntu@ip-172-31-19-105:~$ sudo mkdir /nginxStore ubuntu@ip-172-31-19-105:~$ ls /
bin boot dev etc home initrd.img initrd.img.old lib lib64 lost+found media mnt nginxStore opt proc root run sbin srv sys tmp usr var vmlinuz vmlinuz.old
• Mount the volume to/nginxStore:
ubuntu@ip-172-31-19-105:~$ sudo mount -t ext3 /dev/xvdf1 /nginxStore/
• Check if the volume is mounted viadf -h:
ubuntu@ip-172-31-19-105:~$ df -h
Filesystem Size Used Avail Use% Mounted on /dev/xvda1 7.8G 1.6G 5.9G 21% /
none 4.0K 0 4.0K 0% /sys/fs/cgroup
udev 285M 8.0K 285M 1% /dev
tmpfs 59M 200K 59M 1% /run
none 5.0M 0 5.0M 0% /run/lock
none 295M 0 295M 0% /run/shm
none 100M 0 100M 0% /run/user
/dev/xvdf1 1007M 18M 939M 2% /nginxStore
The last point shows that the EBS volume is attached and mounted to/nginxStore.
7. The html files of nginx should be stored as described on the EBS volume. For this it’s obvious to copy them to the volume and change the directory within the config files of nginx.
• Copy files to new directory / volume
ubuntu@ip-172-31-19-105:~$ sudo cp /usr/share/nginx/html/* /nginxStore/
• Modify config files
ubuntu@ip-172-31-19-105:~$ sudo vim /etc/nginx/sites-available/default In this file it’s necessary to change the line
root /usr/share/nginx/html;
to
root /nginxStore;.
8. Now you have to restart the nginx webserver via /etc/init.d/nginx restartand accessing the webpage again with your browser and the instance ip:
Figure 3: Please consider that I added a line to /nginxStore/index.html.
3 Exercise - Realize a High Throughput Cluster
1. Under Instances click on a instance and thanActions > Create Image.
2. The created image is listed underEC2 > AMIs.
3. Choose AMI from the left console and click on Launch and create a new instance with the same image as the other instance.
4. Creating a load-balancer. Click onLoad Balancersin the EC2 Console andCreate Load Balancer.
• Give a name to the LoBa:
• Health Check options can be standard:
• Create a new security group with a new Inbound Rule for HTTP:
(for me it was also necessary to create afterwards an outbound rule for port 80)
• Choose your EC2 instances to the LoBa:
• Finally create the new LoBa.
• After some time (about 15min) the load-balancer is created and can be accessed via the given DNS name likenginxLoBa-604271246.eu-west-1.elb.amazonaws.com.
It should connect to both of the servers, maybe after some attempts.
Figure 4: First attempt on ubuntu1310 1
Figure 5: Second attempt on ubuntu1310 2