Training Guide:
Administering Windows Server 2012
Orin Thomas
Published with the authorization of Microsoft Corporation by:
O’Reilly Media, Inc.
1005 Gravenstein Highway North Sebastopol, California 95472 Copyright © 2013 by Orin Thomas
All rights reserved. No part of the contents of this book may be reproduced or transmitted in any form or by any means without the written permission of the publisher.
ISBN: 978-0-735-67413-4 1 2 3 4 5 6 7 8 9 LSI 8 7 6 5 4 3
Printed and bound in the United States of America.
Microsoft Press books are available through booksellers and distributors worldwide. If you need support related to this book, email Microsoft Press Book Support at mspinput@microsoft.com. Please tell us what you think of this book at http://www.microsoft.com/learning/booksurvey.
Microsoft and the trademarks listed at http://www.microsoft.com/about/legal/
en/us/IntellectualProperty/Trademarks/EN-US.aspx are trademarks of the Microsoft group of companies. All other marks are property of their respec- tive owners.
The example companies, organizations, products, domain names, email ad- dresses, logos, people, places, and events depicted herein are fictitious. No association with any real company, organization, product, domain name, email address, logo, person, place, or event is intended or should be inferred.
This book expresses the author’s views and opinions. The information con- tained in this book is provided without any express, statutory, or implied warranties. Neither the authors, O’Reilly Media, Inc., Microsoft Corporation, nor its resellers, or distributors will be held liable for any damages caused or alleged to be caused either directly or indirectly by this book.
Acquisitions Editor: Michael Bolinger Developmental Editor: Troy Mott Production Editor: Holly Bauer
Editorial Production: Box Twelve Communications Technical Reviewer: Randall Galloway
Copyeditor: Nancy Sixsmith Indexer: Angie Martin
Cover Design: Twist Creative • Seattle
Contents at a glance
Introduction xv
ChAPTER 1 Deploying and updating Windows Server 2012 1 ChAPTER 2 Managing account policies and service accounts 61
ChAPTER 3 Configuring name resolution 119
ChAPTER 4 Administering Active Directory 177
ChAPTER 5 Managing Group Policy application and infrastructure 237 ChAPTER 6 Group Policy settings and preferences 275
ChAPTER 7 Administering network policies 339
ChAPTER 8 Administering remote access 413
ChAPTER 9 Managing file services 481
ChAPTER 10 Monitoring and auditing Windows Server 2012 565 APPEnDIx A Setup instructions for exercises and labs 627 Index 631
Contents
Introduction xv
System requirements xvi
Virtual Machine setup instructions xvii
Acknowledgments xvii
Errata & book support xvii
We want to hear from you xvii
Stay in touch xvii
Chapter 1 Deploying and updating Windows Server 2012 1
Before you begin . . . 1 Lesson 1: Configuring and servicing Windows Server 2012 images . . . 2
Understanding Windows images 2
Configuring Windows images 3
Servicing Windows images 4
Lesson summary 10
Lesson review 11
Lesson 2: Automated deployment of Windows Server 2012 images . . . . 12
Automating installation 12
Configuring answer files 13
Windows Deployment Services 14
WDS requirements 15
Managing images 18
Configuring transmissions 24
Lesson summary 26
Lesson review 26
Lesson 3: Servicing and updating deployed servers . . . 27
Automated update deployment with WSUS 28
New WSUS features 28
Deploy and manage WSUS 29
WSUS groups 34
WSUS policies 34
Deploying updates 36
Automatic approval rules 38
Lesson summary 39
Lesson review 40
Practice exercises . . . 41 Suggested practice exercises . . . 57 Answers . . . 58
Lesson 1 58
Lesson 2 59
Lesson 3 60
Chapter 2 Managing account policies and service accounts 61
Before you begin . . . 61 Lesson 1: Implementing domain password and lockout policies . . . 62
Domain user password policies 62
Account lockout settings 66
Account management tasks 67
Lesson summary 72
Lesson review 72
Lesson 2: Using fine–grained password policies . . . 74
Delegate password settings permissions 74
Fine–grained password policies 76
Lesson summary 81
Lesson review 81
Lesson 3: Mastering group Managed Service Accounts . . . 83
Service principal name management 91
Lesson summary 91
Lesson review 92
Practice exercises . . . 93 Suggested practice exercises . . . 112 Answers . . . 113
Lesson 1 113
Lesson 2 114
Lesson 3 116
Chapter 3 Configuring name resolution 119
Before you begin . . . 119 Lesson 1: DNS zones and forwarders . . . 120
DNS zone types 120
Zone delegation 126
Split DNS 127
Forwarders and conditional forwarders 128
Stub zones 131
Lesson summary 132
Lesson review 133
Lesson 2: WINS and GlobalNames zones . . . .134
WINS 135
GlobalNames zones 139
Peer Name Resolution Protocol 140
Lesson summary 142
Lesson review 142
Lesson 3: Advanced DNS options . . . 143
Resource records 144
Zone aging and scavenging 147
DNSSEC 149
Answers . . . 172
Lesson 1 172
Lesson 2 173
Lesson 3 175
Chapter 4 Administering Active Directory 177
Before you begin . . . 177 Lesson 1: Domain controller management . . . 177
Managing operations masters 178
Global Catalog servers 183
Universal group membership caching 184
Read-only domain controllers 185
Domain controller cloning 193
Lesson summary 194
Lesson review 194
Lesson 2: Domain controller maintenance . . . 195
Active Directory database optimization 196
Active Directory metadata cleanup 198
Active Directory snapshots 199
Lesson summary 201
Lesson review 202
Lesson 3: Active Directory recovery . . . 203
Active Directory Recycle Bin 203
Active Directory backup 206
Active Directory recovery 208
Lesson summary 211
Lesson review 211
Practice exercises . . . 212 Suggested practice exercises . . . 231 Answers . . . 232
Lesson 1 232
Chapter 5 Managing Group Policy application
and infrastructure 237
Before you begin . . . 237 Lesson 1: Group Policy Object maintenance . . . 237
Managing Group Policy Objects 238
Migrate Group Policy Objects 242
Delegate GPO management 243
Lesson summary 246
Lesson review 247
Lesson 2: Managing Group Policy application . . . 248
Policy processing precedence 248
Policy enforcement and blocking 249
Group Policy security filtering 250
Group Policy WMI filtering 252
Loopback processing 253
Lesson summary 255
Lesson review 256
Practice exercises . . . 257 Suggested practice exercises . . . 270 Answers . . . 271
Lesson 1 271
Lesson 2 272
Chapter 6 Group Policy settings and preferences 275
Before you begin . . . 275 Lesson 1: Folder Redirection, software installation, and scripts . . . 275
Folder Redirection 276
Software installation 279
Scripts 285
Lesson summary 287
Lesson 2: Administrative templates . . . .290
Administrative templates 290
Administrative template settings 291
Central store 292
ADMX Migrator 294
Filter property settings 294
Lesson summary 296
Lesson review 296
Lesson 3: Group Policy preferences . . . 297
Group Policy preference settings 298
Item-level targeting 299
Mapping network drives 300
Configuring printers 302
Configuring power options 303
Configuring the registry 308
Internet options 309
Additional settings 311
Lesson summary 315
Lesson review 316
Practice exercises . . . 318 Suggested practice exercises . . . 332 Answers . . . 333
Lesson 1 333
Lesson 2 335
Lesson 3 335
Chapter 7 Administering network policies 339
Before you begin . . . 339 Lesson 1: Network Policy Server policies . . . 339
NPS deployment 340
Connection request policies 344
IP settings 362
Creating network policies 362
NPS templates 367
Lesson summary 368
Lesson review 368
Lesson 2: Network Access Protection enforcement methods . . . 370
DHCP enforcement 370
IPsec enforcement 373
802.1X enforcement 376
VPN enforcement 379
RD Gateway enforcement 381
Lesson summary 384
Lesson review 385
Lesson 3: Network Access Protection infrastructure. . . 386
Windows Security Health Validator 387
System Health Validators and System Health Agents 389
Health policies 389
Health Registration Authorities 391
Remediation server groups 392
Lesson summary 393
Lesson review 393
Practice exercises . . . .394 Suggested practice exercises . . . .406 Answers . . . .407
Lesson 1 407
Lesson 2 408
Lesson 3 410
Chapter 8 Administering remote access 413
Before you begin . . . 413
RADIUS accounting 424
Lesson summary 428
Lesson review 428
Lesson 2: Configuring VPN and routing . . . 429
Deploy Routing and Remote Access 430
Configure VPN settings 432
Configure routing 439
Network Address Translation (NAT) 441
Lesson summary 444
Lesson review 444
Lesson 3: Configuring DirectAccess . . . .445
Understanding DirectAccess 446
DirectAccess infrastructure 446
Configure DirectAccess 453
Lesson summary 464
Lesson review 465
Practice exercises . . . .466 Suggested practice exercises . . . 475 Answers . . . 476
Lesson 1 476
Lesson 2 477
Lesson 3 479
Chapter 9 Managing file services 481
Before you begin . . . 481 Lesson 1: Configure File Server Resource Manager . . . 481 Quotas 482
File screens 483
File classification 486
File management tasks 487
Storage reports 488
Lesson 2: Configure a Distributed File System . . . 492
Distributed File System 492
DFS namespaces 492
DFS replication 495
Lesson summary 500
Lesson review 500
Lesson 3: Configure file and disk encryption . . . 502
Configure BitLocker 502
Configuring Network Unlock 508
Configuring Encrypting File System 510
Using EFS with an Enterprise CA 511
Key and data recovery 512
Lesson summary 513
Lesson review 513
Practice exercises . . . 515 Suggested practice exercises . . . 557 Answers . . . 558
Lesson 1 558
Lesson 2 560
Lesson 3 562
Chapter 10 Monitoring and auditing Windows Server 2012 565
Before you begin . . . 565 Lesson 1: Monitor servers . . . 565
Data collector sets 566
Alerts 569
Event Viewer 571
Event subscriptions 575
Event-driven tasks 578
Network monitoring 581
Lesson 2: Advanced audit policies . . . 585
Advanced auditing 586
Expression-based audit policies 588
Configuring file and folder auditing 589
Using auditpol with auditing 590
Lesson summary 591
Lesson review 592
Practice exercises . . . 593 Suggested practice exercises . . . 623 Answers . . . 624
Lesson 1 624
Lesson 2 625
Appendix A
Setup instructions for exercises and labs 627
Index 631
Introduction
W
hen Microsoft Learning puts together exam objectives for an exam, it doesn’t randomly select pages from TechNet. Instead, in conjunction with subject matter experts and representatives of the product team, it puts together a list of tasks and areas of knowledge that represents what someone in a specific job role would do and need to know on a day-to- day, a weekly, or even a monthly basis.Each exam maps to a different job role. The objectives for the 70-411 exam are a list of tasks and areas of knowledge that describe what an administrator of the Windows Server 2012 operating system with several years of on-the-job experience (managing other server operating systems as well as Windows Server 2012) does and understands. The objectives don’t cover everything that a Windows Server 2012 systems administrator would know, and there will be tasks and areas that will be relevant to one person’s real world role and not an- other, but the exam objectives provide a reasonable approximation of that role.
This book covers the majority of the topics and skills that are the subject of the Microsoft certification exam 70-411. The idea behind this book is that by reading it, you can learn how to perform tasks you may need to perform on a day-to-day basis in your role as a Windows Server 2012 administrator. Using the exam objectives as a working definition of that role has the additional benefit of giving you a better understanding of the topics and tasks listed on the 70-411 exam objectives. This book will assist you in preparing for the exam, but it’s not a complete exam preparation solution. If you are preparing for the exam, you should use ad- ditional study materials, such as practice tests and Exam Ref 70-411: Administering Windows Server 2012 (Microsoft Press, 2013) to help bolster your real-world experience. For your refer- ence, a mapping of the topics in this book to the exam objectives is included in the back of the book in the Objectives Map.
By using this training guide, you will learn how to do the following:
■
■ Deploy, manage, and maintain servers
■
■ Configure file and print services
■
■ Configure network services and access
■
■ Configure a network policy server infrastructure
■
■ Configure and manage Active Directory
■
■ Configure and manage Group Policy
System requirements
The following are the minimum system requirements your computer needs to meet to com- plete the practice exercises in this book. This book is designed assuming you will be using Hyper-V—either the client version available with some editions of Windows 8 or the version available in Windows Server 2012. You can use other virtualization software instead, such as VirtualBox or VMWare Workstation, but the practice setup instructions in the Appendix as- sume that you are using Hyper-V.
Hardware and software requirements
This section presents the hardware requirements for Hyper-V and the software requirements.
Virtualization hardware requirements
If you choose to use virtualization software, you need only one physical computer to perform the exercises in this book. That physical host computer must meet the following minimum hardware requirements:
■
■ x64-based processor that includes both hardware-assisted virtualization (AMD-V or Intel VT) and hardware data execution protection. (On AMD systems, the data execu- tion protection feature is called the No Execute or NX bit. On Intel systems, this feature is called the Execute Disable or XD bit.) These features must also be enabled in the BIOS. (Note: You can run Windows Virtual PC without Intel-VT or AMD-V.) If you want to use Hyper-V on Windows 8, you need a processor that supports Second Level Address Translation (SLAT).
■
■ 8 GB of RAM (more is recommended).
■
■ 80 GB of available hard disk space.
■
■ Internet connectivity.
Software requirements
The following software is required to complete the practice exercises:
■
■ Windows Server 2012 evaluation. You can download an evaluation edition of Windows Server 2012 in iso format from the Windows Server and Cloud Platform website at http://www.microsoft.com/server.
Virtual Machine setup instructions
The instructions for building the virtual machine environment that allow you to perform the exercises in this book are located in the Appendix.
Acknowledgments
I’d like to thank the following people for their dedication and help in getting this book writ- ten: Troy Mott, Randall Galloway, Nancy Sixsmith, Holly Bauer, and Jeff Riley.
Errata & book support
We made every effort to ensure the accuracy of this book and its companion content. Any er- rors that have been reported since this book was published are listed on our Microsoft Press site at oreilly.com:
http://aka.ms/TGAdminWinServer2012/errata
If you find an error that is not already listed, you can report it to us through the same page.
If you need additional support, send an email to Microsoft Press Book Support at mspinput@microsoft.com.
Please note that product support for Microsoft software is not offered through the previous addresses.
We want to hear from you
At Microsoft Press, your satisfaction is our top priority, and your feedback is our most valu- able asset. Please tell us what you think of this book at:
http://www.microsoft.com/learning/booksurvey
The survey is short, and we read every one of your comments and ideas. Thanks in ad- vance for your input!
C h A P T E R 1
Deploying and updating Windows Server 2012
D
eploying and servicing Windows Server 2012 is a routine task that you will perform in your career as a systems administrator. Deploying the operating system is something you generally do once per server, especially now that it’s easier to restore a system image from backup than it is to deploy from scratch. Servicing includes keeping your deployment images and your deployed services up to date. In your job role, you’re likely to spend a lot more time on these tasks than you will on deployment. In this chapter, you’ll learn about configuring and servicing Windows Server 2012 images, about the tools included with Windows Server 2012 that enable you to automate its deployment, and about the technolo- gies that are available to automate the process of keeping deployed servers up to date with hotfixes and software updates.Lessons in this chapter:
■
■ Lesson 1: Configuring and servicing Windows Server 2012 images
■
■ Lesson 2: Automated deployment of Windows Server 2012 images
■
■ Lesson 3: Servicing and updating deployed servers
Before you begin
To complete the practice exercises in this chapter, you must set up the lab of virtual ma- chines, as described in the Appendix. You should take a snapshot of each virtual machine prior to performing the practice exercises. You can revert the virtual machines to their original state once you have completed the exercises.
Lesson 1: Configuring and servicing Windows Server 2012 images
Although you can install Windows Server 2012 from the installation media, most organiza- tions that deploy the server operating system use custom images. By using custom images, systems administrators can deploy operating systems so that they require a minimum of post- installation configuration. In this lesson, you will learn about Windows images, the steps that you can take to configure these images, and the processes involved in servicing those images.
After this lesson, you will be able to:
■
■ Understand Windows images.
■
■ Configure Windows images.
■
■ Service Windows images.
Estimated lesson time: 45 minutes
Understanding Windows images
In earlier versions of the Windows Server operating system, such as Windows NT 4.0 and Windows Server 2003, all the files needed to install the operating system were located in a special i386 directory on the installation media. With Windows images, the entire operating system—as well as associated drivers, updates, and applications—is stored within a single image. During installation, this image is applied to the target volume. Windows images use the Windows Imaging (WIM) file format and have the following benefits:
■
■ Multiple deployment methods You can use a variety of ways to deploy Windows images. You can deploy .wim files using a traditional DVD-ROM, from a bootable USB drive, from a network share, or through specialized deployment technologies such as Windows Deployment Services (WDS) or Microsoft System Center 2012 Configuration Manager.
■
■ Editable You can mount an image and edit it, enabling, disabling, or removing oper- ating system roles and features as necessary.
■
■ Updatable You can update an image without having to perform an operating system image capture. In previous versions of Windows, you had to perform a deployment, apply updates, and then capture a new image. If you wanted to update that image, you’d have to start from scratch.
The Windows Server 2012 installation media contain two .wim files in the Sources di- rectory: Boot.wim and Install.wim. Boot.wim is used by the installation media to load the
TermsKey
TermsKey
available with the evaluation version of Windows Server 2012 contains four different versions of Windows Server 2012.
MORE INFO WINDOWS SERVER 2012
This book uses the evaluation version that you can download from the Microsoft website at http://technet.microsoft.com/en-us/evalcenter/hh670538.aspx.
FIGURE 1-1 Operating systems included in the evaluation Install.wim file
MORE INFO WINDOWS IMAGING (WIM) FILE FORMAT
To learn more about the Windows Imaging (WIM) file format, consult the following Micro- soft white paper: http://www.microsoft.com/en-us/download/details.aspx?id=13096.
Configuring Windows images
Although you can deploy Windows Server 2012 straight off the installation media, in enter- prise environments you will want to make modifications to the image. The Deployment Image Servicing and Management (DISM) tool is a command-line tool that you can use to manage images in an offline state. The advantage of performing offline modifications to images is that you don’t need to install an operating system and then perform a capture to make changes.
You can use Dism.exe to perform the following tasks:
■
■ Enable or disable roles and features
■
■ Add, remove, and list software updates
■
■ Add, remove, and list software drivers
■
■ Add, remove, and list software packages in .appx format to a Windows image For example, you can take the Install.wim file from the Windows Server 2012 installation media and use Dism.exe to mount that image, add new drivers and recent software updates to that image, and save those changes—all without having to perform a Windows Server 2012 deployment. The advantage is that when you do use this updated image for deploy- ment, the drivers and updates that you added are already applied to the image. You don’t have to install them as part of your post-installation configuration routine.
REAL WORLD FINDING DRIVERS
Rather than searching vendor websites in vain, you can use the Microsoft Update Catalog (http://catalog.update.microsoft.com) to find and download driver files that you can add to WIM images. This site stores all the certified hardware drivers, software updates, and hotfixes published by Microsoft. Once you download drivers and software updates, you can add them to your existing installation images by using Dism.exe.
Servicing Windows images
As a systems administrator responsible for deploying Windows Server 2012, you need to ensure that your deployment images are kept up to date. The latest software updates must be applied to the image, and any new device drivers for commonly used server hardware should be included.
The main goals of an image servicing strategy are the following:
■
■ Ensure that the latest software updates and hotfixes are applied to the image before the image is deployed to new servers.
■
■ Ensure that the latest drivers are applied to the image before the image is deployed to new servers.
If you don’t take these steps, you’ll have to wait until after you’ve deployed the operating system before you can apply updates and drivers, which consumes a significant amount of time. If your images are up to date, you won’t have to pause between deploying Windows Server 2012 and waiting for it to contact Microsoft Update or the local Windows Server Update Services (WSUS) server before you can move on to the next step (for example, de- ploying a server application such as Microsoft Exchange 2013, Microsoft SharePoint 2013, or Microsoft SQL Server 2012).
TermsKey
REAL WORLD LOCATING UPDATE FILES
Instead of searching through TechNet to locate specific update files, the Microsoft Update Catalog (http://catalog.update.microsoft.com) contains all the software update and hotfix files published by Microsoft. You can inject these updates into an operating system image by using Dism.exe.
Using Dism.exe to service images
The Dism.exe command-line utility is included with the Windows Server 2012 operating system. You can use the Dism.exe utility to service the current operating system in an online state or perform offline servicing of a Windows image. This lesson is concerned with perform- ing maintenance of installation images, so it covers only that aspect of Dism.exe functionality.
Servicing images with Dism.exe involves performing the following general steps:
1. Mount the image so that it can be modified.
2. Service the image.
3. Commit or discard the changes made to the image.
Mounting images
By mounting an image, you can make changes to that image. When you mount an image, you link it to a folder. You can use File Explorer, Windows PowerShell, or Cmd.exe to navigate the structure of this folder and interact with it as you would any other folder located on the file system. Once the image is mounted, you can also use Dism.exe to perform servicing tasks, such as adding and removing drivers and updates.
A single WIM image can contain multiple operating system images. Each operating system image is assigned an index number, which you need to know before you can use Dism.exe to mount the image with the /Get-wiminfo switch. For example, if you have an image named Install.wim located in the C:\Images folder, you can use the following command to get a list of the operating system images it contains:
Dism.exe /get-wiminfo /wimfile:c:\images\install.wim
Figure 1-2 shows the result of this command and lists the images contained in Windows Server 2012. The Standard Edition of Windows Server 2012 is assigned index identity 2, the Server Core version of the Standard Edition is listed as index identity 1, the Server Core ver- sion of the Datacenter Edition is assigned index identity 3, and the version of the Datacenter Edition that installs the GUI components is assigned index identity 4.
TermsKey
FIGURE 1-2 List of images in a .wim file
Once you have determined which operating system image you want to service, use the /Mount-image switch with the Dism.exe command to mount that image. For example, to mount the Standard Edition of Windows Server 2012 from the Install.wim file that is available with the Evaluation Edition in the C:\Mount folder, issue this command:
Dism.exe /mount-image /imagefile:c:\images\install.wim /index:2 /mountdir:c:\mount
Adding drivers and updates to images
Once you have mounted an image, you can start to service that image. When servicing im- ages used to deploy Windows Server 2012, the most common tasks are adding device drivers and software updates to the image. You can use the /Add-Driver switch with the Dism.exe command to add a driver to a mounted image. When using the switch by itself, you need to specify the location of the driver’s .inf file. Rather than adding a driver at a time, you can use the /recurse option to have all drivers located in a folder and its subfolders added to an image. For example, to add all the drivers located in and under the C:\Drivers folder to the image mounted in the C:\Mount folder, use this command:
Dism.exe /image:c:\mount /Add-Driver /driver:c:\drivers\ /recurse
You can use the /Get-Driver option to list all drivers that have been added to the image and the /Remove-Driver option to remove a driver from an image. You can remove only driv- ers that you or someone else has added to an image; you can’t remove any of the drivers that were present in the image when it was published by Microsoft. You might choose to remove an existing driver if the driver you added in the past has since been updated.
MORE INFO ADDING DRIVERS TO IMAGES
You can learn more about adding drivers to images by consulting the following TechNet
You can use Dism.exe with the /Add-Package switch to add packages that contain updates or packages in .cab or .msu format. Software updates are available from the Microsoft Update Catalog website in .msu format. For example, if you download an update from the Microsoft Update Catalog website named Update for Windows Server 2012 (KB2756872) to the C:\Updates folder on a computer and you mounted a WIM image of the Windows Server 2012 operating system in the C:\Mount folder, you could apply the update to the image by using this command:
Dism.exe /image:c:\mount /Add-Package /PackagePath:"c:\updates\ Update for Windows Server 2012 (KB2756872)"
REAL WORLD DRIVERSTORE FOLDER
You can download drivers from the Microsoft Update Catalog website. You can also use the C:\Windows\system32\driverstore directory from another deployment of Windows Server 2012 or Windows 8 on the x64 platform. Copy this folder to a USB drive and store it separately because it contains all the drivers that have been downloaded for the current hardware.
The updates in this folder in .msu format are then applied to the mounted image, as shown in Figure 1-3. You can use the /Get-Package option to list the updates and packages that were already added to the image.
FIGURE 1-3 Adding updates to the image
Quick check
■
■ Which switch do you use with Dism.exe to add updates to a mounted image?
Quick check answer
■
■ You use the /Add-Package switch with Dism.exe to add updates to a mounted image.
Adding features and app packages
You can determine which features are available in a mounted operating system image by us- ing the /Get-Features switch. For example, to learn which features are available in the image mounted in the C:\Mount folder, use this command:
Dism.exe /image:c:\mount /Get-Features
You can enable or disable a specific feature using the /Enable-Feature switch. For example, to enable the NetFx3ServerFeatures feature, which enables the .NET Framework 3.5 server features in an image, use this command:
Dism.exe /image:c:\mount /Enable-Feature /all /FeatureName:NetFx3ServerFeatures
Some features in the Windows Server 2012 image are in a state in which they are listed as having their payload removed, which means that the installation files for that feature are not included in the image. If you install a feature that had its payload removed when the operat- ing system was deployed, the operating system can download the files from the Microsoft Update servers on the Internet. You can also specify the location of the installation files. The installation files for the features that have had their payload removed in Windows Server 2012 are located in the \Sources\sxs folder of the volume in which the installation media is located.
You can add these payload-removed features to an image by using Dism.exe and specify- ing the source directory. For example, to modify an image mounted in the C:\Mount folder so that the Microsoft .NET Framework 3.5 features are installed and available, issue this com- mand when the installation media is located on volume D:
Dism.exe /image:c:\mount /Enable-Feature /all /FeatureName:NetFx3 /Source:d:\sources\sxs
NOTE INSTALLING .NET FRAMEWORK 3.5 FEATURES
Before you can add the .NET Framework 3.5 features shown in the previous command to an image, you must first install the .NET Framework 3.5 server features (NetFx3ServerFeatures) shown in the command.
You can add, remove, and list provisioned app packages to an install image. App pack-
image, the application will be installed for all users. You use the /Add-ProvisionedAppxPack- age, /Get-ProvisionedAppxPackage, and /Remove-ProvisionedAppxPackage switches with the Dism.exe command to accomplish these goals.
REAL WORLD .NET FRAMEWORK 3.5
A lot of current software need the .NET Framework 3.5 components. Rather than search- ing for the installation media, this is one of the things that I first change when customizing Install.wim.
Committing an image
When you finish servicing an image, you can save your changes using the /Unmount-Wim switch with the /Commit option. You can discard changes using the /discard option. For ex- ample, to make changes and then commit the image mounted in the C:\Mount folder, use this command:
Dism.exe /Unmount-Wim /MountDir:c:\mount /commit
Once you have committed the changes, the .wim file that you originally mounted is up- dated with these modifications. You can then import this .wim file into WDS or System Center 2012 Configuration Manager for deployment, or use it with bootable USB installation media to deploy Windows Server 2012 with these updates already applied.
Build and capture
The build and capture process is commonly used with client operating systems and less com- monly with server operating systems. When you perform a build and capture, you deploy an operating system; provision that operating system with updates, applications, and drivers; and then capture that operating system for deployment. Build and capture is used less often with server operating systems because they rarely require the same sort of application deploy- ment that is required for client operating systems. Although it is possible to perform build and capture with applications such as SQL Server 2012, many organizations are starting to use Microsoft Server Application Virtualization to simplify the process of deploying applications to servers.
MORE INFO SERVER APPLICATION VIRTUALIZATION
You can learn more about Server Application Virtualization at http://technet.microsoft.com/
en-us/library/hh397409.aspx.
If your deployment strategy does involve the deployment and capture of Windows Server
TermsKey
TermsKey
the dialog box shown in Figure 1-4. When you use Sysprep.exe to prepare the image, you can configure the image to return to the System Out-of-Box Experience (OOBE). This is the same experience you get when Windows Server 2012 boots for the first time, though in this case all the updates, applications, and drivers included in the captured image will be included in the newly deployed image.
FIGURE 1-4 Sysprep dialog box
With previous versions of the Windows Server operating system, you would use a utility known as ImageX.exe to capture and apply images. To perform these tasks, you would boot a prepared server into a special Windows Preinstallation Environment (Windows PE) environ- ment that included these tools. You would then use the ImageX.exe tool to capture the pre- pared operating system in .wim format, saving it on a separate volume or on a network share.
This image capture and deployment functionality is now present in the Dism.exe command- line utility. You can use Dism.exe with the /Capture-Image switch to capture an image and the /Apply-Image switch to write an existing image to a volume.
MORE INFO CAPTURE AND APPLY IMAGES
To learn more about capturing and applying images using Dism.exe, consult the following TechNet link: http://technet.microsoft.com/en-us/library/hh825258.aspx.
Lesson summary
■
■ Install.wim, located in the \Sources folder of the Windows Server 2012 installation media, stores the Windows Server 2012 operating system images.
■
■ You can use Dism.exe to add and remove drivers and software updates from installa- tion images.
■
■ You must mount an installation image before you can modify it.
■
■ You must commit your changes when dismounting an installation image to have those changes saved.
■
■ Use Sysprep.exe to prepare an image for capture.
Lesson review
Answer the following questions to test your knowledge of the information in this lesson. You can find the answers to these questions and explanations of why each answer choice is correct or incorrect in the “Answers” section at the end of this chapter.
1. You want to configure an existing Windows Server 2012 deployment image with sev- eral recently released software updates that are in .msu format without performing a build and capture. Which of the following commands can you use to accomplish this goal? (Choose all that apply.)
A. ImageX.exe B. Dism.exe C. Sysprep.exe D. Diskpart.exe
2. Which of the following switches do you use with the Dism.exe utility if you want to add software updates in .msu format to a mounted image? (Choose all that apply.)
A. /Add-Driver B. /Enable-Feature C. /Add-Package
D. /Add-ProvisionedAppxPackage
3. Which of the following steps must you take before you can modify an existing offline installation image?
A. Commit the image.
B. Capture the image.
C. Mount the image.
D. Discard the image.
Lesson 2: Automated deployment of Windows Server 2012 images
Deploying a server operating system requires that the systems administrator answer a few brief questions, but those questions are spaced out across the operating system deployment process. An administrator who can automate this process doesn’t need to spend time shep- herding the server operating system deployment, but instead can go on to perform unrelated tasks. Automating operating system deployment also has the benefit of ensuring that con- figuration steps are performed in a consistent manner. Automating the process minimizes the chance that a careless mistake will result in the operating system deployment process need- ing to be restarted from the beginning. In this lesson, you’ll learn about WDS, understand different image types used with automated operating system deployment technologies, and learn how to create answer files so that operating system deployment can be deployed with- out requiring direct administrator attention.
After this lesson, you will be able to:
■
■ Create answer files.
■
■ Manage Windows Deployment Services (WDS).
■
■ Deploy discover, boot, and install images.
Estimated lesson time: 45 minutes
Automating installation
When performing an operating system installation, you spend far more time watching pro- cess bars than you do inputting configuration information. If you automate server operating system deployment, you can minimize the amount of time you have to spend watching the operating system install. Automating the process also minimizes the chance of configuration mistakes that might occur when bored administrators get distracted during the deployment process.
There are two different ways to automate server operating system deployment:
■
■ Answer files You can start an operating system deployment and provide an answer file. The installation process uses the answer file to answer all necessary questions. A complex answer file can perform post–installation configuration tasks. The drawback of answer files is that they take time to configure properly. Once you get them working, though, they’ll save you many hours.
■
■ Centralized deployment Rather than installing operating systems from a DVD or USB stick, you can use centralized deployment to perform simultaneous installations of
TermsKey
When considering your operating system deployment strategy, remember what you learned about image servicing in Lesson 1. Keeping your deployment images up to date means that when you automatically deploy Windows Server 2012, the deployed operating system will have the latest software updates and drivers.
Configuring answer files
With answer files, you can automate the process of deploying Windows Server 2012. In- stead of having to manually select specific installation options and perform post–installation configuration actions such as joining a newly deployed server to an AD DS domain, you can automate the process with answer files. During setup, Windows Server 2012 looks for a file on local and attached media named Autounattend.xml. If this file is present, Windows Server 2012 automatically uses the settings contained in the file to configure the new server deployment.
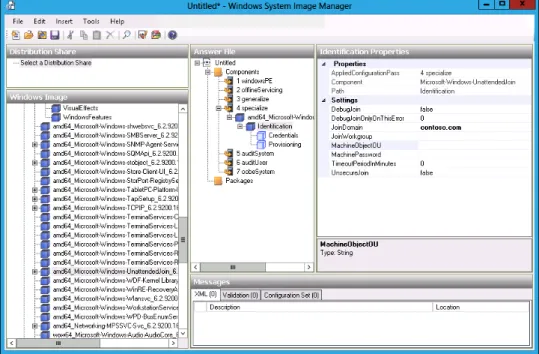
As its name suggests, Autounattend.xml uses the XML file format. Although it is certainly possible for you to manually edit this XML file using a text editor such as Notepad, this process is complicated, and you are likely to make errors that cause the file not to work. The Windows System Image Manager (known as Windows SIM) is a GUI-based tool that you can use to create an answer file. When using the tool, you must specify the image for which you want to create an answer file. Windows SIM then creates a catalog file for all the options that you can configure. After you configure all the settings that you want automated during instal- lation and post-installation configuration, you can have the tool output an answer file using correct XML syntax. Windows SIM is included with the Windows Assessment and Deployment Kit (Windows ADK), which you can download from the Microsoft website.
To create an answer file using Windows SIM, perform the following steps:
1. Download and install Windows ADK from the Microsoft website using the installation defaults.
2. Copy the file \Sources\install.wim from the Windows Server 2012 installation media to a temporary directory on the computer on which you have installed Windows ADK.
3. Open Windows SIM from the Start screen.
4. In the Windows SIM interface, click File and then click Select Windows Image. Open the file Install.wim.
5. Select which operating system image in the install image for which you wish to create an answer file.
6. When prompted to create a catalog file, click Yes.
7. Click File and click New Answer File.
TermsKey
FIGURE 1-5 Configuring an answer file
MORE INFO WINDOWS SIM
You can learn more about Windows SIM by consulting the following TechNet website:
http://technet.microsoft.com/en-us/library/hh824929.aspx.
Windows Deployment Services
WDS is a server role that you can deploy on computers running Windows Server 2012. WDS enables you to deploy operating systems, including but not limited to Windows 8 and Win- dows Server 2012, to computers over the network. WDS sends these operating systems across the network using multicast transmissions, so multiple computers receive the same operat- ing system image while minimizing the use of network bandwidth. When you use multicast transmissions, the same amount of traffic crosses the network independently of whether you are deploying Windows Server 2012 to 1 computer or 50.
Deploying Windows Server 2012 through WDS involves performing the following steps:
1. An operating system deployment transmission is prepared on the WDS server.
2. The media access control (MAC) addresses of Pre-boot Execution Environment (PXE)–
4. These computers locate the WDS server and begin the operating system setup process.
If the WDS server has been provisioned with an answer file, as shown in Figure 1-6, the setup completes automatically. If the WDS server has not been provisioned with an answer file, an administrator must enter setup configuration information.
FIGURE 1-6 Configuring unattended files
REAL WORLD MULTIPLE WDS SERVERS
Each WDS server can have only one unattended installation file for each processor archi- tecture. Because unattended installation files differ between server and client, you will either need to swap unattended files when you are switching between client and server or have multiple WDS servers. In environments in which you frequently perform operating system deployment, instead consider using System Center 2012 Configuration Manager because it makes the process of configuring automatic operating system deployment for multiple operating system types and roles easier.
WDS requirements
If you have a computer that does not have a PXE–compliant network adapter, you can configure a special type of boot image known as a discover image. A discover image boots an environment, loading special drivers to enable the network adapter to interact with the WDS server. You create the boot image by adding the appropriate network adapter drivers associ- ated with the computer that can’t PXE boot to the Boot.wim file from the Windows Server 2012 installation media.
WDS has the following requirements:
■
■ A Windows Server 2012 DNS must be present on the local area network (LAN). This is implied by the domain membership.
■
■ An authorized Dynamic Host Configuration Protocol (DHCP) server must be present on the network. You can host WDS and DHCP on the same computer as long as you configure the options shown in Figure 1-7.
With Windows Server 2012, you can deploy WDS on a server that is not a member of an AD DS domain. This is a feature new to Windows Server 2012. You can’t deploy WDS on a server running Windows Server 2008 or Windows Server 2008 R2 unless that server is a mem- ber of an AD DS domain.
FIGURE 1-7 WDS and DHCP colocation settings
practice to ensure that infrastructure roles such as WDS always use a consistent network ad- dress. You can install WDS on computers running the Server Core version of Windows Server 2012. To install WDS on a computer running the Server Core version of Windows Server 2012, import the ServerManager Windows PowerShell module using the following Windows Power- Shell command:
Import-module ServerManager
And then install the role using the following command:
Install-WindowsFeature –IncludeAllSubFeature WDS
When installing WDS on Server Core, you have to specify the location of the source files or ensure that the server has a connection to the Internet, which enables them to be down- loaded automatically. Although it is possible to manage WDS from Windows PowerShell, most administrators will use the graphical WDS Remote Server Administration Tools (RSAT) from a computer running Windows 8 or Windows Server 2012 with the graphical tools to perform this task. You can use Windows PowerShell to install the role on computers running the version of Windows Server 2012 that includes the graphical tools. When using Windows PowerShell to install WDS on a version of Windows Server 2012 that includes the graphical tools, also use the -IncludeManagementTools switch. To install WDS using the Add Roles And Features Wizard, select the Windows Deployment Services role, as shown in Figure 1-8.
MORE INFO WDS OVERVIEW
You can learn more about deploying WDS by consulting the following TechNet website:
http://technet.microsoft.com/en-us/library/hh831764.aspx.
Managing images
Images contain either entire operating systems or a version of a special stripped-down oper- ating system known as Windows PE. Windows PE functions as a type of boot disk, enabling a basic environment to be loaded from which more complex maintenance and installation tasks can be performed. WDS uses four image types: boot image, install image, discover image, and capture image.
■
■ Boot image A special image that enables the computer to boot and begin installing the operating system using the install image. A default boot image, named Boot.wim, is located in the sources folder of the Windows Server 2012 installation media.
■
■ Install image The main type of image discussed in this chapter. Contains the operat- ing system as well as any other included components, such as software updates and additional applications. A default install image, named Install.wim, is present in the sources folder of the Windows Server 2012 installation media.
■
■ Discover image This special image is for computers that cannot PXE boot to load appropriate network drivers to begin a session with a WDS server.
■
■ Capture image A special image type that enables a prepared computer to be booted so that its operating system state can be captured as an install image. You add capture images as boot images in WDS.
Quick check
■
■ What type of image do you modify if you want to include support for a specific network adapter so it is present after Windows Server 2012 is first installed?
Quick check answer
■
■ You modify an install image to include support for a specific network adapter so it is present after Windows Server 2012 is first installed.
To import an image into WDS, perform the following steps:
1. Open the Windows Deployment Services console.
2. Click Install Images. From the Action menu, click Add Install Image.
TermsKey
5. In the Available Images page of the Add Image Wizard, shown in Figure 1-9, select the operating system images that you want to add. When the image or images are added, click Next and then click Finish.
FIGURE 1-9 Select images to add to WDS
REAL WORLD OPERATING SYSTEM DEPLOYMENT WITH
SYSTEM CENTER 2012 CONFIGURATION MANAGER
Although using WDS is a better automated operating system deployment solution than performing an installation from media, in enterprise environments you are likely to use System Center products to deploy Windows Server 2012. You can use System Center 2012 Configuration Manager for physical server deployments and the Virtual Machine Manager (VMM) component of System Center 2012 for deploying virtualized instances of Windows Server 2012.
Configuring WDS
The installation defaults for WDS are suitable when you deploy the role in small environ- ments. If you are deploying WDS in larger environments and do not choose to implement System Center 2012 Configuration Manager for operating system deployments, you might want to configure the options discussed in the following sections, which are available by edit- ing the properties of the WDS server in the Windows Deployment Services console.
PXE response settings
With PXE response settings, you can configure how the WDS server responds to comput- ers. As Figure 1-10 shows, you can configure WDS not to respond to any client computers (this effectively disables WDS), to respond to known client computers, or to respond to all computers but require an administrator to manually approve an unknown computer. Known computers are ones that have prestaged accounts in Active Directory. You can prestage com- puters if you know the MAC address of the network interface card (NIC) that the computer uses. Vendors often supply a list of MAC addresses associated with computers when you purchase those computers, and you can use this list to prestage computer accounts.
FIGURE 1-10 PXE response settings
You use the PXE Response Delay setting when you have more than one WDS server in an environment. You can use this setting to ensure that clients receive transmissions from one WDS server over another, with the server configured with the lowest PXE response delay hav- ing priority over other WDS servers with higher delay settings.
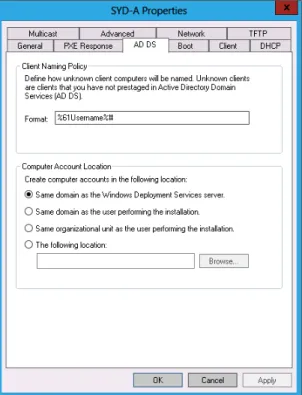
Client Naming Policy
Client Naming Policy enables you to configure how computers installed from WDS will be named if you aren’t using deployment options that perform the action. You can also use the settings on this tab, shown in Figure 1-11, to configure domain membership and organiza- tional unit (OU) options for the computer account.
FIGURE 1-11 Client Naming Policy
WDS Boot options
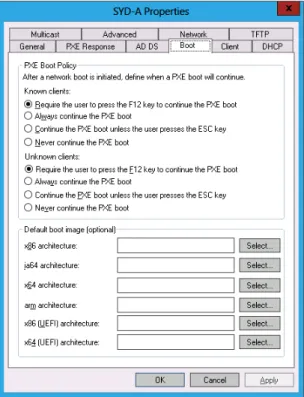
In the Boot options tab of the WDS server’s properties dialog box, shown in Figure 1-12, you can configure how clients that PXE boot interact with the WDS server. You can also config- ure a default boot image for each architecture supported by WDS. By default, once a client has connected to a WDS server, someone must press the F12 key to continue deploying the operating system. In environments in which you are performing a large number of simultane- ous deployments, requiring this level of manual intervention might substantially delay the deployment.
FIGURE 1-12 Boot options
Multicast options
The default settings of WDS have all computers that join the multicast transmission receiving the installation image at the same speed. If you frequently deploy operating systems, you are aware that sometimes there are 1 or 2 computers that have network adapters that slow a transmission that should take only 15 minutes into one that takes half a day. You can con- figure the transfer settings on the Multicast tab, shown in Figure 1-13, so that clients are parti- tioned into separate sessions depending on how fast they can consume the multicast trans- mission. You still have those slow computers taking a long time to receive the image, but the other computers connected to the transmission can complete the deployment more quickly.
FIGURE 1-13 WDS multicast options TermsKey
Other options
Although you are less likely to need them, you can configure other options on the following tabs:
■
■ Advanced tab You can configure WDS to use a specific domain controller and Global Catalog (GC) server. You can also configure whether WDS is authorized in DHCP. DHCP authorization occurs automatically when you install the WDS role.
■
■ network tab You can specify a User Datagram Protocol (UDP) port policy to limit when UDP ports are used with transmissions. You can also configure a network profile to specify the speed of the network, minimizing the chance that WDS transmissions will slow the network down.
■
■ TFTP tab You can specify maximum block size and Trivial File Transfer Protocol (TFTP) window size.
Configuring transmissions
You use WDS transmissions to set WDS to transfer the operating system image across to PXE clients. When configuring a WDS transmission, you need to decide what type of multicast transmission you will perform in the Multicast Type page of the Create Multicast Transmission Wizard, as shown in Figure 1-14.
FIGURE 1-14 Multicast type
The difference between these options is as follows:
■
■ Auto-Cast A transmission starts whenever a client requests the image. If another cli- ent requests the same image, the client will join the existing transmission, caching data from the current transfer, and then retrieving data that was transmitted before the client joined the transmission. This is the best option to use when you are performing one-off deployments.
■
■ Scheduled-Cast You choose either to start the transmission when a specified num- ber of clients have joined, or at a particular date and time. This is the best option to use when you are deploying the same operating system image to a large number of computers.
To configure a WDS transmission, perform the following steps:
1. Open the Windows Deployment Services console, expand the WDS server from which you want to perform the deployment and click Multicast Transmissions. In the Action menu, click Create Multicast Transmission.
2. Provide a name for the multicast transmission.
3. In the Image Selection page, specify which operating system image you want to de- ploy using the transmission.
4. In the Multicast Type page, specify whether you will use Auto-Cast or Scheduled-Cast.
If you choose Scheduled-Cast, select the number of clients or the transmission start time.
REAL WORLD VIRTUAL MACHINE TEMPLATES
As more infrastructure moves to private and public clouds, you will increasingly deploy servers from virtual machine templates, such as those that you can configure using the VMM component of System Center 2012, rather than performing a traditional installation from an image. Although configuring virtual machine templates is beyond the scope of the 70-411 exam and this book, in the real world you’ll probably be deploying virtualized serv- ers from templates more often than you will Windows Server 2012 from WDS.
Lesson summary
■
■ Unless you are booting from a discover image, computers must be able to PXE boot to receive an operating system image from a WDS server.
■
■ With boot images, computers with PXE-compliant network cards can load a preinstal- lation environment over the network from which it is possible to then load a minimal operating system.
■
■ Install images contain the operating system as well as additional components, such as software updates and applications.
■
■ Discover images are used with computers that do not have PXE-compliant network cards. Capture images are used when you want to capture a prepared operating system.
■
■ Multicast transmissions enable the same installation image to be transmitted to mul- tiple computers at the same time.
■
■ If a WDS server also hosts the DHCP server role, it is necessary to configure the server to listen on a separate port and to configure DHCP option tag 60 for all scopes.
■
■ You use Windows SIM to create unattended Windows Setup answer files. You can con- figure WDS with an unattended Windows Setup answer file to minimize the amount of interaction you need to perform when deploying Windows Server 2012.
Lesson review
Answer the following questions to test your knowledge of the information in this lesson. You can find the answers to these questions and explanations of why each answer choice is correct or incorrect in the “Answers” section at the end of this chapter.
1. You are in the process of configuring WDS so you can use it to deploy a number of computers that will run the Windows Server 2012 operating system. All computers in your organization have PXE-compliant network cards. Which of the following images must you import into WDS to perform a basic operating system deployment? (Choose all that apply.)
A. Boot image B. Install image C. Capture image D. Discover image
2. You have just used Windows PowerShell to add the WDS role to a computer in the Melbourne branch office running the Windows Server 2012 operating system. The computer already functioned as a domain controller, DHCP server, and DNS server. You attempt to perform a test deployment of a Windows Server 2012 install image, but the PXE network card on the test server cannot connect to WDS. Which of the following strategies should you pursue to resolve this problem? (Choose all that apply.) A. Configure WDS not to listen on DHCP ports.
B. Configure WDS not to listen on DNS ports.
C. Configure DHCP options to support WDS.
D. Authorize the WDS server in AD.
3. At the moment, WDS does not respond to client computers. You want to configure WDS so it responds to all clients, but an administrator must manually approve deploy- ments to any computers with unrecognized MAC addresses. Which of the following settings must you configure to accomplish this goal? (Choose two. Each answer forms part of a complete solution.)
A. Do Not Respond To Any Client Computers
B. Require Administrator Approval For Unknown Computers C. Respond Only To Known Client Computers
D. Respond To All Client Computers (Known And Unknown)
Lesson 3: Servicing and updating deployed servers
Windows Server Update Services (WSUS) 4.0 is a role that is built into Windows Server 2012.
WSUS functions as a local mirror of the Microsoft Update servers on the Internet. Organiza- tions that have deployed WSUS can use Group Policy to configure client and server operat- ing systems to check for available updates against a local WSUS server instead of checking against the Microsoft Update servers on the Internet. The primary benefits to you as an administrator in deploying WSUS is that you can minimize the amount of update traffic that goes across your organization’s Internet connection and take control of which updates are approved for deployment to computers in your organization.
After this lesson, you will be able to:
■
■ Deploy Windows Server Update Services
■
■ Use Windows Server Update Services to manage updates
Automated update deployment with WSUS
WSUS, and before it Software Update Services (SUS), has been available as free add-ins for Windows Server operating systems for more than a decade. WSUS 4.0 is the version of WSUS released with Windows Server 2012. Unlike previous versions of the Windows Server operat- ing system, in which you needed to download WSUS separately or install a special update to make the role available, WSUS 4.0 can be deployed directly as a server role.
Because it has been available free of charge for so long, WSUS is widely deployed with Microsoft registering more than 1 million WSUS servers regularly synchronizing against the Microsoft Update servers on the Internet. Although there are more sophisticated update deployment solutions available from Microsoft and third-party vendors, WSUS is the most commonly used update deployment solution besides Windows Update.
REAL WORLD WINDOWS INTUNE AND SYSTEM CENTER 2012 CONFIGURATION MANAGER
Organizations that need to manage software updates to clients outside the organizational network, such as users who telecommute in home offices, may find Windows Intune a more effective solution than a perimeter network WSUS deployment. The focus of Win- dows Intune is client operating systems, so it’s less relevant when you are thinking about managing updates for servers. Organizations that want to automate the deployment of up- dates for third-party applications as well as Microsoft applications are likely to use System Center 2012 Configuration Manager. System Center 2012 Configuration Manager includes a more comprehensive set of tools for deploying updates, but it is beyond the scope of this book and the exam.
New WSUS features
Administrators who have used WSUS 3.0 Service Pack 2 (SP2), which can be deployed on servers running Windows Server 2003, Windows Server 2003 R2, Windows Server 2008, and Windows Server 2008 R2, will find WSUS 4.0 very familiar. The big changes between WSUS 3.0 SP2 and WSUS 4.0 are as follows:
■
■ Integrated Administration console WSUS 3.0 SP2 had a console that was separate from the Server Manager console. The WSUS 4.0 console is integrated into the Win- dows Server 2012 Server Manager console.
■
■ Supports Server Core You can install WSUS 4.0 on computers running the Windows Server 2012 operating system deployed with the Server Core installation option. This applies only to Windows Server 2012; you can’t install WSUS 4.0 on computers running Windows Server 2008 R2 installed with the Server Core installation option.
■
■ Windows PowerShell support WSUS 4.0 includes Windows PowerShell support for
TermsKey
Deploy and manage WSUS
You can install WSUS 4.0 as a role on Windows Server 2012 in both the Server Core and full administrative interface configurations. The advantage of deploying WSUS on Server Core installations is that these deployments require fewer updates. If you do deploy WSUS on a Server Core deployment, you need to ensure that you install the WSUS RSAT components on another computer, either running Windows 8 or Windows Server 2012 to perform WSUS administration tasks. Although WSUS 4.0 does include Windows PowerShell support, not all WSUS functionality has been replicated in Windows PowerShell.
When you install WSUS, you can choose between using a local Windows Internal Database (WID) or a SQL Server instance. The advantage of using a SQL Server instance is that it’s easier to back up and you can run more-complex reports. The majority of WSUS deployments use the built-in WID database. When you install WSUS 4.0 on Windows Server 2012, all prerequi- site components are also installed.
Products, security classifications, and languages
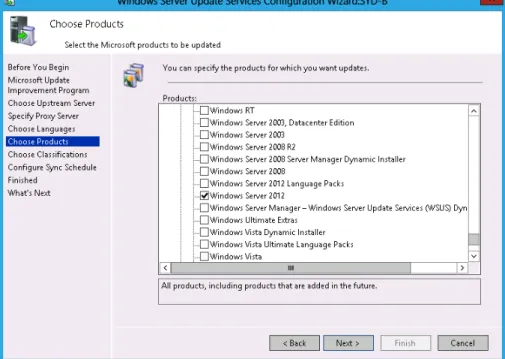
During setup, you are asked to choose which update you want to download based on product name, security classification, and languages. Although you can choose to download updates for all product categories for all classifications in all languages, you’ll minimize the amount of configuration required later if you download updates only for products used on your organi- zational network.
REAL WORLD YOU STILL NEED TO APPROVE THE UPDATES
Remember that you need to choose whether to approve updates. If you aren’t selective, you’ll have to spend a lot of time dealing with updates that aren’t relevant to the comput- ers you are responsible for managing.
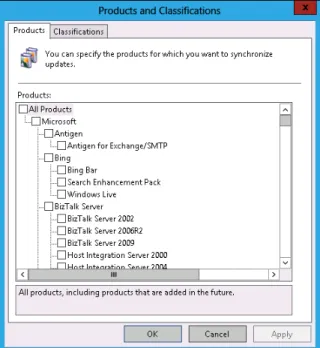
When WSUS synchronizes, it may update the list of available product names to reflect newly released software. If your organization deploys a new product, if it retires an old product, or if you simply want to alter which updates are synchronized, you can do this in the Products And Classifications dialog box, available through Options in the Update Services console and shown in Figure 1-15.